Drying Rates of Acrylic Polymer Dispersion
On most containers of commercial paints, primers and coatings, it is common for the label to provide a specific timeframe for the product to be dry. “Dries in 2-4 hours under ideal conditions.” “Dries to the touch in 30-60 minutes.” “Allow to dry 4 hours before re-coating.” So why then doesn’t Golden Artist Colors list such information on most of its products? The answer is simple; our products are used in many different ways, on many different surfaces, and in a myriad of environmental settings. Therefore it is extremely difficult to offer a “guesstimate” without knowing more details about the application and taking into account the different needs at each stage of an artwork. Is this the priming layer before working in oils? Does the work need to be on a delivery truck in the morning? Are you going to heavily saturate the surface with washy layers of acrylics? Is this an exterior mural in Louisiana? This complexity causes us to pause whenever asked the question, “how long will it take to dry?”
While it is impossible to account for every aspect and provide absolute drying times, in this article we describe some of the factors surrounding the drying process, reveal recent test results and discuss how all this can impact a real world situation.
Drying Stages of Acrylic Polymer Dispersion
At the simplest and most schematic level, acrylics dry by evaporation of water and other “volatiles” from the paint film. As these leave, the acrylic solids move closer together until they come into contact with one another and form a film. These eventually compact together with enough force to squeeze out water and additives until it reaches coalescence. The cured film is now quite stable and doesn’t adversely react to moisture or subsequent paint layers.
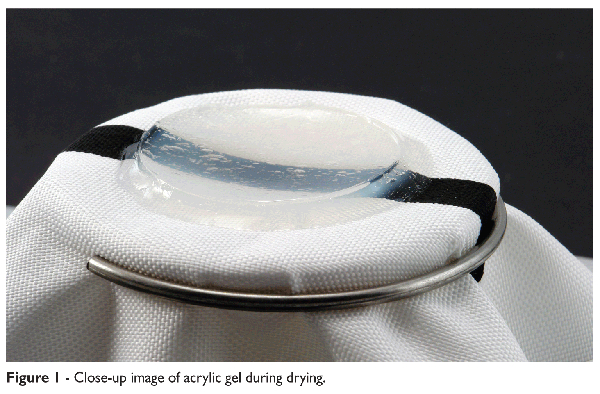
In thinner applications and under ideal drying conditions, acrylics will appear to be dry within minutes or hours. Conversely, it is not uncommon for thickly applied paint films to take weeks or months to reach the same state. Although all acrylic paint films dry via the same mechanisms — water and co-solvents leaving — there are many factors at play during the process affecting the outcome, particularly the rate of drying. In fact, thick paint films may have several zones at different stages of drying, each with a varying degree of volatile content.
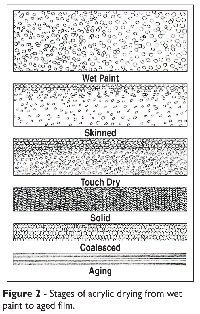
While over the years this process has been rather loosely defined, and some terms will mean different things to different people, the following is an attempt to represent the basic stages of the process (Figure 2).
Wet Paint — The product from the container remains so until it is applied to the palette or canvas. The paint still has its starting level of volatiles (water and co-solvents) that begin evacuating the film as it is applied to the substrate. Wet paint is still movable and can be manipulated easily by brush or knife, but it is becoming noticeably stiffer. The polymer particles are drawn closer together and when the paint is no longer uniformly workable, the wet paint stage is over.
Skinned Over — As the volatiles quickly begin leaving the paint film, the acrylic solids move closer together. Depending on the paint film thickness, the paint may go through several stages in very rapid succession. This particular one describes the moment when you can lightly touch the paint surface and enough of a skin has developed to where product doesn.t lift up when it is touched. As a paint film becomes skinned over, the permanent film structure has started.
Touch Dry — The touch dry stage is very closely related to the skinned over stage. A thin layer may move from wet paint, to skinned-over, to touch-dry within seconds! However, in the thicker films, there is usually a substantial enough skin to withstand some touching without it wrinkling or tearing. The skin grows continually as the volatiles escape, but there still remains a significant amount of additives underneath, especially on non absorbent substrates.
Dry to Handle/Solid State — At some point the paint film ceases to have any overly wet areas and the rate of weight loss slows down significantly. While artists may believe this is when their paint film is “dry”, it is not. Plenty of additives still need to come out. This would be a bad time to try and pack up or roll the painting for transportation, as the acrylics are very fragile at this stage. Since the films are only partially cured, adhesion and film integrity are not yet fully developed.
Cured/Coalesced — During the drying process the acrylic solids have moved into a closely packed arrangement (like some free-form Tetris game), causing the majority of volatiles to be pushed out in the process. In addition, the presence of film formation additives has softened these acrylic solids to allow them to deform around one another and eliminate any air gaps between the particles. The gaps between the solids once occupied with water and other volatiles are now eliminated, allowing for a hexagonal, honeycomb-like polymer network to form. This process is known as coalescence. It is only after sufficient coalescence has occurred that the paint film is stable, and the final physical and chemical properties develop.
One would assume that coalescence is the final stage of an acrylic paint film process. While this is largely true, acrylic films must incorporate a certain degree of hydrophilic, or water loving, additives in order to be compatible with water. This means they will inevitably hold onto some water even after they are seemingly dry. In addition, a level of incomplete coalescence causes acrylic films to be somewhat porous, leaving channels that run along the walls of the hexagonally deformed particles. These pores are then passageways for water to move in and out of the film.
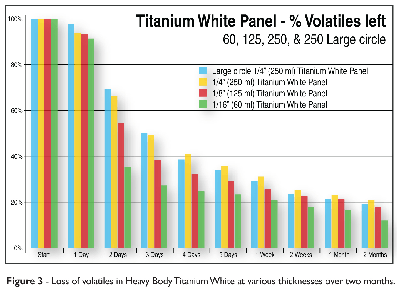
Some evidence of this is seen in the graph (Figure 3), where it is apparent that there remains a relatively significant amount of volatiles in the film, even after an extended period of time. It is surprising how much film integrity has been achieved, when in fact, there is still 5-20% of the original level of volatiles still remaining. Acrylic films will continue to lose weight as well as gain weight, depending on the atmosphere they are in. Higher temperatures and increased air flow tend to drive off the moisture, while higher relative humidity encourages the film to hold onto moisture. This process will continue as the paint reacts with the environment, re-equilibrating to the moisture levels of the atmosphere. The process is quite slow to develop — especially in an ever-shifting climate such as New York — taking many more months to reach a point of stable equilibrium. As with any porous material, there will be a level of moisture that may never leave unless the humidity level is lowered long enough to draw the moisture out.
Setting up the Test
In order to learn more about the timing of the drying process of acrylics, a series of test parameters were defined to look at some manageable and influential drying factors, and identify them with key stages of drying. We realized that we could not test every factor. Since the testing was all done at the same time, we were able to rule out differences in temperature and humidity. Environmental factors are important, but would be impractical to try and control during this round of testing. Whatever the ambient conditions were, they were recorded. Air flow was limited to normal room traffic.
A minimum of three test samples were always created, and substrates that were inert to moisture retention (aluminum, Lexan, and polyester canvas) were chosen. One problem realized early on in the testing was that the most common artist supports are absorbent enough themselves to allow humidity to alter the substrate weight during testing. Cotton canvas absorbs and retains water. So does hardboard and paper. Within the chosen substrates, polyester canvas offered a more breathable surface, while the acrylic sheeting and aluminum panels offered more sealed surfaces. The goal was to see if sealed versus breathable surfaces would alter the drying process.
The actual batch information of both the Regular Gel (Gloss) and Heavy Body Titanium White selected for this test were recorded and used to calculate the actual solids levels which are critical for comparing the loss of volatiles during drying.
There were two rounds of testing conducted. One set started over a year ago, and a second series was observed for a 60 day cycle.
Film Thicknesses
Our Acrylic Dry Time Testing included a series of standard paint film thicknesses. We used the tools to decide the range of thickness and provide a realistic set of uniformly cast films. We chose 10 mil (about the thickness of a generously brushed application), 62.5 mil (1/16″), 125 mil (1/8″), and 250 mil (1/”) for this test.
Methods to Assess Drying Rates
|
Test Results
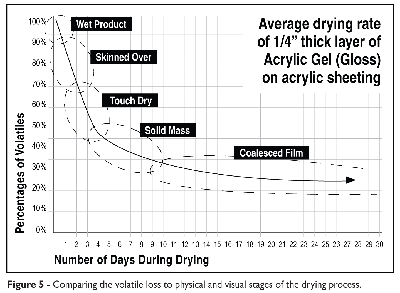
As one can imagine, this kind of testing creates massive spreadsheets full of data. Each test is looked at individually and then compared with the others. One of the most important parts of the testing was to try and define the level of volatiles in relation to the degree of dryness of the paint films at each interval. We created a graph to help visualize this (Figure 5). This range is based upon comparing sample weight loss to physical and visual changes, and in reality most stages happen so rapidly that one stage blurs into the next. Thicker films give us a better understanding of this relationship, but these key points in the drying cycle are important to establish for the results to follow.
Rapid Drying Early
Across the board, with each test panel, most of the volatile loss happens early on in the drying cycle. The loss of water and co-solvents is facilitated by the lack of a paint skin, or at least not a very substantial one. One can see this rapid loss by looking at the graphs in Figure 5. What was interesting was seeing each film creating the same drying curve line as we plotted the weight loss. We noted thin paint films take about 3 days to reach a solid state. This doesn’t mean you can’t continue to apply paint or mediums, but rather a general time frame to wait before doing anything extreme, such as stretching the painting, or varnishing.
Substrate Influences Drying Rates
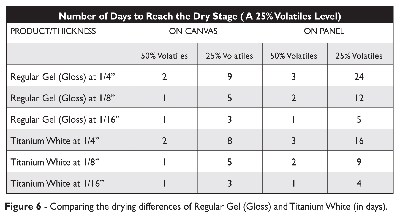
The impact of substrate on drying time was shown to be significant. The same product applied at the same thickness dries noticeably faster on a breathable substrate like canvas, which promotes two-way drying, when compared to a non-absorbent panel. Early on, the weight loss was similar, but as paint films began to develop a thicker skin on the surface, a pattern emerged showing the difference.
 |
 |
The testing shows that a more breathable substrate allows for two-way drying. The non-absorbent aluminum cards in almost every case showed significantly slower weight loss and slower clearing of the gels (Figure 6).
Film Thickness
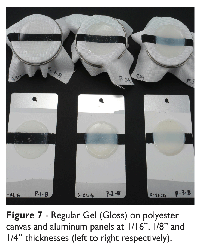
Film thickness has always been recognized as a key factor in the drying rate of acrylics. 10 mil films of gels and Heavy Body Acrylics become touch dry in minutes. The paint film dries uniformly and follows the standard paint drying process. But when thicker layers are applied, the key difference is the development of a paint skin that becomes more substantial during drying until the entire paint film coalesces (Figure 7). This paint skin dramatically impedes the movement of volatiles out of the film.
We verify this by how quickly the Regular Gel (Gloss) is able to clear up, and there is direct evidence to support this by comparing it to the rate of weight loss. We further were able to confirm this against the physical manipulation data. In every case, thinner films dry faster than a thicker counterpart regardless of product or substrate.
Product Differences
Due to the large scope of this testing, the number of products tested was limited. Heavy Body Titanium White and Regular Gel (Gloss) provided a reasonable range of product differences. We do recognize various kinds of pigments, paint formulations and other products are going to behave differently than these two products. Aside from the acrylic polymer solids, products may contain a large range of additional solids, including many kinds of pigments, fillers, grits and matting agents, whereas gels tend to only have the acrylic binder as the solids unless it contains matting solids.
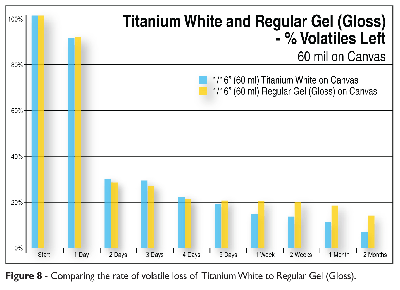
When comparing Titanium White to Regular Gel, there were not many differences between them early on, across the various thicknesses and substrates. The Titanium White does seem to take an early lead regarding weight loss, and it maintained this edge for the 60 day testing cycle. In several test groups the final level of volatiles left in the film was between 7 and 15% (Figure 8).
Manipulation Results
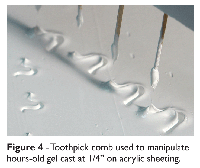
We manipulated (with toothpicks and later pencils) the surface of both the gel and white paint for several days until there wasn’t a discernible difference in how the acrylic responded to being prodded (Figure 4). We found that thinner films dried so quickly it was hard to measure the various changes that occurred, so the thicker . applications provided the most recordable data.
Products became noticeably thicker and began to skin over during the first day of testing. In general, acrylic layers begin changing very quickly during their first day of drying. Within several hours, a “crust” developed on the Titanium White similar to the crust on Brie (soft, aged cheese), whereas the gel skin was more rubbery, pulling and stretching when probed.
By the second day, there was a point where it was difficult to use toothpicks anymore. The skins were thick and unyielding, making it necessary to switch to using pencils to check dryness. Gentle prodding soon gave way to more aggressive poking. By the end of the second week, the films were strong enough to break pencil leads.
Small Versus Large Area Size
Every so often when doing this kind of research the testing data throws a curve ball. The standard assumption would be that a smaller acrylic paint film will dry faster than a larger one. Right? Not so fast. We compared a 2″ circle of product to a 12″ circle of product, both on panel. In both the Regular Gel (Gloss) and Heavy Body Titanium White samples, the larger circle lost weight faster than its smaller diameter counterpart. The differences may not be substantial, but there was enough of a difference to make us wonder why this happened.
Zonal Drying
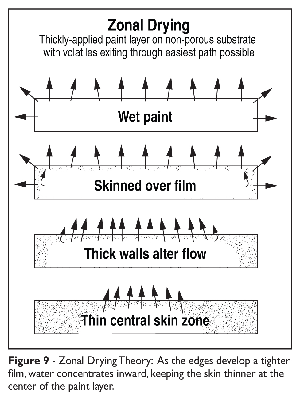
While more testing needs to be conducted to further understand these results, one theory is that on a large, thick layer of paint or gel, the initial product skins over just like the smaller 2. circle, but the overall thickness of this skin varies from center to edge (Figure 9). It may be that the center area of the paint skin is thinner because of the rush of volatiles to the center during drying caused by the edges drying. The outer edge skins first and is quickly tighter making it more difficult for the water to pass through the film. Water takes the easiest route to escape from a material. In this case, water flows inward towards the center, and results in the water being able to leave the film at a slightly faster rate than a thinner, more uniformly skinned paint layer will allow.
Summary
Many artists take advantage of the fast drying nature of acrylics. It is one of its most noted features, and although it can be slowed down with the use of retarders, the fast drying allows for a great range of techniques. However, when time is critical, many artists who have not thought about all of the factors early on, will face the issue of having to wait longer than desired before beginning the next phase of their painting process. If one paints thickly, then they must understand the importance of giving that generous layer time to dry. If faster drying is important, then take a good look at what can be changed to improve the drying time.
To summarize the test results, here are some key thoughts:
–Thin layers dry faster than thicker layers. It doesn’t mean you cannot end up with thick layers, but see if it’s possible to apply several thinner coats rather than one heavy layer.
–Breathable fabrics facilitate faster two-way drying. Panels certainly provide great stability, but using them means all of the volatiles can only leave the paint film one way, mostly through a thickening paint skin.
–Product selection may influence drying, but not enough to be overly concerned.
–The size of the painting is not a critical factor.
–Environmental factors are big influencers on drying. Temperature, humidity and air flow can be adjusted to control drying times.
Finally, it is important to note that while we isolated the drying time variables in this testing, in the studio, the artist’s ability to control as many as possible should result in faster overall drying times without causing potential issues. Thinly applied paint films on stretched canvas allowed to dry in a warm, dry space with good air flow are going to dry much faster than an impasto painting on panel in the basement. So even when you are in a hurry, take the time to factor as many variables into the drying time equations as possible in order to meet your needs.
About Michael Townsend
View all posts by Michael Townsend -->Subscribe
Subscribe to the newsletter today!
No related Post


I’ve never done this before, but i want to learn. I think i learned the wrong way first with olis and silicone. Wasn’t very good at that either, but i want to be. Is there any videos out there to show us the Golden way to pour paint? There’s plenty out there that show us how to add oils and silicone.
Hello El Lena,
Thank you for your questions. We have a video showing us doing a big pour with GAC 800 and Fluid Acrylics, located here: http://www.goldenpaints.com/videos/big-paint-pour–with-golden-gac-800. If you read through the many comments in this article, you’ll see we are very wary of using oils that do not dry in your paint, which is what silicone oil is. Try isopropyl alcohol first, you may find that to be all you need, but pouring paint isn’t all about big cell patterns, so feel free to explore other avenues. Let us know if you have any questions at [email protected]
– Mike
Thanks for the article. Over the course of my painting I’ve done my own (less scientific) research on drying times. Other than physical prodding, it helps to hold the painting up to light so that the light reflects off of the surface at various times in the drying process.
I found the best way to do this is by reflecting light off the finished work directly after a film has formed, and then putting it out of sight for at least a day or two. When I come back to shine some light on it again, right away I can visibly notice a difference in the appearance of the painting. The best way to describe the difference is that there is a general flattening of structure in a thinner acrylic application. Brush strokes become harder to recognize. Top layers merge with the under-painting layers to create a more cohesive, ‘lived in’ look.
In a thin acrylic application, the process from newlyweds-to-50-year-anniversary-level-of-merging is 3 days. In a thick application, sometimes it seems the cure process may actually take 50 years.
That merging change is easiest to see in landscape paintings in my experience. Usually the foreground objects ‘pop’ too much during the initial stages of drying. After curing for a few days they settle into the landscape nicely.
But it always gives me a little anxiety when I’m doing a more naturalist style. The foreground grass and the trees’ highlights initially look a bit too neon for me until the painting cures.
Thank you for your comments Jone.
There are many facets of acrylic paint films drying that are in need of exploration. All insight is welcome!
– Mike Townsend
I have a few questions about crazing with poured paints about 1/4″ thick. I understand that the skin formation in thicker paint layers, such as during pours, can lead to crazing because of stresses caused in the unequally dried paint.
Does retarder prevent crazing?
If the pours were made in layers, for example 4 layers 1/16″ thick, or progressively thick layers, such as 1/64, 1/32, 1/16″ etc up to the same depth, would that promote deeper drying and diminish crazing?
If before each successive pour the deep layer is allowed to dry to coalescence, would the next pour rehydrate the deeper portion and defeat the strategy?
Hi Charlie.
Thanks for your questions.
Slower drying mediums are less prone to crazing than faster drying ones. Also, humidity is a big factor for pours as well. If you “tent” a pour while it is drying, the water evaporating from the paint will create a humid microclimate between the tent and painted surface. This tends to be better to do than using Retarder. Retarder certainly slows the drying time, but in thicker applications it is very slow to leave the film, resulting in a tacky surface for days and weeks. Thinner pours are also less likely to craze, as the entire pour dries about the same rate. The thicker puddles are the ones that are most likey to craze.
– Mike
Thanks for this informative article.
I’ve recently added a thick layer of faux encaustic (the last layer before varnishing, composed of thick matte gel and gloss medium) to the process for a body of work for an upcoming exhibit. My exhibit of 12-14 paintings is in 90 days. After reading this article, I turned on my dehumidier! (I live a few hundred feet from a river channel in a low-lying area, about a mile and a half from the ocean. The humidity in my home usually hovers around 62%.) Fortunately I am working on stretched canvas.
It seems from the article that the best test to see if the paint has coalesced, would be pressing the surface with a pencil?
I leave the paintings flat for several days, but then must prop them around the room so as to continue painting other works on my flat surface. I’m thinking as long as the paint has reached a more solid state, that it is OK to store the paintings in a more upright position.
I really appreciate the scientific testing that you conduct at Golden.
Hello Kerry.
Thank you for your interest in this article. The pencil test was used to check skinning over times and depth. It also left a mark where I did the test for later review. If you keep the work at room temperature with lower humidity, the gels and mediums should clear up as intended. Bear in mind that Matte, Satin and Semi-gloss Gels and Mediums will always have some degree of cloudiness, which helps make them look more like translucent wax. Please contact us if you have any additional questions at [email protected] – Mike