
While the practice of pouring artist paints is certainly not a new way to apply paint, achieving consistent results can be frustrating and costly. However, it is vital to the process to conduct experiments to gain the knowledge of what are the most critical controlling factors which preside over paint pours.
Studio Preparation
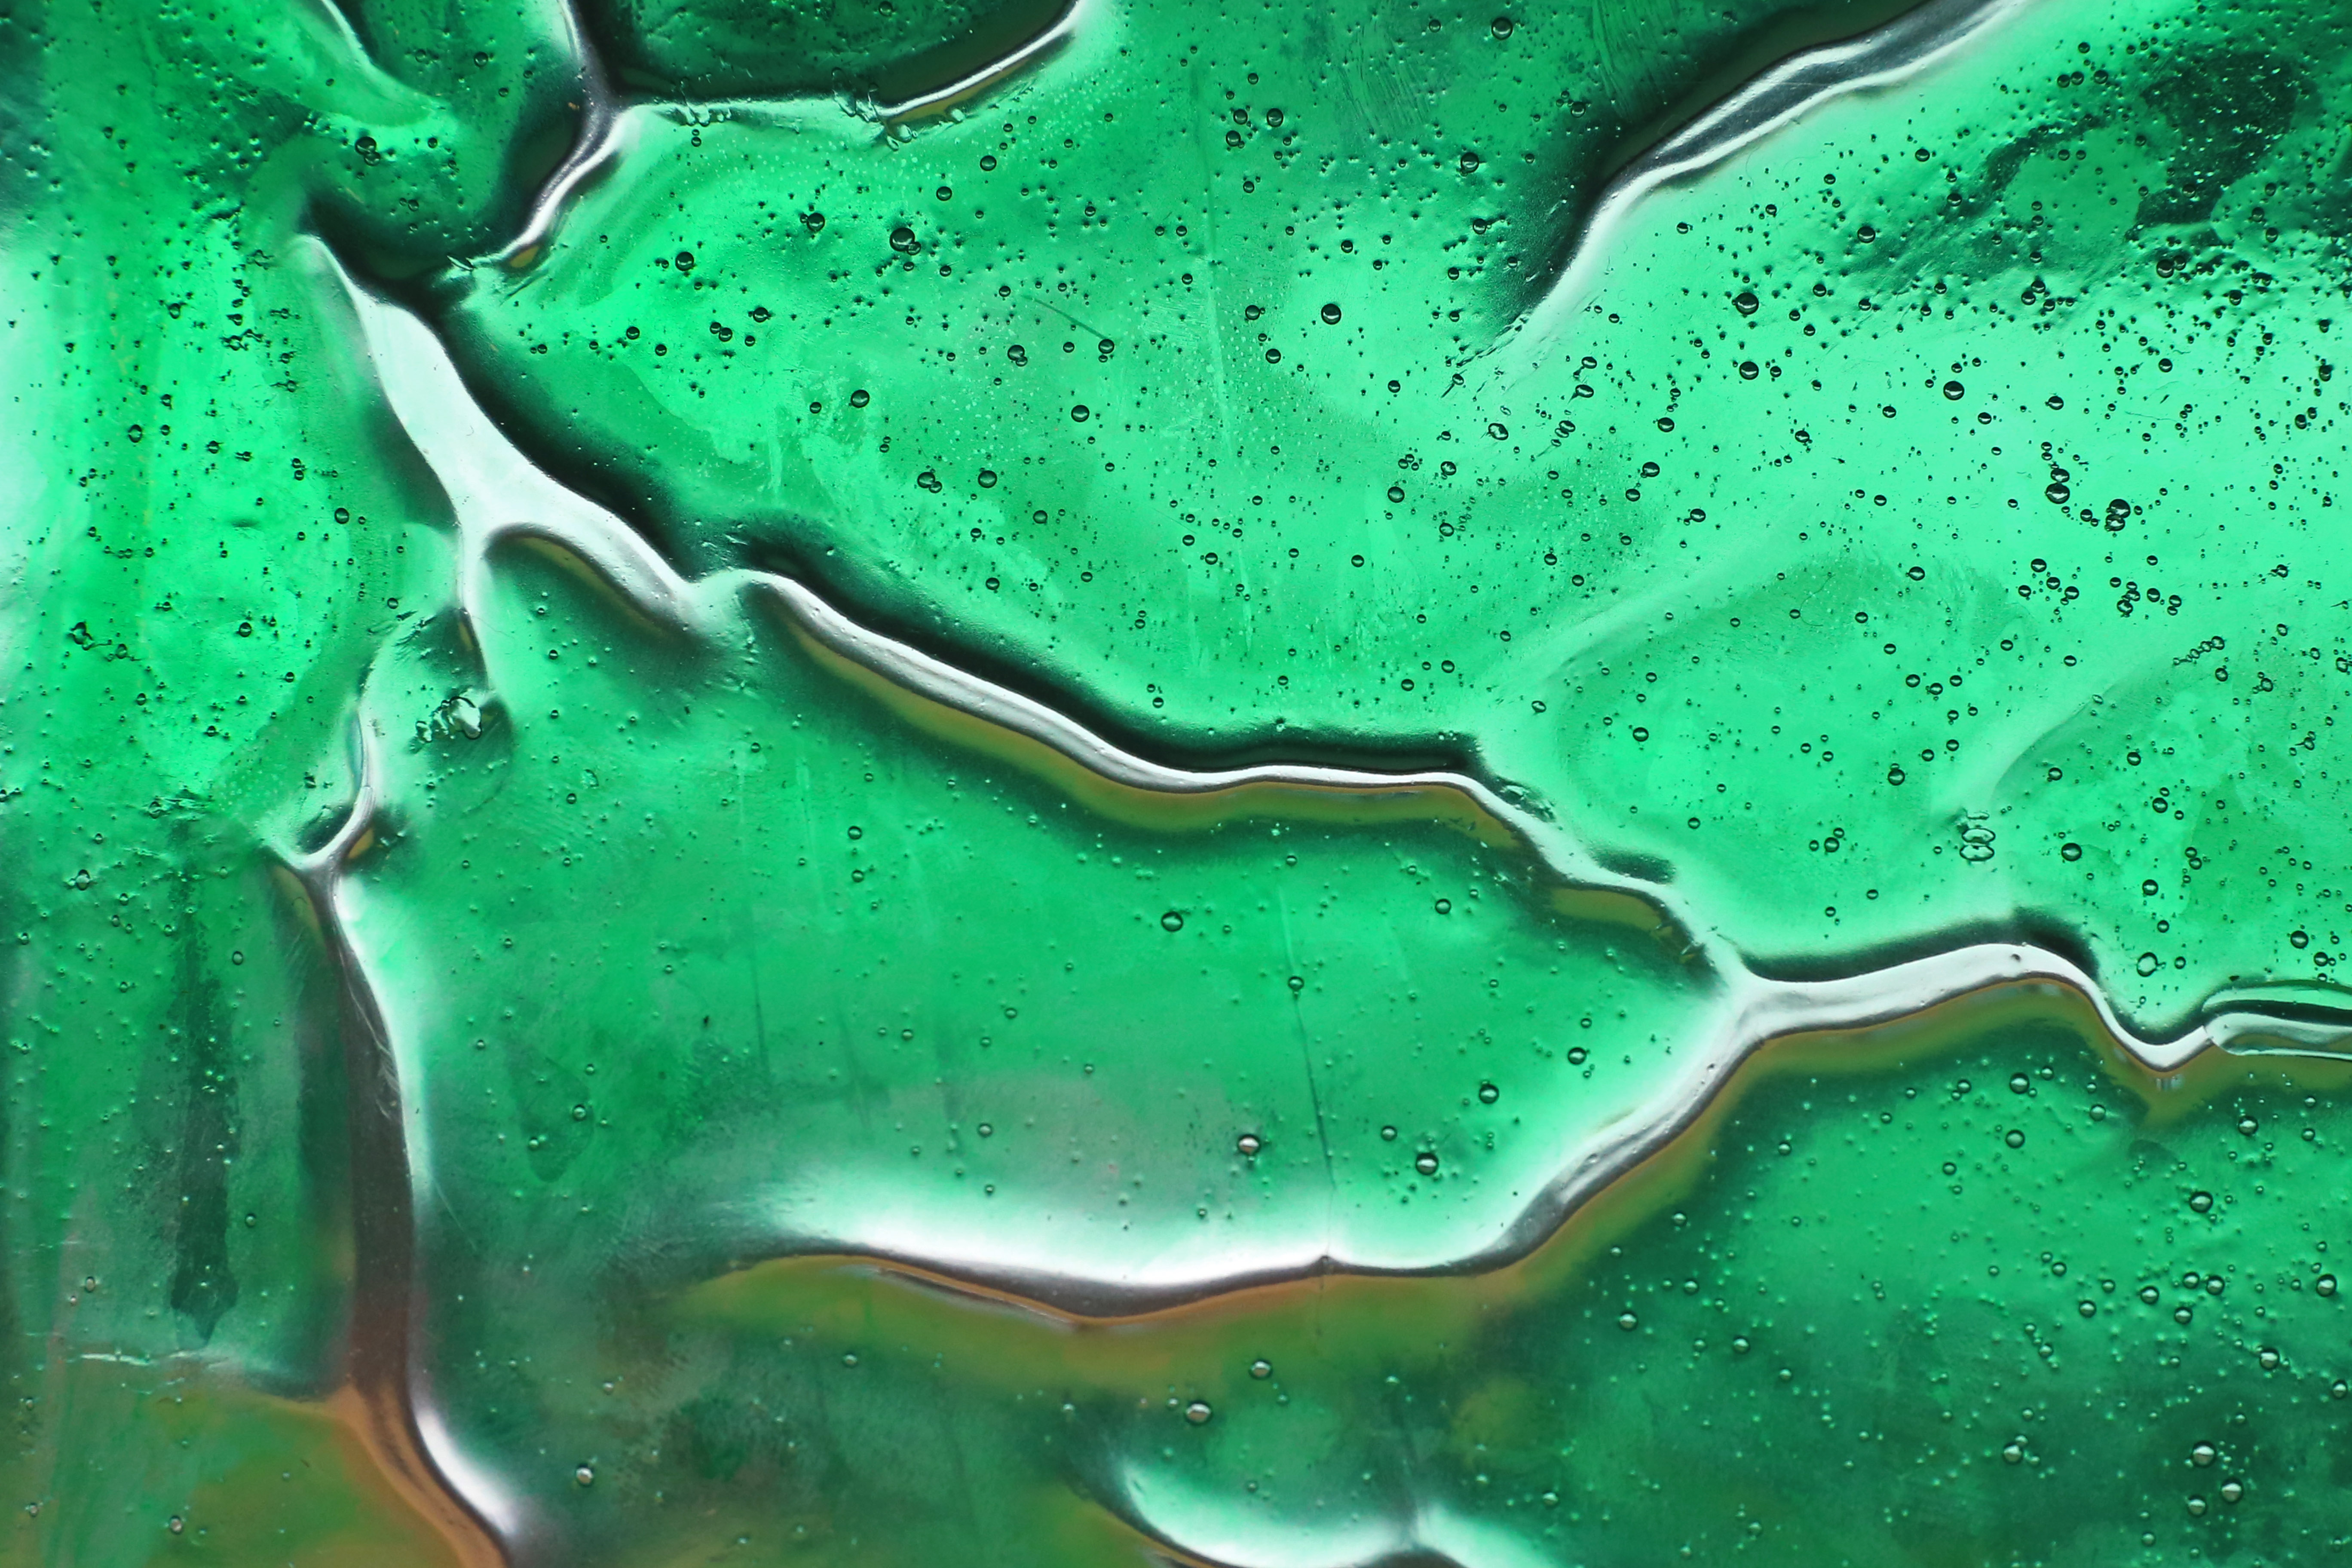
One sure way to improve the odds for successful pouring is to start with a clean studio. Acrylic pours are relatively slow drying paint layers and dust can easily become imbedded into the film. Take some time to free the immediate workspace, sweeping the floor and wiping down surfaces around the studio. Next, be sure the table top or floor you are working on is also clean and level. Even slight angles can cause issues with pours. Put down fresh poly plastic sheeting on the surface which will protect the surface and help later on by preventing your artwork from becoming glued to the work surface, as pouring products creates puddles and drips that can travel off of the canvas or panel. Finally, control the temperature and humidity level in the studio as much as possible. Dry climates increase the chance of crazes developing – fissures resulting from liquid acrylic products skinning over during initial drying while the underlying liquid paint is still very fresh. The skin shrinks and tears apart resulting in unwanted physical textures known as a “craze” (see Image 1).
Painting Substrates
The most predictable painting surface for pours is a sealed panel. This surface is less affected by the weight of the wet product compared to stretched canvas. Of course, the panel needs to be resistant to warping from water, thus sealing the surface with one or more coats of acrylic medium (or paint) is helpful. Conversely, this advice may be counter-productive if your technique relies upon the surface absorbency and/or the ability to curve the substrate in order to control the paint movement. This is why testing is such a critical factor even when using products that other artists find successful. If working on stretched canvas is vital to your process, you may be able to eliminate the sagging by stretching over a wooden panel or using a cardboard block between the stretcher bars.
Paints and Mediums used for Pouring Applications
Free-flowing liquid paints and mediums are at the heart of the pouring process. Adjusting the viscosity and flow rate to work in tandem with how you want the paints to interact with each other is key. Obviously, products like GOLDEN Fluid Acrylics and High Flow Acrylics are more practical when doing pours than thicker Heavy Body Acrylics. This is not to say you cannot use Heavy Body paints, but they will first require thinning with water, acrylic medium, or both. A great approach for thinning Heavy Body paints without a loss of film strength is to first mix a thin acrylic medium such as GAC 100 with water (1 part medium to 1.5 parts water, and then use this mixture to thin the paints as much as desired). This mixture assures quick thinning but contains enough acrylic binder so that you still end up with a pourable paint instead of a color stain mixture. Since Fluids and High Flow Acrylics are already pourable, this step isn’t required to work with them, but sometimes it is necessary to adjust these paints as well. GOLDEN Airbrush Transparent Extender is also a valuable medium for adjusting paints. This product is a similar consistency to High Flow Acrylics, containing flow improvers and leveling additives.
Although most acrylic mediums are inherently pourable, some are better suited for pouring than others. GAC 800 is a medium specifically produced to modify paints for pouring, such as when pouring a puddle onto a paint surface. The GAC 800 mixes readily with the Fluid Acrylics and this combination is the least likely to craze during drying. It’s still possible GAC 800 may craze, but this is usually the result of too much paint being added and in turn, countering the acrylic solids level or the pour has been applied in too thick of a layer. A great starting point is to mix 1 part paint into 10 parts GAC 800 and limit the thickness to how far the product will spread. In other words, pour the product into a pancake puddle, and let it seek its own thickness without impeding its flow by use of a taped off or dammed edge. Once these tests are done you may want to try other paint amounts and use edges to control the flow, but be wary of too thick of a pour to start. The biggest negative attribute of GAC 800 is “dry state clarity”. This medium retains a slight cloudy quality making it a poor choice as a clear topcoat or even transparent color layer.
Other mediums to experiment with include GAC 500, Polymer Medium (Gloss), Fluid Matte Medium, Self-Leveling Clear Gel and Clear Tar Gel. One important note worth mentioning is that these products were not developed with defect-free pouring in mind, and although smooth thin layers are possible when using them, they are not free of issues and limitations. For example, a common misconception is that Self-Leveling Clear Gel can be poured liberally and spread around with palette knives, trowels and squeegees and level perfectly upon drying. This is not the case, and some tool marks, however slight, will likely remain in the dried layer. Tool shape and application technique are critical to their success, and artists who have mastered their use have spent many frustrating nights in their studio figuring out the best application method that provides the desired results. As a place to start, use clean, large tools with smooth edges and carefully spread the product in multiple thin coats until the desired effect is attained. Allow one to three days drying between coats to reduce the chance of crazing and don’t be put off if every layer isn’t a perfect epoxy like surface, as perfection is nearly impossible to attain in layers of air drying products.
Pouring Application Techniques
There are as many methods as there are product combinations to try. First, appreciate each paint color as its own unique formula and pigments vary in their density and ability to move and spread. The same is true for the many acrylic mediums produced. Now factor in the addition of water, Retarder, or diluted Acrylic Flow Release. Toss in the impact of the painting substrate and studio environment and suddenly, predictable pouring seems unattainable. The way to best describe the approach to pouring applications is the concept of setting the stage to allow the products to do what they want to do; in other words, controlled chaos. And if you don’t take good studio notes to identify how each painting is created then you’ll never be able to reproduce a great effect when they happen. That said, here are some common methods and beginning mixtures to try out:
- Thinned Color Washes – High Flow Acrylics are ready to use for this application. The colors will readily move and interact. Try them neat, mixed with mediums like Airbrush Transparent Extender or GAC 500 and let gravity move them around. Fluid Acrylics will require at least 10% additions with water to allow them to freely move about. Note: high additions of water increase surface tension, which can be countered by adding in 2 or 3% Acrylic Flow Release into the water prior to using it to thin paints. Do not over-add Acrylic Flow Release as it does not help improve flow, it’s intended to reduce surface tension which happens quickly.
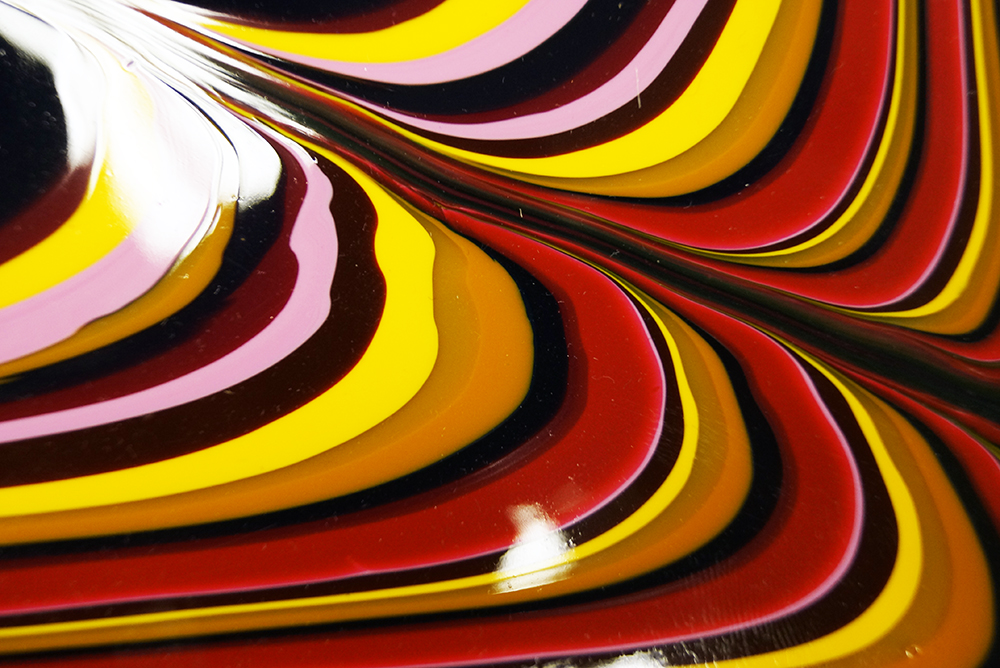
- Solid Color Pours – As mentioned previously, GAC 800 is a great medium to use with Fluid Acrylics for making colored pours (see Image 2). Ideally start around 10 parts GAC 800 to 1 part Fluid Acrylic, mix and store the paint overnight in a sealed container. This allows the bubbles incurred during mixing to rise and pop, resulting in clean pours with sharp edges. These mixtures produce clear color edges. Solid color pours can be used over an entire canvas, but avoid damming up the edges during drying.
- Adding Isopropyl Alcohol into Acrylic Paint – Alcohol is less dense than water, and evaporates quickly once it hits the surface of a pour. Unlike other applications, the alcohol amount for this technique is relatively low because once the effect happens and it escapes the fresh pour, there needs to be sufficient time for the normal acrylic paint curing process to

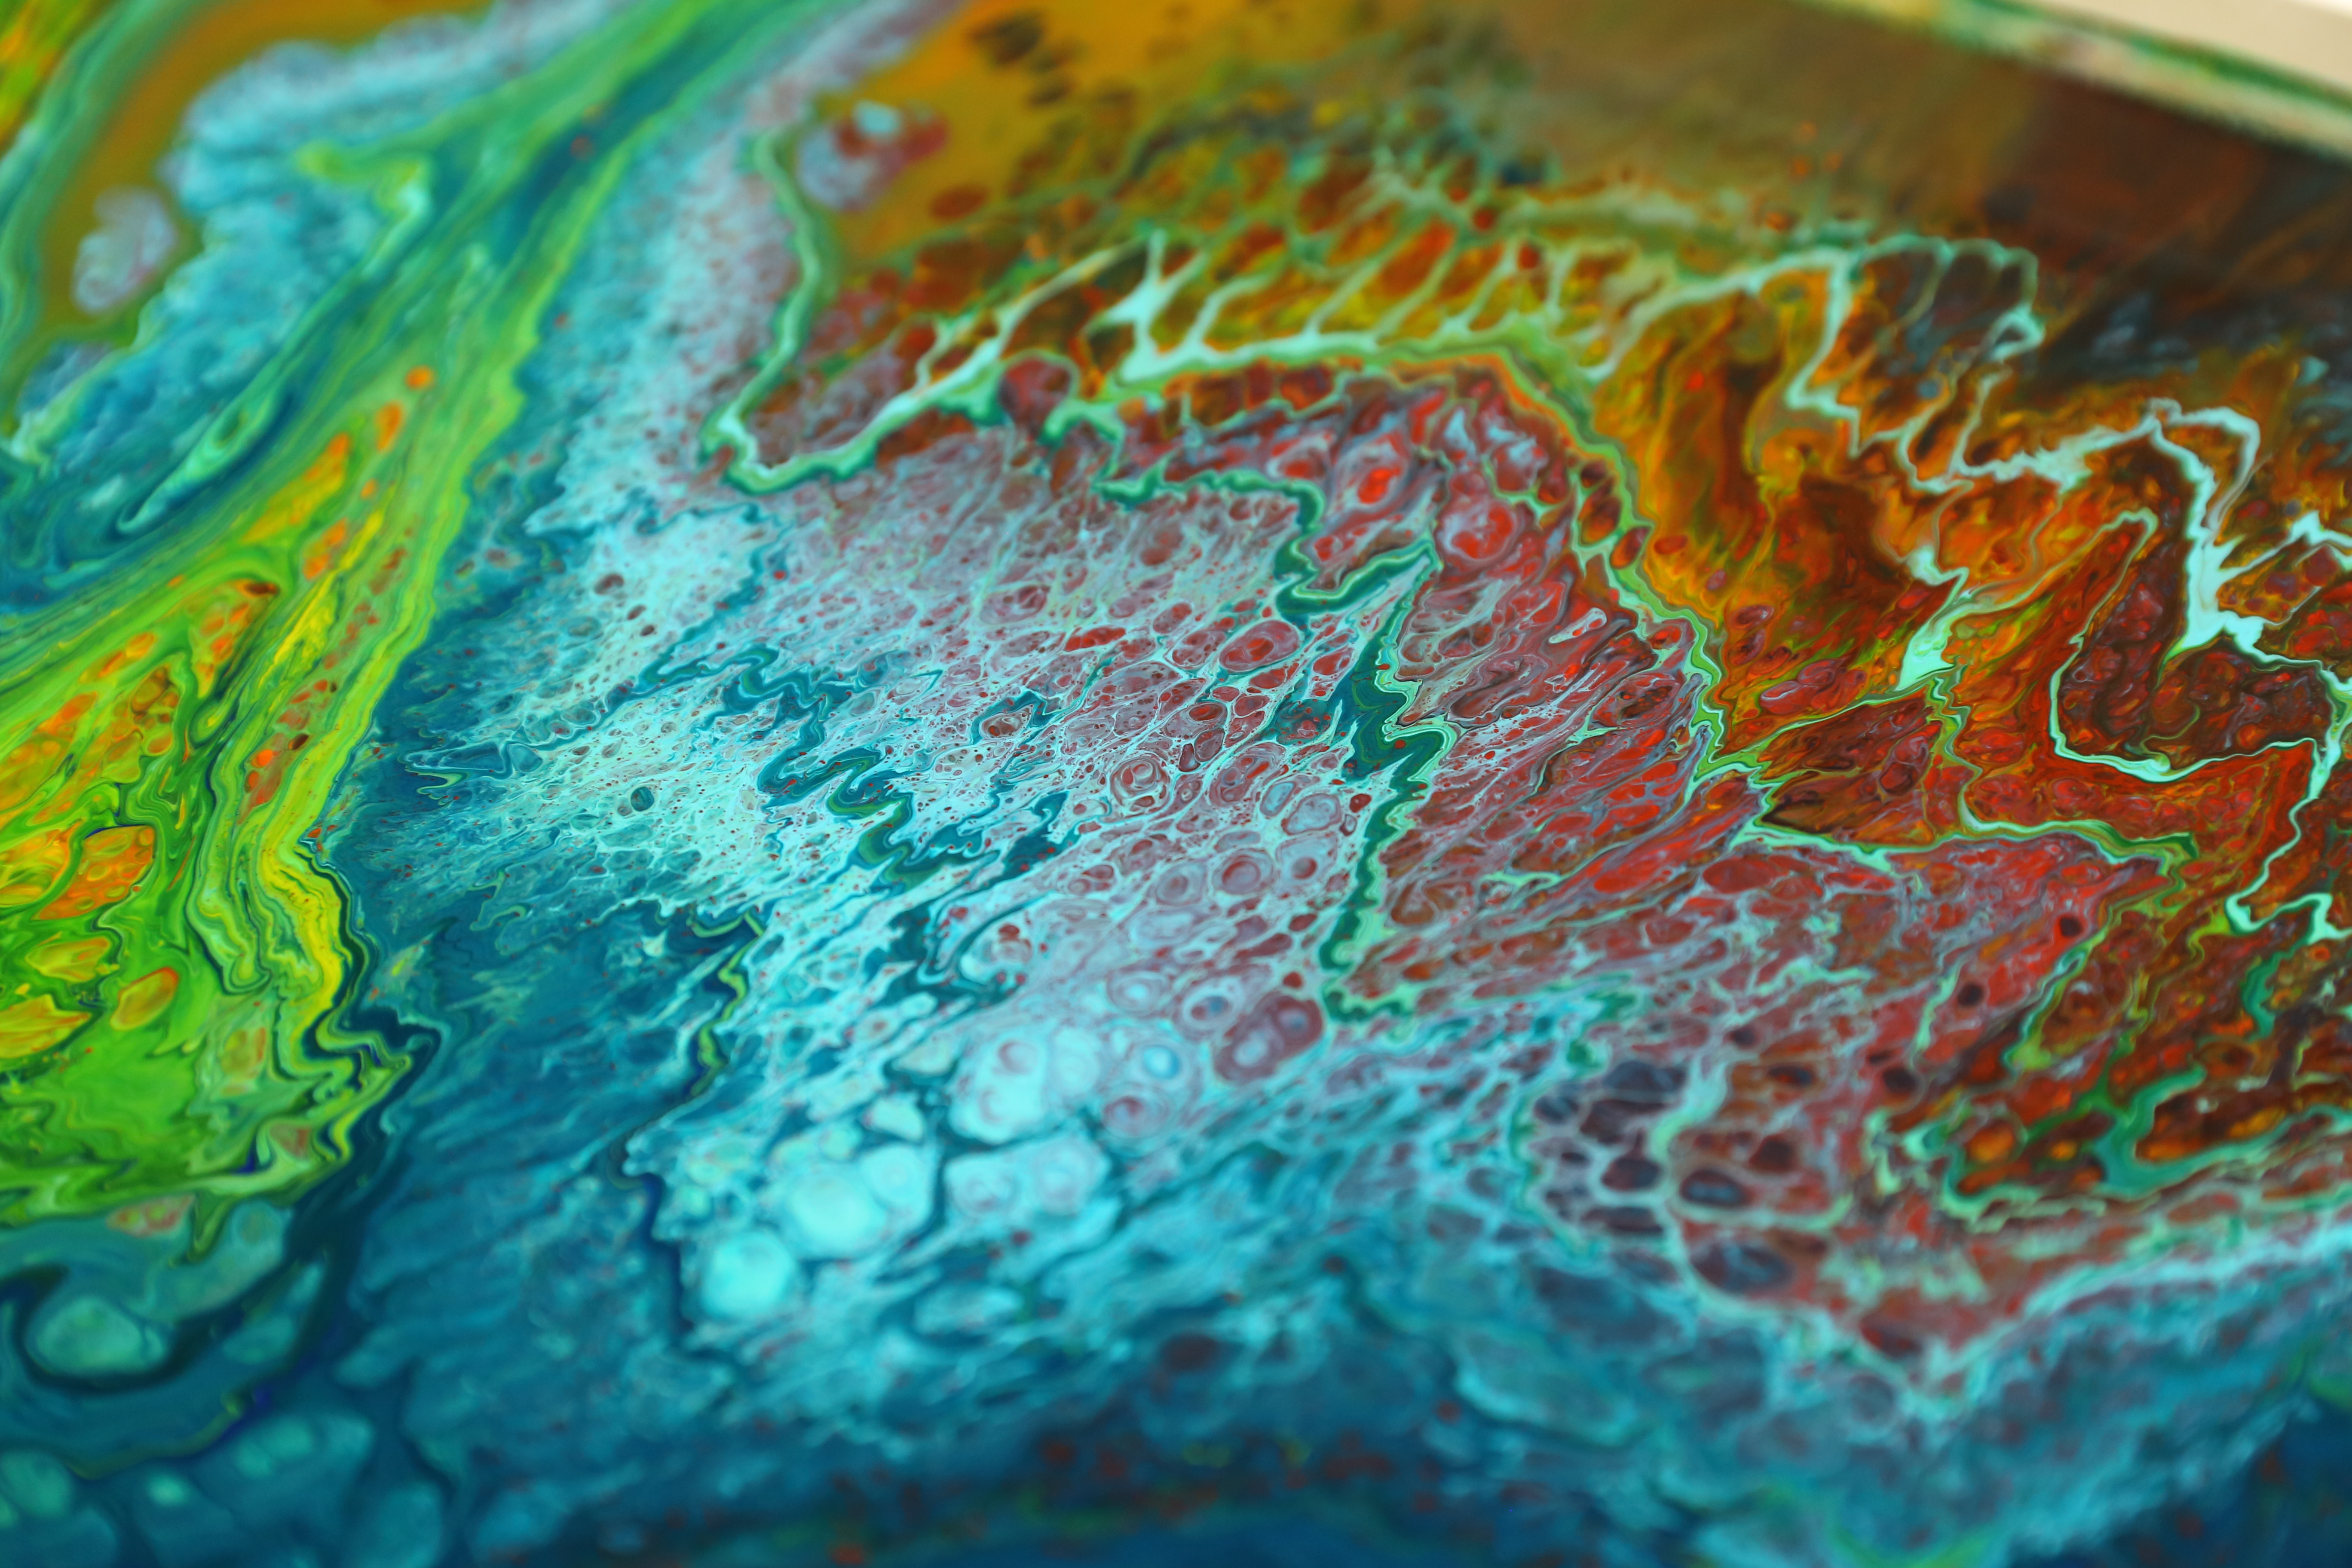
Image 3: Pours of GAC 800, GOLDEN High Flow Acrylic & Isopropyl Alcohol create cellular patterns as the alcohol tries to escape the paint during drying. occur to avoid film formation issues. An effective starting recipe is 2 parts GAC 800, 1 part High Flow Acrylic, and 1 part 70% isopropyl alcohol. Create 3 or more paint mixtures in containers which can be shaken without spilling and carefully pour one color on top of another. Dense pigments like Titanium White should be used as the final layers so that the more aggressive colors below will push up through and create the cellular effects (see Image 3).
Conclusion
As with any new painting technique, do not be discouraged if the desired results don’t happen immediately. Good note taking is critical for successful pours of acrylic paints and mediums. If you find yourself at the crossroads and need additional guidance, please contact the Materials Specialists with your questions!

Subscribe
Subscribe to the newsletter today!
Great article with useful information! I was wondering how artists were achieving the cellular look. Going to give this technique and the others mentioned a try. Thanks so much!
Hi Christine!
I’m sure you’ll have a great time. Take notes and expect a learning curve!
– Mike
Mike when using liquitex pouring medium with fluid acrylics how much exact should be used? it seems it gets to thin. Can you use this with regular tube acrylics? What is best to seal the gesso befor pourings?
Hi Ginny,
We have tested Liquitex Pouring Medium with Fluid Acrylic and Heavy Body Acrylics, so they are compatible with one another. Using Heavy Body Acrylics should result in a thicker pouring mixture, assuming enough paint is added to factor in the overall thickness.
Sealing the Gesso surface can be accomplished with many kinds of mediums, gels and even pastes. I would use a gloss product, such as Polymer Medium Gloss, but keep the layer very thin to avoid crazing.
– Mike
Thanks Michael, lots of great info!
Diane
Hi! Thanks for the great post. I’m trying very hard to get large cells to form when I do pours. I’ve watched many tutorials and tried many paint:Flietrol ratios, paint:silicone ratios and am finally getting teeny tiny cells. But I want large ones. I live in a very arid, high altitude desert and my studio has been experiencing sub freezing temperatures. I can’t control those things. Any suggestions? I’m totally at a loss.
You are very welcome, Kathleen.
It sounds like you are in a very dry area with low temperatures. One of the things you may not have tried is to add some water into the paint mixtures to help make them a bit thinner, which can help the development of the cell patterns. Do some testing, where you add 5%, 10%, 15% and 20% water to the paints you are currently mixing up, and see if you notice any improvement of cell development. If you still don’t see any positive changes, repeat, but use a medium with retarder in it, such as GOLDEN Airbrush Medium and see how that does. IF that still doesn’t work, then you may need to switch the paint brand and mediums being used. – Mike Townsend
What does a “retarder” do?
Hello Cathy.
Thanks for the question. A “retarder” is a paint additive that “retards” the evaporation of the water in the paint, effectively slowing down the paint’s drying speed. In artist acrylic paints, this provides extra blending and painting time. It is important to be careful with using retarders in thick paint layers, because it is harder for the retarder to evaporate out, which keeps the paint sticky or tacky until most of it has gone.
– Mike Townsend
Rain X + floetrol + Liquitex pouring medium + paint = cells cells cells
that rain x is a game changer, trust. 😉
Hello Cara.
Thank you for commenting.
You may very well achieve some cells with this combination, but the question is whether the RainX will also create issues for the artwork long term?
It is unknown without scientific testing confirming if adding these non-painting products will create failure for the artwork in the future.
– Mike Townsend
Hello Cara
Can you kindly give ratios of the above recipe? Thanks
If you mix the silicone in the paint very little & gently, you should get larger cells. If you mix the silicone a lot & briskly, you will get smaller cells.
OR you can leave out the silicone and after you pour your paint, take a toothpick or or a wide-toothed comb, dip it in silicone and then dip it in your paint. You should get large growing cells. You can also tilt your canvas down and as the paint is flowing down, tilt your canvas side to side to kind of keep the cells from stretching too much in one direction & keeping the cells round.
You could also add a humidifier to your work area to help with the drying. Adding silicone directly to the paint, THEN mix with the rest of your recipe. That helped me when I wanted cells. I had cells on top of cells which I didn’t like. There were just too many and they were big to small. I was using a 30″x48″ canvas and I had nightmares of circles that night in bed with how many cells were on that big piece. I had to start over and gesso, sand and do something different after that try.
Thanks Daryl.
I found that it was easier to control cells with very light spritzing of dimethicone onto the surface of paints (using a small brush) rather than adding into the colors and hoping for the best. Slowing drying time with humidity is a great thought to allow for more cells to form before the paint starts skinning over. – Mike
iF YOU HAVEN’T WORKED IT OUT YET YOU NEED SILICON OIL, LOADS ON UYOUTUBE
Hi Katie,
At this point in time we do not endorse the use of silicone oil in painting mixtures that are expected to last. There are many reasons for this stance. Most silicone oils do not evaporate out of the paint, therefore they stay within the matrix of the paint and could potentially cause film formation issues. At the very least, the silicone oil will impede the intercoat adhesion between the surface of the pour and subsequent product layers, such as mediums and varnish. As an artist, you are free to do what you want to to make your artwork, but until we gather enough evidence that there isn’t any long term issues, we won’t suggest artists add silicone into paint. – Mike Townsend
The automotive silicone works beautifully! I made my own pouring medium with Elmer’s Glue All. Would love to try alcohol but concerned it might not work with my everyday craft paints.
Hello LAC,
Thank you for your comments. Artists are free to combine materials as desired for their artwork. Our job is to try and identify any potential permanency issues likely to occur when using products never intended to be added into paint films. Silicone oil is a non-drying, non-evaporating oil. Other non-drying oils like Mineral Oil, Olive Oil, and Motor Oil are all things best left out of paint mixtures. The use of Elmer’s Glue All as your base medium, poured thickly, is likely to result in adhesion issues and noticeable yellowing.
– Mike
I tried some pours wi elders & didn’t get any cells. Do you know at I could have done wrong? And you
Hello Shelly.
Please re-submit your questions as I’d prefer not to guess what you are asking.
Thanks
-Mike Townsend
Nice to know! I was thinking of stopping at the parts store to check for some since silicone oil for painting is not available in the town I live in neither is flood.
Hi, I have been using silicone in my mixes and in Reading this I am concerned…. The silicone tends to rise during curing and then gets washed off whien acrylic is dry. Would it still affect the film formation?
Hello, Emmanuelle. Thank you for your question. While some of the silicone rises out during drying, no one knows if ALL of it comes out and reaches the surface. I believe wiping down the surface is a good idea but it may require repeating several times as the films more fully cure. We have seen this happen with overloads of surfactants, which tend to rise and collect on the surface of the paint film. So to summarize, what is truly going on with the silicone during film formation and afterward still needs to be studied, but overall try to minimize the amounts until it’s shown to be either acceptable or not.
– Mike Townsend
You don’t need silicone for cells anyway once you learn about the different densities of the different paints and how they react with other colors. #stopusingsiliconeforcells
Agreed!
Thanks, Ryan.
– Mike Townsend
Michael and Ryan,
Totally agree with you both but I am having a heck of a time learning this information. I know that Golden has a chart of their densities but do either of you know of any resources that can teach me more in depth about this? Thank you in advance!
Hello Alana.
Yes, there’s a learning curve with this painting technique and the more you try to pinpoint a specific pouring method, the more testing you need to do. Work small, take notes, and don’t be afraid to fail! I will say that density is important for this level of control, and if you make a set of paint mixtures, use a little to create 2″ puddles of one color, and then drizzle a few lines of a second color across it. You’ll be able to use this as a guide to better predict how individual colors will behave based on the sequence of the order in which they are applied.
– Mike Townsend
I would be worried about toxicity, after reading the labels on silicone lube products. Did my first pour with WD40, which worked, but was very smelly. Now I use rubbing alcohol, acrylic gloss varnish and paint conditioner.
Also torching silicone products releases hazardous fumes.
I get my cellar patterns by mixing liquid silacone also known as a lubricant such as coconut oil in to one or more paint color then once finished I use a chefs torch in a circular motion to achieve cells.
Thank you for replying to Christine, Max. Just realize that we do not endorse the use of silicone oils, commercial lubricants, or other non-drying oils with acrylics, as we do not know what it does to the film formation process or long term stability of the paint layers. This also goes for the use of a torch. The high temperature may not adversely affect the silicones but may cause film formation issues of the acrylics.
– Mike
Michael,
I have been doing experimental silicone pours and there have been a few issues but the GAC 800 finally stopped crazing issues for me. What I’ve discovered is that the oil will continue to come out of the painting for a couple of weeks and during those couple of weeks while you essentially cure the painting, you keep wiping it thoroughly in circular motions and it continues to create a nice shine. If you want to epoxy one, wait 3 weeks, you don’t want any moisture at all in the painting.
I do one coat varnish when I feel it’s cured enough. The torch stabilizes the cells you are trying to preserve in the initial pour and it helps create texture, giving an organic look, and it works better than a heat gun or blow dryer which moves the paint to much.
Thank you Kim for your insight. There is much testing to do to learn how the silicone oils are affecting the paint layer, and if enough of the oil can be removed to allow for sufficient intercoat adhesion between the paint and the varnish or topcoat layers. In the silicone testing I have done, which isn’t very much to qualify me as an expert, the surface seems very slick and not likely to allow for proper adhesion. We follow the “ASTM Cross-hatch Adhesion Test” which is one we use for many kinds of adhesion testing between substrates and primers, primers and paints, paints and topcoats.
– Mike
have you ever tried this with Acrylic glazing liquid (gloss) by Golden
Great article!! The chemistry geek in me loves getting into what’s going on behind the scenes so to speak…how & why the paint is doing what it’s doing!! Thanks for the informative article!!
One question…I mix my paints ahead of time as I love having a collection of colors available…I mix large batches of white too…my white was getting low so I mixed up a new batch & I’ve been battling the white ever since. It is rising to the top. I tried making it a bit thicker still it is overpowering…any ideas why this might be happening? I’m wondering if I got my ratio wrong…your note taking advice seems relevant here LoL!! I thought I had it memorized but as I write this I’m having some doubts…any suggestions would be great!!
Thanks so much!
Interesting, Amber.
My experience has been that the Titanium White wants to dive downward in a pour, not rise. However, if the white mixture was thinner than the other paints it would likely stay afloat or rise upwards, trying to equalize. Try using the same amount of medium to paint, and see if this helps!
Regards, Mike Townsend
I do not want cells. Is there a way to avoid when using heavy body, regular, or liquid acrylics with GAC 800?
Should water be avoided during mixture? Can you pour color combinations in a cup or can the colors be directly poured onto substrate.
Great article and replies to questions. Thanks.
Hello Michelle.
Thank you for your questions. The Fluids and GAC 800 can produce smooth color fields without the creation of cells. The 10:1 ratio in the article helps to minimize the impact of the various paint formulas, which in turn reduces the differences of the color mixtures for pouring. It can also be helpful to keep the pigment density range close together. Density differences will cause some colors to sink and others to rise. The easiest way to do this would be to work with organic pigments (modern pigments such as Phthalo, Quinacridone, Benzimidazolone, etc.) and avoid most of the inorganic pigments(metal and natural earth pigments. At least try to use one type in a painting.
Please let us know if you have any other questions!
– Mike Townsend
Can one apply acrylic paint on top of the poured surface once dried?
Hello Natalie,
Yes, once you have allowed the poured layers to become solid (typically 3 days or so) then you may hand-paint over them as desired. It’s possible you may be able to paint sooner, but the timing changes based upon environment, poured paint thickness and what you’d like to do next. Multiple pours often take the most time to reduce the chance of cracks and other unwanted surface defects occurring.
– Mike
Michael Townsend is there a chance you could send me a paint density print out like you sent to Danny Clark?
Patricia
Hi Patricia,
Yes, we’d be happy to send you the Pigment Density Chart. Here’s a link to it GOLDEN Pigment Density Chart .
I will also send you an email with this link as well, in case you don’t return to these comments. – Mike Townsend
Please send me the paint density chart
Hi Linda, here is the link to the Pigment Density CHart PDF file. https://goldenhub.goldenpaints.com/storage/uploads/pigment-density-of-golden-artist-colors.pdf
– Mike
Hello Patrica,
Yes, we would be happy to send you an email with the link. I’ll also provide it here: Pigment Density Chart
Michael
One more question, okay three questions…☺️
In order to get large cells in a pour what is the recommended ratio and/or recipe?
Doing a resin/paint combined pour would you still need silicone or alcohol?
I see many on YouTube using a torch but wouldn’t a hair dryer with a diffuser on warm/low be effective and less dangerous?
Hello again Patricia,
1- Larger cell patterns are produced by blending low density-pigmented paints with low density additives (Isopropyl Alcohol) in the lower layers, which in turn push through paints with a higher density, forcing them apart. Alcohol wants to readily escape the paint mixture and it takes the paints it is mixed with for a ride to the pour surface. This is of course assuming the paints are thin enough to allow for the rapid movement but not so thin that the developing patterns break down before the paint is able to dry. While there are other forces at play here, this is the idea behind the process.
2- I would assume that you would need the low density additive in any mixture in order for this cellular pattern to develop.
3- There are concerns that the use of silicone oil in a paint mixture can cause poor film-formation in the acrylics, and also poor intercoat adhesion for any paints, mediums or topcoats/varnishes applied over them. Therefore, we cannot endorse the use of silicone in artwork that you hope will last the test of time. Maybe it will be okay, maybe not. We just don’t know. The same reasoning goes with the use of a torch to coax the patterns to develop. We don’t know what it being released into the air, or if the heat is great enough to alter the film formation process. Heat and/or flame with highly flammable isopropyl alcohol is a very dangerous combination, please do not do this. – Mike Townsend
So you therefore do not put alcohol in the paint that is to be poured last or do you put it in all of the paints?
Hi Mike,
You mentioned patterns breaking down during drying. I’ve been using Liquitex pouring medium with Floetrol and isopropyl alcohol and a bit of water, and have varying densities in my paint. I’ve been finding that while my paintings are gorgeous prior to drying, the patterns resulting the next day are not nearly so pretty. How can I ensure my patterns stay put overnight?
Thank you!
Hello Daniel.
I find that the key to retaining the patterns in a pour are to, first, mix the paints where they are pourable but not so thin that they stay put. This includes the amount of alcohol and floetrol used. The more aggressive solvent is use, the greater the amount is evaporating, creating the changes. Second, make sure you work on a VERY level table surface, and reduce any air flow until the paint layer is solid. Do not move the artwork at all if you can. Ideally, where you pour is exactly where you leave it to dry.
– Mike Townsend
Hello Michael,
When adding alcohol to acrylic with the intention of creating cells, do you suggest stirring the alcohol in or simply add a few drops? Thank you in advance for your help.
-Tina
Hello Tina.
I’ve done both. Each gives a different look. Adding alcohol also helps to thin the paint mixture, which in turn produces more cells depending on what colors you add it to, and how the paint colors are sequenced. If I’m at the tail end of the pour and it doesn’t seem like there’s going to be enough cells, then I’ll spritz the alcohol onto the surface. Apply sparingly but in a way that creates some decent sized droplets, otherwise you’ll get more of a fine lace effect.
– Mike Townsend
Great article! Can I ask, would you put the lighter colours down first, or the darker? Wondering if the lighter blues (for example) would have enough opacity to sit on the darker blues. What generally happens here?
Hi Laura, If you are referring to the alcohol pours, colors with more opacity seem to develop more pronounced patterns. Transparent colors are darker and it’s harder to see the effect. Contrast is important, so that light layers give way to darker colors rising up through them.
This article is everything, ESPECIALLY the end part about getting the cell effect with rubbing alcohol. Is 91% alcohol okay? Thank you for writing this, and sharing information that most artists consider a “secret”!!
Thank you Kailey. We’ve always been of the opinion that giving information about techniques is a two way street; you get back as much as you give. I found both 70% and 91% alcohol works for this process. 91% might be better in terms of not having to add as much into the mixture. The alcohol should be mostly evaporated first in order to allow the acrylics to properly cure.
How long do fluid acrylics take to dry when used neat for pouring? I tired using these and they do not seem to dry……..
Any help will the appreciated
Regards, Joanna
Hello Joanna,
Acrylic paints applied heavy handedly can take several days to become solid and stable paints, and may require an additional several months to become fully dry. Much of this depends on the many factors about the drying of acrylics which we have an article about here: https://justpaint.org/investigating-the-drying-process-of-acrylic-color-and-gel-medium/
Interesting read, thank you for sharing this info.
I use equally challenging technique in terms of how to achive consistent results and the paint going down the drain (literarly). With this technique I create foam-like texture by applying narrow stream of water from a water sprayer on heavy body acrylic paint that’s been distributed onto a canvas.
I’m thinking if I should use mixture of water and acrylic medium instead of just water. Which medium would you recommend?
Hello Silvija,
There are probably many mediums which you can try for this technique. The GAC 100 or GAC 500 are the most likely candidates as they are thin, pure acrylic mediums. Rather than replace all of the water you use, you may be better served by blending water and medium (1:1 as a starting point) so that the technique produces the desired effects. However, if you do find adding medium for this part of the process not practical, you should then move to applying an “isolation coat” and then varnish to protect the work. Please let us know if you have any other comments. – Mike
Thank you for sharing the information.
I have the following question concerning the thickness of the poured layer, and the time between pouring the next layer.
Is the thickness of influence of the process letting the paint underneath rise ? In my experiment i poured a white layer directly on top of an black/blue layer, the white completely disappeared even with alcohol.
Hello Claudia. You are most welcome for the information. Poured painting layers are often quite thick, so you should allow ample time for the paint to coalesce before you apply the next layer. Usually, this can take between 3 and 7 days, depending on the overall factors such as temperature, humidity, air flow, product thickness and surface absorbency. I’m not sure what happened with your painting, not knowing all the details. It’s possible the density of the white caused it all to drop to the bottom of the blue/black, but the most dramatic effects would be to pour these layers immediately on top of one another. Hope that helps! If not, please contact me directly via email and we can figure out what’s going on.
Claudia why not try something I got great results from. I mixed pouring medium with fluid acrylics making a white a black and 2 other colors – no alcohol. I poured the white with my board at an angle then the black then the other colors. I then took a light weight paper color swats from Home Depot and lightly swiped a ross the paint. Then I let it sit and do its thing. I got some cells and spider webbing. Try it and hope you get great results like I did.
Great topic and excellent advise! Question : can I use my normal acrylic paint (brush and pallet knife) as I see you advise high flow acrylic. Can I turn my heavy body paint into high flow somehow ?
Thanks
Thank you Peter. In regards to modifying a thicker acrylic paint to be used in this process, it’s possible, but I have not tested it. You would want to first thin the paint down with a blend of water and medium (for example 3 parts water to 2 parts GAC 100). Add small amounts of this acrylic-water mixture into the paint until the paint becomes pourable, then it can be modified with the GAC 800 and isopropyl. As stated in the article there are many variables which influence the patterns developing, so you may need to adjust the ratios of products until you find the combination that provides the right movement of paint.
Yes, heavy body acrylics can definitely be thinned down for pouring and liquid painting. I have used it many times.
Thanks for your comment. What would ratio be since I expect you have to use more fluid additives (water, medium…).
Is your GAC 800 the equivalent of Liquitex pouring medium?
Hi Christine,
Thanks for your question. The GAC 800 can be used as an alternative for pouring when paints are added with it. The GAC 800 lacks the level of clarity of Liquitex Pouring Medium, so we do not suggest to use it as a topcoat or 2-part epoxy alternative. As you can see, when used with color, the GAC 800 allows you to pour with minimal concerns of “crazes”. – Mike Townsend
Is GAC100, GAC400 or GAC500 closer to the Liquitex pouring medium? What are the differences in all of these and GAC800?
Not really. They interact differently with the paints. Pouring medium tends to spread the colors a bit, GAC 800 does not. They both are quite good for pouring; you’ll just get some different effects. Each has its uses, and yes, they can be mixed. I would recommend, if using Liquitex Pouring medium, that you add something like a tiny bit of flow release, otherwise it can easily skin over. VERY easily skin over in the mixing cups. GAC 800 is a staple for my liquid paint/pouring mixtures. Both are excellent! As Mike says, you will have to experiment.
Plus a helpful money saving tip you can mix elmers glue and water into the paint plus silicon or oil until satisfyed with the consistency I found that it works even better than liqutex pouring medium if you have any questions or concerns please contact me.
Max, the use of Elmer’s Glue (a PVA material) can also have an impact on the durability of the paint film. As PVA ages, it becomes very stiff to the point of being brittle. This may not be an issue on panels but on canvas the movement could create cracking of the entire film. Artists are certainly free to do as they please with various additions of non-archival, untested paint mixtures, and achieve interesting effects, but there are no guarantees the resulting paint layers will hold up over time.
– Mike
Hi Michael, Question, what if I add a coat of resin over my pouring where I added Elmers glue? Do you think that could prevent my painting to create crazing over time?
Thannk you for this article!
Hello Ninozka.
You are very welcome for the article. I know there are artists using the Elmer’s Glue (PVA binder) and then using epoxy resin on top to finish, but since we do not make either of them, it would be critical to test them out on a non-important painting panel and see how they fare. Epoxy should not craze because it’s a two-component system that cures from chemical reaction and not water or solvent evaporation.
– Mike
Great help here with alcohol pours!!! but wondering if they could be made up & stored for a time? I am assuming the alcohol will evaporate if not kept in airtight containers.. Also does each color including the titanium contain the alcohol??
Thanks.
Hello Maureen,
I have made mixtures and kept them in a sealed jar, and they have worked. The alcohol as you mention does flash off very quickly, so if the container has a lot of head space it would fill with the alcohol, lessening the amount in the liquid paint mixture. Overall though we’d suggest creating these mixtures and using them fresh, as there isn’t any trials where we studied the affect of alcohol mixed with the paint long term, so it may end up wasting product. We just don’t know for sure. In the image from the article showing this effect, all of the colors were mixed approximately similar in regards to the ratios of paint, medium and isopropyl.
Hi Michael
This is a great article, it’s very difficult to find information on mixtures for the alcohol pouring technique. Do you have recommendations for the substrate to use, I’ve tried gesso covered canvas boards and the paints sink in and you see the canvas texture in certain areas. I also tried gesso covered wooden boxes and I had severe cracking.
I really want to achieve a smooth glass like finish, I realize I can pour epoxy resin to give it it’s final coat but I’m struggling to get the desired finish prior to this.
Thanks
Hi David,
Thank you for comments. If you seal the surface of the gesso with acrylic medium before doing the pours they will be much smoother. For example, the Soft Gel Gloss thinned 2:1 with water (isolation coat recipe used prior to applying varnish). Smoothing canvas with Molding Paste works really well also. The same thing is true with the wooden substrates, as gesso on wood is highly absorbent. I should note also that with all of alcohol evaporating from the paint layers the surface isn’t as smooth as it is when using just GAC 800 and paint. You could also apply pure GAC 800 as a thin coat but as the article mentions, it’s slightly hazy, so you have to make sure it’s not going to be an issue for your artwork.
Hi Michael, I really appreciated this article about pouring. Very clean and clear and understandable. There is also the pouring technique where you start by putting your canvas in water and you pour the colors directly on the canvas in the water and when you pour it out it makes beautiful effects and less messy. Did you try that method?
thank you very much.
Hello Linda,
Thank you for the kind words about my article. There are certainly many kinds of pourable paint applications we were not able to cover within this article. We refer to the technique you describe as “stain-painting”.
Here is a video that supports this painting approach: . Perhaps in another article we could speak to this technique! – Mike
I want to thank you so much for this article! I searched for hours and hours for this exact information! I have been trying over and over to achieve the “cellular pattern” look. I tried last night and it didn’t quite work the way it does in that picture but I took notes and I’m sure I just need to keep trying as you mentioned, “As with any new painting technique, do not be discouraged if the desired results don’t happen immediately.”
The way I did it was that I poured the paint, then dripped the alcohol onto it, but as i re-read the article, maybe I was supposed to mix it in with the paint?
Thank you again! This is so helpful 🙂
Hello Jennifer!
I’m very glad you found the article so useful. You are correct that you want to mix the alcohol in with the paint and medium, because it’s the action of the alcohol rising to the surface, pulling paint along with it, that causes the patterns to emerge. Keep at it! – Mike
I had tried with the golden high flow and fluid acrylic with rubbing alcohol but did not get the cellular effect. What went wrong ? Should the paints be mixed thoroughly with the alcohol before tilting the canvas. Any sequence on the pouring ?
Hello Jackson,
The way I have been mixing the paints up has been by mixing them in a tight sealing jar and shaking the mixture up. The air bubbles seem to help create the cellular patterns. The key though is to have one color flowing over others, wet into wet. So, mix the paints with the alcohol, pour one or more colors out and then tilt the canvas so that one color can roll over the other. – Mike
Thank you. Will try that again
how can I get the cells effect of Arthur Brouthers? Which medium can I use? Thank you
Hello Moni,
Thank you for your questions. I can only speak to what has been working for me, which is the isopropyl alcohol and GAC 800 with High Flow and Fluid Acrylics. How Arthur Brouthers specifically accomplishes his work is unknown to me.
Thank you for your information. Will try the alcohol and gac 800 combo with the fluid acrylics.
Probably some kind of silicone, judging from my experience. However, I am not Arthur Brouthers whose pours are fantastic!!!!…so maybe you can contact him? Or contact Annemarie Ridderhof. She knows a lot about acrylic pours too.
Moni, did you ever get any further in your research of Arthur Brouthers type mixture/technique? I am also on the hunt for finding out this information. If I do find out, I can post here. If you find out anything, or if anyone who sees this message knows the secrets to creating works like Arthur Brouthers, PLEASE 🙂 reply/post. Thank you.
Hello Dani,
I don’t know of the Arthur Brouthers specific techniques but I believe they use epoxy resin as their base.
There’s also some interesting reading about whom I believe is the originator of using hydrodynamic instability to create patterns: David Alfaro Siqueiros, who described the result as “accidental painting”.
– Mike
What a great article. Answered so many of my questions. Now I can proceed with confidence that my paintings will remain intact. Thank you
You are most welcome, Linda.
Hey Michael….i did a large canvas last night….it was perfect when i went to bed, but i woke to something completely different this morning! The paints moved SO much overnight and i really don’t like it anymore. Parts are now very think and tacky. Once it’s completely dry, can i re-pour/layer over the top?
Really need to salvage it!!
Hello Jenna. With the great patterns resulting from alcohol, it is important to not overdo the alcohol additions. They make the paint mixtures very thin and very volatile. Try reducing the amount you are adding so that the majority of alcohol has left the paint film before the film formation process begins. Also realize that dense pigments such as ultramarine blue will readily sink in a liquid paint layer, and if you are adding the levels of GAC 800 I did when crafting this article, the mixture becomes less milky and more transparent after it dries.
I love this techniques, always surprised by the results!
I’m interested in putting a second layer on top of the dry first layer. I’m hoping to lightly lift off the dry second layer to reveal the color underneath. Instead, both layers come off together. How can I get the result I want?
Thank you.
Hi Judy. Without seeing the work it’s difficult to understand what you are experiencing. However, it sounds as though the first layer was not completely dry, or it was perhaps overloaded with alcohol and that might make it more sensitive to a second application. You may need to apply an isolation coat of acrylic medium before you attempt another layer with alcohol in it.
hi! just wondering, when you mix alcohol into paints to get more cells, is this when you pour the paint on the canvas in a water bath/dip the paints into a water bath or do you only mix alcohol into the paint when you are doing a dry fluid paint? not sure if i’m describing it correctly–im entirely new and only started researching this yesterday and i watched alot of youtube where canvases were either in water or dipped in water. thanks!! I love the cell look.
Hi Elizabeth. Thanks for commenting. No, you are describing a marbling technique, which is quite different. That technique involves hydrophobic paints (usually enamels or oils) that readily float on water, and an object is pushed through which imprints a pattern onto the surface. It can be done with acrylics although thickened water is best for waterbased paints.
This article was super helpful. Thank you.
You are very welcome!
Do you have/will you make a demo video of this technique?
Hello Li,
No video just yet showing the application just yet. What would you like to see in the video that would be most helpful for you?
I guess just watching the amounts of each to use in the timing …
Did you ever get around to making that video about creating cells in poured painting?
Hello Suni,
Thanks for your question.
I don’t have a timetable for when videos on pouring will be release but we are currently filming.
– Mike
Hello, Michael.
Thank you so much for this informative article. I have been practicing the acrylic pouring technique for a few months, and my biggest obstacle has been little to not-so-little craters created by air bubbles that popped while the paint was drying. Is there anything you could suggest that would prevent this besides sitting in front of your piece for hours popping every single bubble you see? You mentioned in the article to let your paint mixture sit overnight in a container before pouring. Is that the best method to prevent air bubbles? Would mixing the alcohol into mixture prevent this as well? Thanks so much in advance!
Hi Sarah,
You are most welcome for the article. When I started out doing pouring my impatience to work definitely led to many unwanted bubbles and craters. It is nearly impossible to mix paints and mediums together without developing air bubbles, but as you cited, the best approach to removing them is to simply allow the mixtures to sit overnight. Pre-mixing batches allows you to dial in the color and have it ready to use for the near future. Some mixtures may have the denser pigments settling a bit while in storage, but often just a gentle stirring returns the mixture to a uniform color. While adding some alcohol might help the mixing bubbles rise and pop faster, it’s not a great substitute for time.
Hi Sarah, try torching your painting once you have poured the paint. I use a creme bruille torch that chefs use to caramelize sugar on top of deserts. Lightly wave the flame over the painting fairly quickly at a distance of approximately 5 or 6 inches above your painting. This will pop the bubbles and enable the alcohol to form cells more quickly. This is a technique also used in resin pours. Hope this is if some help to you.
This technique could be dangerous with alcohol. Very flammable. The torch is normally used on silicon/paint mixtures to create cells.
Thanks Susan. That’s a great point. – Mike
Thank you Michael
I use a product called Flowtrol there are several companies that make it but the one I have is made by Flood and is purchased from a paint supply store.
Hello Deborah,
Flood’s Floetrol is the only one I have seen. Floetrol is a paint modifier, designed to improve spraying, rolling and brushing out of housepaints. In testing, I have noted that it greatly lowers the gloss of the paint mixture. Flood suggests adding no more than 25% into any mixture, but only “approximately 8 oz. (237 mL) per gallon (3.78 Liters) of paint. If paint is thick, or in extremetemperatures, more FLOETROL may be gradually added, up to 16 oz. (473 mL) per gallon (3.78 Liters)”.
– Mike
This is great info thank you so much! Just one question how many layers do you suggest be poured before rolling the canvas around to completely cover it with paint?
Hello Serena,
Thank you for your feedback. I think that the number of layers depends on how complicated of a design you want to have. I could see this effect work with just two colors. You could pour a color on half of the canvas and then cover the other half with the next color, or you could completely cover the surface with one color and then add the next over it. In this case, I like to have a light pigment color applied first, and then a denser color over top. For example, Quinacridone Red as the base and then Titanium White on top.
Michael Townsend
Hello is there a French translation please. I would like to try this. Thanks for your answer. Nicole
Hello Nicole, This article has not been translated, but you can copy the text and run it through a translator program, such as Babblefish.
Like This: Bonjour Nicole, Cet article n’a pas été traduit, mais vous pouvez copier le texte et le lancer à travers un programme de traducteur, comme Babblefish.
Please let us know if something does not translate well for you.
Michael Townsend
Thank you, Michael for this article! Is it absolutely necessary that the canvas be gessoed or can you use a “raw” canvas to create a nice piece using GAC800, alcohol, and acrylic. Thanks again.
Thank you for the information Michael. One question please, have you experimented with both a gessoed and raw canvas? Is it absolutely necessary to prime the canvas before you pour? Thank you!
Hello Adelina.
You are most welcome for the article. You do not need to gesso the canvas necessarily, however, in my experience you will likely lose a great deal of the detail due to the canvas weave.
Hi,
Ive recently started doing pours however I’m really struggling with it drying evenly. I level out my canvas at the beginning and then once in finished I come back in about an hours time and then for some reason there is a thick layer of paint that hasnt reached an edge causing it to clump. Is there any possible way to fix this?
Hello Veronica.
I’m having difficulty understanding what you are experiencing. Please contact me directly, with images if possible of what the issue is, and what products and ratios you have tried thus far. [email protected]
– Mike Townsend
Hi. Is it possible to use normal craft paint from Walmart for this method? If I just properly thin it out with water and Liquitex Medium?
Hello R. It may be possible, but we have not tested using other brands of products.
You can use cheap paint and also house paint.
Deborah,
Yes, you can use cheap paint and housepaint, but realize these products are made with lower quality colorants and binders, both of which can result in long term permanency issues.
– Mike
Hello! Thank you for this article 🙂 I’m having problems with the finished edges of my pour paintings. I’m wiping them but generally as it dries I get more drips which creates ridges or lumps, sometimes a bubble….and then i get some parts that didn’t get any paint. I’m using a pouring medium with different types of paints in it and I LOVE the results I’m getting I just can’t get the sides looking well enough. Any suggestions? The pouring medium makes it dry with a plasticy type of feel so unless I sanded them down I can’t really get rid of the drips, maybe just paint over them with a neutral color?
Thank you!
Hello Dawn,
Thank you for contacting us with your questions. Pre-painting the canvas and edges is a good idea before doing the actual pours. Then tape off the edges well. If the pours flowing over the edge are thin enough they should pull away fairly cleanly, although it’s not uncommon you will also need to slice some of the thicker areas with a razor knife. You can also apply a second tape along the edges using a less adhesive tape (for example masking tape is used for the initial tape and painters blue tape is used for the second). Once you are done with the pouring, allow the paint to level and stop flowing, then while wet, pull the low adhesive tape off but leave the underlying tape in place until everything is completely dry.
– Mike
Hello Michael.
Thank you for sharing such great tips for pouring paint. I have been wanting to try this for very long but never had the right information about the ratios in which to mix the paint.
Just a quick question. Do I need to seal the painting after it has dries completely? If yes, then what do you suggest I do it with?
Thank you so much.
You are most welcome, Veda.
Heavy-handed applications like these pours will take some time to really dry. My suggestion would be to wait for at least a week if you can before moving onto any additional layers, including varnishing. Acrylics are quite durable and do not necessarily require a varnish, but it can adjust the sheen and add some depth (especially gloss coats). Overall though, varnish is intended for the long haul and may be applied at any point in time. The GOLDEN Polymer Varnish, MSA Varnish and Archival Varnish are compatible with acrylic paintings.
Michael
Hi Michael! I was curious with example #2 if there needed to be a drying period between different colors or if you could pour one after another!
Thank you so much for this article, it cleared up a lot of questions for me that I’ve been researching for a long time.
Hello Jenna,
You are most welcome for the information. I’m glad it helps with your own artwork. For the image #2 work, the paints were premixed and allowed to sit in a sealed container. After at least overnight, the paints were then poured onto one central spot and the liquid mixture flows outward. There was a box on top of the panel that the paint flowed over and that resulted in the line between the rings.
Michael
Great article! I have been like a mad scientist in my painting room for hours experimenting! I have had some amazing results with the water and alcohol mix. In order to get the look I want, I mix each paint at different dilutions. The problem I’m having is, because some colors are much thinner, it’s moving too much. I get an awesome image and then it keeps moving and turns to mud. This may be a crazy question but is there anything at all to add to the paint, or spray on the paint once the look is achieved to stop the movement?? If I thicken the paints, I just don’t get the effect I want. Thank you!
Thank you Tracy. There’s no magical spray to freeze a pattern, but overadding alcohol causes more movement and change until it’s evaporated from the paint layer. Thicker mixtures with just enough alcohol to create the cellular patterning seem to be the most stable.
great article.. was in doubt if we can also use Medium1 which is used for transperency and water colour effect instead of the poring medim?
I’m sure there are many types of paints and mediums that can be used for this effect, but we have not currently tested them. I will say that thinner mixtures will create patterns but they usually change rapidly until they are dry. Thicker products tend to “settle down” faster, especially if the alcohol isn’t over-added.
– Mike
Hi Michael,
I have been experimenting with the densities of paint for some time. You state that the opaque high flow colors are better than transparent ones. You also said that using Titanium White ( a dense paint) on top allows the most aggressive colors to pop through.
Are there any charts on the densities of the various High Flow colors? What makes a color, like Ultramarine Blue, more aggressive?
Thanks for any help you can give me!!
Julie Underriner
Hello Julie,
Thanks for contacting us with your questions. Very recently we published a listing of the density of the pigments used in our paints, available here: http://www.goldenpaints.com/pdf_viewer?file=http://goldenhub.goldenpaints.com/storage/uploads/pigment-density-of-golden-artist-colors.pdf. Titanium White usually gives good patterning, and when used over lighter colors that contain alcohol, the cellular patterns push through the white and rise, while the white is displaced and begins to sink. Less dense pigments should rise more readily than denser ones, and the difference helps interesting effects develop. Pigment is only part of the equation, as every paint color, every paint line will influence the way the patterns develop. Unfortunately, these differences fall under our trade secrecy and I am not at liberty to disclose them. I would as always encourage to conduct testing, as similar paints should have similar formulas, such as the Phthalo or Quinacridone families.
Mike
Hi Mike–Ive read this entire thread (!!), and am awed by your kindness at replying to EVERY.SINGLE.COMMENT!
Is there a way to test the density of paints, that aren’t Golden? I LOVE the pigment density chart you have, and use it readily, and sort of approximate pigments with other brands. I didn’t know if there was a better way to try and figure that out?
Thanks so much!
Dawn
Thanks Dawn! I greatly appreciate the comments. The paint pigment density list is universal, so any brand of paint that uses that specific pigment should have similar density levels. When paints are made from blended pigments that is when it becomes complex. Most companies are less willing to provide specific ratios and some do not list the pigments they use.
I hope that helps out!
– Mike
Hi Michael,
When I click on the link to the density chart, I get this message:
PDF.js v1.2.109 (build: 875588d)
Message: Unexpected server response (0) while retrieving PDF “http://goldenhub.goldenpaints.com/storage/uploads/pigment-density-of-golden-artist-colors.pdf”.
I also can’t find it looking through all of the articles on the website. Can you send me a link to the density chart?
Thanks,
Kelly
Kelly _ I had the same problem . When I went to the Golden site I typed “density of Pigments” into the search box and got the PDF to download to my computer. All the information was there when I opened it. Hope that will work for you too.
I get Sorry page not found of that link.
Hello, Kristin. Which link are you referring to? – Mike
Hi Michael:
I have a different project in mind. Most of your responders seek a mirror-like surface. I, on the other hand, wish to achieve a rippled surface. I am a model-railroader and have been preparing a dry river bed. I have applied earth colored paints to my medium surface and now wish to apply acrylic to achieve a rippled, glossy surface indicating the movement of water along the river-bed. Can you suggest a technique that would help create the idea of flow around boulders and islands in my river channel? Would use of a thin knife blade or a needle to create lines suggesting flow be possible just before the surface begins to skin over or would the time-line be too brief to accomplish the pour and the subsequent rippling effect? My river surface averages about ten inches wide and extends approximately five feet.
Hello Don,
There are some ways you can try out to create textural crazing in acrylic products and some others that can allow you to have a control in how to adjust the width of the craze. First, as mentioned in the article, crazes develop when the surface skins before the underlying materials have begun to dry. This seeds the surface and starts the patterning. Our experience with products containing fillers and aggregates that also craze are somewhat limited but it does happen. Products like Coarse Pumice Gel, Molding Paste, and various earth colors (ochres, umbers, oxides, etc.) can be blended and reduced with some water. You may also find that using dry solids in the mixture will help as well. The amount of acrylic binder needs to be low to help encourage the “failure”. The mixtures can be applied heavy handed, and then you would want to use heat lamps and fans to get the surface to become touch dry. You might find it better to then leave the lamp and fans on, or you might find that once the surface is dry it helps to then turn them off so they can dry slowly and maximize the effect.
In terms of being able to control the width of the craze, that can be even more unpredictable, but if you apply the products onto a polyethylene plastic sheeting (4 mil poly plastic sheeting from the hardware store secured well to a wooden surface) you can allow it all to dry first, and then peel the acrylics from the surface of the plastic and use gel to attach them to the model surface.
Modelers in the past have used thick gels to create the ripples of the moving water using a palette knife to model the ripples and waves. You may want to start with a shallow overall layer of gel (Soft Gel Gloss or Regular Gel Gloss) and after that dries, use Regular Gel or Heavy Gel to selectively create the ripples. You can mix a little Titanium White into the gel for white water effects. Others have used products like our Clear Granular Gel and Glass Bead Gel to simulate air bubbles, or simply frothed up the thicker gels first, then applied them.
I hope this helps out. Please contact the Material Specialists directly at [email protected] if you require any more information about these applications.
– Mike
I currently shaped my own surfboard this past summer and have been dying to try something like this on my board. Do you think the foam would absorb the paint too much and the effect would not work? Thanks!
Hello Maddisen,
You may want to apply a sealer coat of medium or paint onto the board foam first, then do the poured techniques after the initial layers have had time to dry well. We would also suggest testing the foam to see if any of the ingredients (such as the isopropyl alcohol if used) will interact negatively with the foam.
– Mike
Hello, I see artists using oil (silicon) to create cells in their acrylic pours. Would any others oils have a similar or better even, a different effect ?
Hello Peter,
Thank you for your questions. The use of silicone oils has become a popular trend for producing cellular patters in poured acrylics. The concerns we have for doing this stem from what the ramifications of these oils remaining in the paint film. Some of the oils never dry, others leave residue behind, and some evaporate completely. Applying several drops of the oil onto a sheet of clean smooth glass and observing their drying is very important, as these products were not created with the intent to mix with acrylics. They may be just fine, but if they don’t dry or leave a residue, can they be varnished or otherwise topcoated with other acrylics? We just do not have the testing to support this. With isopropyl alcohol, at least we know it completely leaves the paint film early on, and therefore creates patterns without lingering additives being left behind. Experiments and repeating successful applications before incorporating them into your actual artwork is highly suggested!
– Mike
Mike,
Thanks for your quick reply! Does IPA create cells as well or only the webbing in the paint ?
Would you put it in all colours used or just pick some out ?
If I see the result some pro’s have I ask myself if this can be achieve in one pour. Do you have any experience in ‘multilayer’ pouring ? If so how does that go ?
Thx
The range of patterns with the alcohol allow for cells to form. I just posted a link for a density chart which should help to offer a bit more control for colors patterning.
Thank you so much for this college crash course in acrylic pouring. Per your reference listing of paints, are the paints with a lower specific gravity the ones that form the nicest large cells when using alcohol and layering?
Thank you in advance.
Joyce
You are most welcome Joyce.
The use of the pigment density chart is to create contrasts of both the pigment density of paints used. For example, a low density pigment like Diarylide Yellow mixed with some isopropyl alcohol and GAC 800 will naturally want to rise out and push open a higher density pigment such as Titanium White. As the white opens up to allow the alcohol to escape, the yellow is revealed. As this happens, you’ll see many You Tube artists tilting the paintings to stretch the cells open even more.
– Mike
IF you want to use an oil type product to produce cells and take your chances, silicone is the best choice, IMO. Mineral oils do not have the same effects and I would trust any drying oils way less than either silicone and/or dimethicone.
NOTE: We recently published a list of our pigment densities. It should prove very handy for artists who pour: Here’s the Article.
Very handy. Thanks a lot! Is this top science or could I also determine this as well for all the paints and brands I have lying around my studio ? Is their a DIY method ?
You are most welcome Peter.
As far as I know, the isopropyl alcohol additions should work with various products, although I can only directly speak to the materials I have tried. The mixtures need to be thin enough to flow and move and in turn allow the alcohol to rise and spread the paint into the patterns. Start with small 1 ounce mixtures and keep track of the general percentages of each component. Also, try using a couple of paints with different pigments. In other words, don’t use paints that all have Titanium White in them, but some organics and inorganics, with tinted white paints.
– Mike
Mike,
Great article, thanks much! I was curious as to how I may keep the vibrancy of the colors while pouring. I had an amazing piece (5 or 6 colors) that looked amazing…until it dried. This left the piece looking very dark, grim, and muddy. It still looks neat, but I was curious if there is something I could be doing to keep that color popping and the colors from blending so much.. rather than darken/muddy? Thanks again!! Cheers.
Hello Michael,
You’re welcome for the information. There are a couple of things I believe you are referring to which I can help with. The best approach for me is to add just enough isopropyl alcohol to achieve the effect and then leave the paint film. If there is a lot of alcohol added it looks amazing when wet and moving but the mixture is so thin that the paints keep moving and blending which contributes to the muddiness.
Another key factor is that there is considerable color shift from wet to dry. The wet acrylic binder is milky and the colors tend to be tinted as if white was added. As the acrylic dries and clears, the colors can return to become much darker. Over a white and black stripe, pour a little of the mixture and let it dry. This will tell you what to expect. Try using more opaque colors and even a little Titanium White to improve opacity as needed.
I hope that helps!
– Mike
There is a sweet spot for dirty pours regarding paint consistency. Too thin, colors blend, too thick, virtually no blending at all, and very small cells whatever method is being used. Brilliant pours CAN be done. You just have to find that sweet spot. And, as Mike says, add a bit of white to the more transparent colors. It will help a LOT.
Thank you for all the great information! I love the colors in the last image, specifically on the right side, the turquois with the red and rust over the top. Could you tell me what paints were used to make the image?
Also the pigment densities list is very helpful but missing some colors, specifically turquois (phthalo), bronze, and sepia. I know these are multiple pigments, and I’m wondering how to predict the density of these colors.
Hello Victoria, you are most welcome!
Colors used in Image 3’s pour would be: Quin Burnt Orange, Teal, Phthalo Blue, Napthol Red Dark, Hansa Yellow Light and Phthalo Green Blue Yellow Shade.
The pigment density list is about the individual pigments not the actual paints. The paint density delves into trade secrecy information. However, for paints that are mixtures I would use the main pigment’s density as the one to test around. For example the Teal is comprised of Titanium White, Phthalo Blue and Phthalo Green with Titanium White being the main color used it seems to also be the main contributor to the patterning.
I have taken my Golden liquid acrylics and marked their density number with a sharpie on the lid. That really helps me when I’m choosing my colors. Just a trick to make it easier!!
Hello Shelly. That’s a great idea and should make it easier when you are mixing products!
– Mike
Hi Michael. Thank you for this excellent article!
What would you recommend as an archival way of varnishing poured acrylic while minimizing brushstrokes?
Right now, I’m using gamvar, which is archival and clear, but the surface film remains quite delicate and vulnerable to damage (ferrotyping, dents, etc.) when the art is stored or shipped.
Hi Kirsten,
You are very welcome! Spraying the varnish is the best way to apply and not have brush strokes or trapped bubbles. If your artwork is under 3’x3′ you can use the GOLDEN Archival Spray Varnish. Apply one or more coats until you achieve a uniform surface. contact us if you have any questions at [email protected]. – Mike
Hi , thanks for the awesome article , it’s very informative and found it very useful . I recently started painting with high flow acrylics and attempting to do fluid painting – at the moment I just use acrylic paint, high flow acrylics and a pouring medium – I get cells but not too many .
Just wondering if to add alcohol to all colours or just 1 or 2?
Thank you !
Hi Romy,
You are welcome! You don’t have to mix the alcohol into every color, but it might help as you are learning. If you don’t get enough cells after you pour the mixtures out, use a palette knife to nudge the product a bit, and fold a color over another and see if that helps to encourage the pattern. – Mike
Ok So I’ve done pouring but want to try the alcohol step. I understand the mixing but do I add this mixture “as a pour” or do I do it such as like droplets onto the already poured painting?
I have had the most success from mixing the alcohol with the paints, not onto the surface. I have seen spraying onto the surface create some interesting effects but the best cell patterns have come from mixing with the paint. – Mike
Hi Michael,
There is a lot of activity on YOUTUBE mixing a few drops of Silicone Oil into Fluid Acrylics, then heating the surface with a Culinary Torch to create ‘cells’. I’m thinking that this has got to be toxic! Any thoughts on health impact. Not much of any info online. I’m teaching a course on Acrylic Pours and I know there will be interest from the students because of the popularity of this approach on social media.
Thanks in advance,
Tina
Hello Tina,
Thank you for you comments. Although silicone is used with high temperatures in baking (think of silicone impregnated parchment papers, for example) the heat could in fact be causing outgassing of the acrylic resins and paint additives, and these materials are not FDA approved. In most of the videos, the torch is used to coax out the silicone to create patterns, but artists should be taking the proper precautions when trying applications like this. Good ventilation, organic vapor respirators and use of personal protective gear is highly encouraged. – Mike Townsend
Is the ventilation / respirator necessary if one is not torching (i.e., using pouring medium, silicone, maybe alcohol), but hot heating)? And I guess–if the rest is safe–then if one did want to torch, the precautions would apply not only during, but for some length of time thereafter; any idea how long? (Please let me know if I should address my question directly to Golden.) Thank you! (Sorry if this is duplicate; I got error message re the Captcha code.)
Hello Grace.
For larger works, it’s always a good idea to think about ventilation. Air exchange can be as simple as leaving interior doors to the studio open, or using box fans exhausting out of a window. Acrylic gives off ammonia which should be limited. Isopropyl alcohol is not great to inhale in large amounts either. I do not know any concerns of silicone as it escapes a paint film but there are many forms of silicone oils and solvents, so check with the kind you are working with, such as dimethicone. Torching acrylics and other painting products come with a lot of unknowns. Being plastic, if they are heated excessively they will begin to give off toxic fumes.
– Mike Townsend
Hi, I am a visual artist and I REALLY want to attempt this. Do you put the acrylic down first or put the alcohol first.
Hi Renee,
Thank you for your questions. Please read the article in detail to understand how I have been successful. Each artist needs to experiment to discover the techniques and product mixtures that work best for their needs. – Mike Townsend
Hello Michael
Just wanted to say thank you for such an informative article and your attentiveness to answering questions and comments. I have not yet taken the leap into pours but I have been fascinated watching the process and have been relishing the day I begin to commit to the many ideas swirling in my head.
You are most welcome Carmela. The best approach is to just get some small test surfaces, paints and mediums and give it a try. Take notes on what works and what doesn’t. Let us know if you have any questions.
Mike
I have also learned that I can thin down titanium white with floetrol and rubbing alcohol…you can add alcohol ink white snow to the mix for better effects.. Really thin spread over painting with a tounge depressor and spread it out. It laces nice over problem areas
Hi Shelly,
Thanks for your comments.
I have not tried mixing alcohol inks with the acrylic products, but it’s worth trying out and see what happens in a couple of experiments!
– Mike
Love the advice. Have you ever tried pouring onto rusty metal versus a canvas or panel? Just curious.
Thanks,
Mike
Hi Mike,
I have not tried pours on a rusty metal surface, but you might want to seal the rusty surface with a clear primer/sealer so that it doesn’t change when you apply waterborne products over it. Unless of course you want to encourage the rust to migrate into the wet layers.
– Mike
Is it possible to do this technique on a ceramic tile?
Hi Kelly,
Thanks for your question. There are commercially available “bonding primers” designed for use on tile and glass. XIM is one brand of such products. Just be sure the primer is suitable for “latex based paints” and it should also work for acrylic paints and mediums.
– Mike
Thanks for your insight Mr. Towsend…
Could you please tell us exactly how were the paints poured into the substrate to get that beautiful effect in image #2 ?
Thanks in advance,
Romano
Hello Romano,
Thank you for your comments and question. Image #2 is made using a mixture of GAC 800 and GOLDEN Fluid Acrylics, approximately at a 10 parts GAC 800 to 1 part paint ratio. Mix them together and allow them to sit in a sealed container overnight so that the air bubbles generated during mixing are able to rise up and pop. Then you can use them as desired. This image is made by pouring several colors in one location, until you create a bullseye series of rings. The pour may then be manipulated by slowly running a skinny stick or similar stylus through the rings.
– Mike
Hi Michael!
Thank you so much for posting this, it’s been incredibly helpful! Lately my colors have been getting supper muddled when I pour them, as in the colors become too mixed together and extremely dull when they dry, which leaves me with a really unappealing end product. I use pouring medium and a single cup for all my colors when I pour, but I’m not sure why the colors are turning out so poorly! Do you have any ideas? Thank you so much!
Hi Sarah!
You are welcome for the information. Without knowing the colors you are using and the paint line, it’s hard to say for certain what is causing the muddiness, but perhaps you might want to stick to an analogous set of colors (such as yellow, orange, red) and do not overmix the colors in the cup before you pour. The dull surface could be from the kinds of paints used. Pouring mediums tend to be glossy, so perhaps add less paint or switch to paints that do not have matting additives. GOLDEN Fluid Acrylics with GAC 800 should dry in the gloss to semigloss range.
– Mike
Outstanding article, and incredible patience to answer everyone’s questions and address each comment, thank you Michael! I definitely fall into the, “spent many frustrating nights in their studio figuring out the best application method that provides the desired results” category…I thought I nailed it, just last night. Gorgeous crisp separation, rich vibrancy, beautiful cell formation,-only to wake up to a muddy uninteresting mess this morning. (Level surface, tight canvas. PVA with water, paint, and added silicone.) Rats. Weeks now, after gathering a culmination of techniques and experimenting with a slew of different pouring mediums, paints, surfaces, ratios, and ‘cell coaxers’ I’m going to get it right eventually. Fine tune variables.Thank you for letting us know that silicones in pours may not stand the test of time-it didn’t occur to me until you explained why. Now I’m going to try isopropyl alcohol and get ‘sciency’ with specific gravities/densities of paints and see what results I can get. I appreciate all of the tips, and trouble shooting. Back to the lab, Erica.
Great to hear the information was useful, Erica!
– Mike
What formula do you use with fluid acrylics (you gave a formula for high flow, GAC 800 and isopropyl alcohol). Is it the same formula?
Hello Pat,
Yes, you can interchange the High FLow Acrylics and Fluid Acrylics as needed. Fluids and GAC 800 result in a thicker pour which seems to have more control. The thinner the pour the more dynamic the cell patterns can be, but they need to also be applied thinly or they will keep changing and morphing past what you wanted (or at least where you stopped with pouring and manipulation).
– Mike
Thank you Michael!
Thank you so much for this wonderful article. I’d just like to double-check my understanding of the recipe using fluid acrylics + GAC 800 + alcohol. Is it really the same ratio as for the high flow acrylics? That is, 2 parts GAC 800, to 1 part Fluid Acrylic paint, to 1 part 70% alcohol? I’m just hesitant, because when not adding alcohol, the ratio is 10 parts GAC 800 to 1 part Fluid Acrylics. Also, I’m weighing things (e.g., 20g GAC 800 + 10g Fluid Acrylic paint + 10g alcohol). It seems way more runny than expected. Do you have any input on that? How much alcohol is really needed to create cells? Thanks!
Hello Lee.
Thank you for your kind words and your questions. The starting ratio I currently prefer to use is 10 parts (not 2 parts) GAC 800, then 1 part GOLDEN Fluid Acrylics or High Flow Acrylics, and 1 part 91% isopropyl alcohol. I think your mixture would be much to thin for my taste, and sounds like that’s true for you also. By the way, you can also wait until the end of the pouring process and mist on droplets of alcohol instead of actually mixing them in with the paints.
– Mike Townsend
Hello Lee.
Thank you for your kind words and questions. The starting recipe should be more in line with 10:1:1, not 2:1:1. You can also leave out the alcohol in the paint mixture and spritz some on towards the end of the process.
– Mike Townsend
Thank you so much for the clarification! 10:1 (GAC 800 : Fluid Acrylics) makes much more sense, and I had no idea that you could just spritz the alcohol on without mixing it in.
when i leave paints overnight in pour method number 2, do i pour all paints used one after another into container and let sit overnight? or do i put each paint used into separate containers and let sit overnight, then pour each after the other into a bigger container when i get ready to use? Also, if separate containers, do i stir paints once to mix them before pouring?
Hello Marilyn,
Thank you for your questions. The GAC 800 and individual Fluid Color mixtures can be mixed and stored for quite some time. If you are mixing together in a cup to do a “dirty pour” application, I would suggest doing that just prior to the application. It seems as if the colors would mix together in the cup and cause muddiness.
– Mike
Great article! After reading your article and a lot of trial and error, I started trying these techniques on vinyl records. I wrote a blog post about it here: http://www.redideostudio.com/abstract-paintings-vinyl-records/
Thanks for letting us know you enjoyed the article. Let us know if you have any questions!
– Mike
Thank you for sharing the recipe. I tried wth 10 parts GAC800 and 1 part heavy body acrylics with 91% alcohol but there were no cells. can anyone suggestplease.
What colors did you use and how did you apply them?
– Mike
I used Windsor and Newton galleria paints from the tube mixed with 10 parts GAC 800 and alcohol. No luck with cells when poured over.
Thank you for your very interesting information. I haven’t tried any of the techniques yet just reading about them first for more info but wondered if I could use Floetrol in place of the GAC800?
Hello Juanita,
Thank you for your question. Floetrol is a commercial housepaint additive by Flood. Additives are different than paint mediums as they do not contain any binder. If you use a large percentage of Floetrol you will create a slow drying, weak paint layer. Floetrol contains retarders, flow improvers, surfactants and other paint additives designed to allow the paint to be more easily sprayed, or flow and level better for brush and roller application. Adding GAC 800 extends the paints and helps reduce crazing when doing pours of paints as described in the above article.
– Mike
Hi MIchael,
I have a question about adding water to acrylics to thin them. Is this ok to do for all acrylics? I notice that some brands say “suitable to add water to” & some say “water resistant”. I have purchased some new paints & added water to them, they seem to have lots of air bubbles – so banged the cups a bit & let them sit for a while. The bubbles don’t seem to be going away. I then noticed that the bottles said ‘water resistant’ – would this be why I have the bubbles? If not, what is your best suggestion for avoiding or getting rid of pesky air bubbles before you pour the paint?
Thank you,
Mel
Hello Melissa,
Thank you for your questions. Most waterborne products are going to be “suitable for adding water to” unless adding water means it will hinder the performance of the product. Water is the solvent for the acrylic based paints and mediums, and with any GOLDEN waterbased products, adding water is often done to thin the paints down or to replace water that is being lost during evaporation.
“Water resistant” does not mean you cannot add water. Water resistance is a term used to describe the dried film and it’s durability. For example, GOLDEN Fluid Acrylics are water and chemical resistant and should not reactivate or become instable when water is wiped onto the surface. QoR Modern Watercolors are not water resistant, they are water sensitive. Water readily reactivates a dried watercolor paint layer.
Bubbles usually develop when mixing products together or adding water. In thinner, pourable products, bubbles that are in the mixture will come out given enough time in a sealed container. Some bubbles are going to develop while you are applying the product. These are the tricky bubbles and if you don’t pop them while the paint layer is still very wet, the bubbles will be either trapped in the drying paint layer or pop as the paint layer is skinning over and they result in a pinhole or slight crater. Have a toothpick or similar stylus handy and try to locate and pop bubbles as they rise to the surface.
– Mike
thank you for all the valuable information!
You are very welcome, Yvonne!
– Mike
Hi, I used silicone in some of my paintings, I’m new to fluid painting so I didn’t know that that was probably a bad idea, and my paintings are dry but the surface is VERY oily. The paint won’t come off, but it’s very oily. And I’m afraid to varnish it because of that. Is there anyway I can safely dry that oil without ruining my painting and varnishing process?
Hello Skye,
Thank you so much for commenting. This is the very reason for concern when using silicone oils and other non-evaporative additives mixed into paints. Because of the relative newness of this painting technique, we do know if the oils will continue to remain inside the paint film, or if through the coalescing process, they will be “squeezed out”. This process can take several months with just standard acrylics, but with silicone oil who knows? The only material I know that is compatible with silicone oil is called silicone fluid, which is the solvent for silicones. It MAY be able to be used to remove the silicone. You might want to try wiping the surface with a clean dry tack cloth every so often, essentially buffing the silicone while (hopefully) removing some, and forget a topcoat or varnish until you can test a system that you know will work.
– Mike
Hi Michael. Not all the colours are listed on the density chart. Is it possible to get the specific density for the colours not listed?
Hi Pat,
The Density List is for the pigments that are used in our paints. Many of our paints have a single pigment used but others are blends, such as our Historical Color Hues. We do not provide the density for mixtures, at least at this time we do not.
– Mike
Hi Mike! Thank you so much for this article!
How much alcohol is needed, how many percent?
You are welcome Carola.
If you are mixing the isopropyl alcohol in with the paints try to limit your additions to 10%. If you use “91% strength alcohol” you don’t need to add as much.
– Mike
Two questions:
1. What is emulsion paint? Where in the states can I buy it?
2. Can I pour OVER another fluid art painted canvas that I don’t like?
Thank you
Hello Brenda, thanks for the questions.
1) “Emulsion” refers to mixing two ingredients together that normally don’t mix well together. Examples are oil and water, or mixing oil with egg to create mayonnaise. It is often used incorrectly in the paint world. For acrylics, we use acrylic “dispersions”, which means the acrylic polymer strands are dispersed into water. GAC 100, Matte Medium, and Gloss Medium are all examples of acrylic dispersions. Any artist supply store should carry a range of these products.
2) As long as the underlying paint layer is allowed to fully dry and the products you mixed together are not water sensitive you should be able to do multiple layers of pours. Be wary if you used PVA (Elmer’s Glue All), craft or cheap interior housepaint, as these are prime examples of water sensitive products.
– Mike
Thank you for this article!
I am wondering if its possible to do Tempera pours?
Hello Angelica,
You are most welcome for the information. Tempera paints by their nature have very little binder, so they might be able to be used to make the color but adding acrylic medium like the GAC 800 is necessary to create a strong paint layer.
– Mike
Hi Mike. Thanks for such a wonderful & informative article. I love the Golden products & have used many paints across your ranges & gels & mediums.
I am situated in Australia & we have challenges here getting the alcohol in the suggested %. I managed to get 99.8% isopropyl alcohol. Would this be okay to use in the acrylic pours in place of silicone or oils to create the great cells which appears to be the holey grail!
Hello Kym. Thank you for your comments! I would believe the 99.8% alcohol would work, but if for some reason it does not, adding water is essentially how they create the 91% and 70% versions.
– Mike
Is there anyway to keep the poured paint from changing so dramatically as it drys?
Thank you.
Jeanne
Hello Jeanne,
Great question. The paint mixtures will undergo several types of changes from wet to dry. If GAC 800 and Fluid Acrylics are used the film will shrink but the changes are less noticeable. Other kinds of paint mixtures — where paints with a lot of water, alcohol, fillers and different kinds of binders are used — are more likly to craze or crack, and move from gloss to matte or an uneven sheen.
In terms of color shift (from wet to dry) the milkiness of the acrylic medium clears up and deepens the final color. I like to mix the paints and swatch the colors on the lid so I can anticipate the dry color. However, you can also add a little Titanium White or Zinc White into the mixture which will help reduce the amount of color change.
– Mike
Great article, Michael! Thank you so much! I am very new to acrylic pouring. I have two questions. First, what if I do not want cell but instead want a marbled effect? Second I have two with washi tape. I would like to pour over it and then remove the tape. At what point in the drying stage should I remove the tape? Thank you in advance for answering the questions!
Thank you Angela!
You should be able to achieve a marbled effect by using the GAC 800 and Fluid Acrylics. Mix several colors, let sit to allow the bubbles to rise and pop, then pour in bullseye circles as desired. Next, use a toothpick or other thin stylus to manipulate the paints into the patterns. The paint can be allowed to flow over the edges a bit with gentle tilting. Place the painting on a raised level surface and allow to dry.
For the works with tape, do the pours as desired and level the panels off as described earlier. Allow the paints 10 minutes or so to level and then carefully remove the tape. As long as the poured paints are not overly thick, and the surface is completely level, the paints should stay put and not want to creep into the unpainted sections. You may need to try several kinds of surfaces as rough or absorbent textures will likely allow the paint to move into the previously taped sections.
– Mike
Thank you SO much for the advice. I’m super excited now that I know the taping is a possibility! What a wonderful resource you are 😁
Have you had success with the tape?
I’m thinking you could follow the removal with a fine line of solid color paint to hold the poured paint in place, but it’s just an idea that I haven’t tried.
I’d love to hear back!
I know that when I have used masking tape with pours containing alcohol or silicone that they attack the adhesives, so if you use tape, be sure to remove the tape after the pour is level and before it has a chance to skin over. With the GAC 800/Fluid mixtures, the thinner pours should stay put for the most part. – Mike Townsend
Michael
I have a question about remixing my paints with water and medium and then sealing them in a plastic airtight container. It would really help with mixing times and allow for some free styling work as I am pouring. I realize I would need to check the consistency and mix them again before I paint but being able to shake them up is so easy. I know I would need to let them rest to remove air bubbles. Again this allows me to premix and that saves so much time.
Would it work?
Hi Sherry.
Thanks for your questions. As long as the mixtures are allowed to sit overnight before you use them, shaking to blend the mixture is acceptable.
– Mike
Thanks Mike. How long can I store my paint premixed with water and medium?
Very helpful article with great information. Question, is there any colors you wouldnt recommend using that would cause the muddy look? Is there any time of scheme or color choices that would work better with this technique?
Hello Stephanie.
Thank you for your kind words and questions.
If you review this article about color https://justpaint.org/defining-warm-and-cool-colors-its-all-relative/ I think you’ll get a better sense of how to choose colors that will work well together. For example, if you use a bluish red like Quin Magenta with reddish blues, violets and purples, any mixing that occurs while pouring are going to remain clean and vibrant. A yellowish red will result in muddier mixing.
Overall, if you stick with organic pigments like Hansa, Quinacridone, Phthalo, Diox, they have similar enough density that they will behave very similarly. Of course, using some Titanium White with them will change how they behave, and that can be a good thing if you want to create contrast or cell patterns.
Mike,
Thanks for the article. Have you ever tried pouring on any other surfaces, other than canvas (wood, metal,plastic)?
Thanks,
Mike
Helli just found this technique and would live to give it a try. I am not sure about some of the verbiage used such as the different types of acrylics! The only acrylics I have are the regular acrylic paints you use for painting on like wood etc you know the stuff you can get from any craft store. Can you explain what the differance s are?
Also can denatured alcohol be used in anyway?
I appologize for being such a beginner as to not even know this info. Anything you can share woukd.be greatly appreciated.
Thank for your time,
Tam
Hello Tamara,
Thank you for your questions. Craft paints have been used for pouring techniques but they can behave much differently than the GAC 800 and GOLDEN Fluid/High FLow Acrylics. Experiment and see how they do for you. Denatured alcohol is very different than Isopropyl alcohol, so that too would be something to test (with caution). You should be able to locate isopropyl (rubbing) alcohol in most every drug store or grocery store.
– Mike
Dear Michael,
Thank you for this article as it completely answered my questions. However reading through all of the comments has me very confused again! So just to recap~ I have invested in both Golden Fluid Acrylics and High Flow Acrylics and GAC 800. Adding 91% Alcohol to the paint & GAC mixture will give me cells. I am priming a 10 x 10 canvas with gloss medium to seal. Can you share the Paint:GAC 800: alcohol ratio please.
I primarily work with watercolors, pen and ink and dabble in printmaking. I’m out of my league here but it’s been requested by my brother so I’m ready to give it a try.
Thank you for any help; I’m swimming in a sea of confusion surrounded by Flotral, WD-40, silicone etc??? Help! Thanks so much!
Peace ~ Patty
Patty,
It certainly is very confusing, as there are so many methods and products being shown and talked about online. We are all for artists experimenting but it’s important to realize the ramifications of adding materials that were never intended to be used to create long-lasting paintings and artwork.
– Mike
Absolutely love the concept. Especially using the alcohol. I paint with all mediums and incorporate a multitude of mediums in a painting at times. Water colors with oils, acrylics, pen and ink, eye shadow, etc. I’ve used different items for different effects-feathers, leaf tips, grass, hair {different types too}, string, etc. Another word, I like different just as much as I like Ansel Adams photography, or the pig running along the dock and flying through the air to jump in the lake, and Norman Rockwell. Deinitely going to give the “alcoholic acrylic” a go round. lol Thanks for a great article. ~D~
Thank you for this article! Planning on a dirty pour with high flow Golden, GAC 800, and alcohol. What would you recommend to seal the work once it is done?
Hi Julie,
Thank you for your kind words and questions. You can apply any of our varnish products over the pours once you allow sufficient time for them to dry. I would suggest at least a week or so being that these are relatively thick paint layers. Here’s a link to our varnish section: http://www.goldenpaints.com/products/varnish-top-coat.
– Mike
Hi,
I have a question. When using high flow acrylics, do they have to be mixed with pouring medium or can they be used by themselves to create the same effects?
Also, for the finish a spray varnish will work?
Thanks
Michelle
Hello, Michelle.
Thank you for your questions.
The High Flow Acrylics can be used by themselves to do pouring applications. The drawback is often the big changes the paint layers will go through while wet and until they are mostly dry. Thinner paints allow for much more movement. In the end, if you are pleased with the results of using the paints without additional mediums, then you are using them correctly!
Yes, you can use a spray varnish such as the GOLDEN Archival Varnish over acrylic paint layers after they are sufficiently dry.
– Mike Townsend
Dear Michael, thank you very much for the very informative article and all your answers to the questions. I have a question of my own, regarding the pigment densities: I like to prepare my paints from dry pigments myself. So I thought that I can just weigh the pigments – Also, Sennelier for instance gives the weight of the 200 ml of pigments in their containers right on the label. This seemed very simple and straightforward. However, the results seem not to correspond with the GOLDEN table of densities. I can `t really understand this; the pigments all seem to have about the same fine grain, so that would not seem the explanation for the discrepancies. Is there anything you can say about this? Thank you beforehand for any information to this!!
Hello Jan,
Thank you for your comments and appreciation for the article.
Pigment density is based upon weight and volume. When we measure paint density in quality control, we use a small metal container that is zeroed out (tared) before filled, making sure there aren’t any air pockets left inside the container. Dry pigments do come in a wide variety of particle sizes and under magnification, you can see some are uniform and very small, others are very large and irregular with many pigments falling somewhere between the two extremes.
Think of it this way: if you try and fill the 200ml container with grains of sand, you will have gaps between the particles and the sand particles are relatively heavy. If you filled the same 200ml container with tiny styrofoam balls the styrofoam balls would read as less dense as compared to the sand particles.
Unless you are able to use a high-powered microscope you are not able to discern the pigment particle size.
– Mike Townsend
Dear Mike, OK – that makes sense – thank you very much!
As I was thinking about this some more, I realised that the different pigments “melt” to different degrees, when you start mixing them with fluid. (I.e. for some pigments you need 4 spoons to get 15 ml. of paste, with others only three, etc.). so that must be due to different particle sizes / forms, as you said.
However, I would still like to be able to measure the density of the particular pigment I am using to make my paint, so that I know the density of the actual stuff I have in front of me. I am not sure yet, how I can do that, and since I am planning some “liquid” projects, this would be important to me. .
Therefore, one more question: Do you measure the density of 1) the dry pigments (i.e. do you compress them into the measuring container, so that all the air is out), or do you 2) mix the dry pigments with some standard amount of liquid to get the air out?
This is probably laboratory high-tech, but both methods would get reliable results, I think.
I could maybe apply some approximation of the second method myself, without wasting pigments.
And if I know how you do it, I would have comparable results – I do use ready-to-use Golden paints also.
What do you think? Can you give me some more data about how this is done?
Hello again Jan,
Here’s a link to Cole Palmer who sells Density Cups. https://www.coleparmer.com/p/specific-gravity-cups/47902 There are various ones available but we use one that is tared, then filled with wet product, and weighed. You can also calculate the pigment you have via displacement, as seen in this video: https://www.youtube.com/watch?v=yGnNE-MWDV4. There are many resources online that show other methods as well.
– Mike Townsend
Great! Thanks – completely answered, Mike!!! Thank you very much. Jan
You are most welcome, Jan.
– Mike Townsend
I recently came across this video that compares how various acrylic mediums age. I use GAC800 almost exclusively in my fluid art and I was taken aback by the yellowing of it over 10 years in this video. Is this an accurate depiction of what I can expect I n the white parts f my paintings as they age? I mix GAC800 approximately 10 to 1 with Golden Fluids for pouring. Thank you in advance.
https://youtu.be/jaOcC565bL0
Hello, Demitria.
There are many factors that go into mediums changing over time. GAC 800 is known to be slightly hazy and yellow, which is why we suggest using it only when mixed with paints. The 10:1 ratios with Titanium White and other colors should do well as they age, however, and the yellowing noted in a 10 year old pour of GAC 800 (in the referenced video) appears to be in the expected change upon drying. Therefore, we believe this change happened relatively soon after curing and hasn’t changed much over the years. We believe at the 10% paint addition that the discoloration is hidden and should retain the look you currently have, That said, we always look to improve our knowledge on these matters and are gearing up for a new round of accelerated ageing using our QUV Weatherometer and Xenon Arc chamber. I have already cast pours of neat GAC 800, and mixtures with a range of paint additions from 10:1 to 10:7 (GAC to Fluid Titanium White and Carbon Black) to be used for this testing. These tests take several months to complete and then evaluate the results. I would also suggest reading an older article about the Acrylic “Patina” which takes on these changes with a realistic expectation: https://justpaint.org/defining-the-acrylic-patina/
– Mike
Thank you so very much, Michael. In addition to the superior quality of Golden’s acrylic paints, mediums and additives, the customer service you provide is just excellent and much appreciated.
There may be issues getting GAC 800 where I am so am looking at alternatives for pouring. What would be the recommended composition of Polymer Medium (Gloss) : paint : water?
Hello, Sharm.
The GAC 800 is unique, and trying to achieve similar results with other acrylic mediums such as Polymer Medium Gloss – a.k.a. Gloss Medium – tend to also cause issues such as crazing. Adding water helps to thin the products, and creates thinner, faster drying pours. Using other mediums with or without water in heavy handed pours is not suggested, so keep the individual layers thin to minimize issues.
– Mike
Just a note: silicones are not oils. Oils of whatever kind are lipids, silicones are siloxanes. Very different in the ways they interact with acrylics.
Thanks for the corrections, Bryan.
– Mike
Hola, paso a comentarles que vengo desde hace tiempo intentando hacer celulas con poco éxito, las que logros son muy pequeñas y debiles, he utilizado como medio la mezcla de cola vinilica y agua, y aceite lubricante. Comienzo a desanimarme por los malos resultados ya que no generan celulas, sino un efecto marmolado , con mucha amabilidad de su parte, quisieran que me digan especificamente que medio utilizar para lograr celulas de tamaño grande , asi también que colores poder combinar, ya que no entiendo bien el tema de las densidades, quisiera que me proporcionen en los posible 3 tipos de colores para comprar y tambien creo buena idea cambiar el aceite por alcohol, en que proporcion se colocaria. Muchas gracias.
Hola Fabian,
Gracias por las preguntas.
Your text translated to English:
My response:
Mi respuesta:
Es difícil para nosotros ayudarlo con pegamento PVA, agua y pinturas y aditivos desconocidos, ya que no son productos GOLDEN. Sin embargo, para lograr las celdas, las mezclas de pintura requieren un adelgazamiento adecuado en mezclas fluidas de pintura líquida. El alcohol también requerirá este adelgazamiento. La densidad del pigmento es importante para saber qué colores desean extenderse y producir células y qué colores mantendrán la forma de la célula desarrollada. GOLDEN GAC 800 y GOLDEN Fluid Acrylics (10: 1) con 10% de alcohol es un buen comienzo sin la necesidad de aceite de silicona. Si usa aceite, debe agregarse mínimamente, ya que no se seca y puede causar problemas más adelante para la pintura.
– Mike Townsend
Is it necessary to strain or sieve the paints first and why?
I’m confused by this and it just seems a lot of trouble?
Thank you
Julia
Hello, Julia.
Thank you for your questions. With the GOLDEN products there should not be a need to strain the paint. However, as products are used there can be a tendency for it to dry along the inner walls of the container, and then they drop into the wet paint. If this becomes a problem, then straining the mixtures is a good idea to achieve smooth applications. However, if the paint is smooth and no dried specks or globs are detected, then there is no need for straining to the best of my knowledge.
– Mike
I am wondering what you all use as the base I’ve read here canvases what type please
Would love to attempt this
Hi Deb,
You can use most artist gessos that are intended for acrylic painting. Also, realize that some are going to be more textural, toothy, and absorbent than others. These differences can impact the way the poured paint behaves going over it and later how the dried paint looks.
– Mike Townsend
With regard to substrates to use, would a sealed wood panel work? I’ve been toying with the idea of doing this to make a coffee table sealed with a good coat of resin. I figure the substrate needs to. E very sturdy. I’m not an artist by any means and have a steep learning curve.
Hello, Anna Kim.
Thank you for your questions. Wooden objects can be prepped with commercial wood primers to seal them and prepare them for the actual paint applications. Brands such as Sherwin Williams, Rustoleum, Valspar, Ben Moore, etc. All have primers that can be used. The key is to make sure that the primer is 1) meant for functional wooden furniture and 2) intended to be painted with “latex” housepaints (Which are usually acrylic and vinyl-based products).
– Mike Townsend
Gracias por la anterior respuesta, ya se como conseguir los productor Golden, ahora necesito que me digas cuales colores debo comprar para lograr el efecto celdas o celulas. Son los colores de alta o baja densidad los mas adecuado para esta tecnica ? o debo combinar ambos? Tengo entendido que el blanco titanium debe predominar en mayor proporcion en la mezcla, es esto cierto , no quedaran demasiado desaturados los colores ?? gracias.
I’ve just bought some Dimethicone after reading the downsides of using Silicone. Right beside it on the shelf was Cyclomethicone, described as 100% active silicone polymer. It’s described as useful in hair & beauty products, and as a paint additive. It’s silicone based, doesn’t feel greasy.
!. Can you enlighten me on the differences between Silicone, Dimethicone, and Cyclomethicone for pouring and creating cells? I’ve viewed tons of Youtube pouring videos and no one has ever mentioned cyclomethicone.
2. What exactly does Cyclo do for paint as an additive?
3. Can Cyclo be used as an acrylic paint extender and/or increase the open working time of acrylics and still dry without an oily residue?
Thanks in advance!
Hello, Ellie.
Thank you for your questions. There’s plenty of investigative work to be done here so I cannot say exactly what works for creating cell patterns better or worse when it comes to silicones and their use, but it is important to state that there are many types of silicones that are produced for a variety of applications.
Dimethicone is, in fact, a silicone. It is a non-volatile type, meaning that it doesn’t evaporate over time. It can rise to the surface of the paint, and it may stay within the paint film long afterward. We don’t know if this poses short-term or long-term issues. Cyclomethicone is a volatile silicone, and some evaporate faster than others. These types of products are what we find in beauty and healthcare products and they are often blended together and with other ingredients. That’s part of the problem with using household and commercial products; you don’t know what all of the other ingredients are going to do to your paint, much less the silicones.
I’m not sure if all of this helps you out with your questions but hopefully there are answers later as more information and testing is compiled.
– Mike Townsend
If a wrinkle forms during the drying process is there anyway to smooth it out?
Wrinkle was caused by a child touching the surface before completely dry.
Thanks for explaining the alcohol process and for someone to finally put a warning on that and the blow torching
Kim,
Thank you for your kind words and question.
Unfortunately, once acrylic paint films dry, they will want to retain that shape and stay that way. Depending on how textural the wrinkling is, you might want to try applying a clear acrylic medium over the surface, or as a safer approach, apply the Matte Polymer Varnish which helps hide texture compared to a glossy paint layer. Feel free to send us an email and images to help give us a better idea of what you are dealing with, to [email protected]
– Mike Townsend
I have been attempting to use a dirty pour technique with acrylic paints on glass so that I can back light the glass with led lights, but so far the final product has been too opaque for the effect I am after. Do you have any suggestions as to what might be the best formula for achieving this? Thank you
Hello, Jim.
Thank you for your questions.
What brands of paints are you using, and what medium are you using? Ideally, using an artist acrylic paints made from single pigments, would help considerably. Especially organic pigments such as Quinacridone, Phthalo, Hansa, Dioxazine. Using a medium with good clarity is important as well. The medium should be the main ingredient of the mixture, upwards of 90-95% medium to 5-10% paint (or less).
I would suggest doing small scale test batches and pour into mylar or duralar plastic sheets (overhead projector sheets or binder inserts can work as long as they are clear. This should help to dial in the transparency range you are looking for.
– Mike Townsend
This is great man. Thank you for the high level and the specific recipes. I’ve been looking all over and this is what I needed. Thank you!
Thank you, Marc!
– Mike Townsend
Hi Mike.
Thank you for your well-written, informative articles.
I have searched for some article whereby I can work out the densities of all sorts of acrylic paints and brands, but with no luck. Unfortunately, Golden paints and media are not available in South Africa unless I import them, which then makes them prohibitively expensive. I cannot even find an equivalent to Elmers’ Glue All. Most brands are available (just in case you are wondering about my mud hut and the wild animals roaming around!! :).
Seriously though, how do I work out the various densities of other paint brands, so that I can pour them correctly and create beautiful cells. I know that cells don’t necessarily make a painting, but I want to create cells – the bigger the better!
Is there some working formula (not mensa standard, please)!
I’ve read that similar colours have similar densities. For example, Daler Rowney phthalo blue and Americana phthalo blue. Is this correct?
I would think, by simply observing different paint colours, that opaque paints have higher densities than transparent paints. Why do some artists layer opaque and transparent paints alternatively in a cup? What if an opaque and transparent paint create mud?
As is obvious, I am really confused as to how to layer my paints in a cup, and would really, really appreciate your input.
Thank you sincerely,
Joan Ballett
Hello, Joan!
Thank you so much for your questions. Golden products are sold in South Africa, as you can see at our “store finder”, located here: http://www.goldenpaints.com/store_locator
In regard to your other questions, let me try to address each one.
The pigment density list is located here: https://goldenhub.goldenpaints.com/storage/uploads/pigment-density-of-golden-artist-colors.pdf
These densities are for pigments, not paint mixtures. Therefore if you can discover the paint brand pigment information, you should be able to use this list as a guide.
Opacity doesn’t necessarily translate into density. For example, Ultramarine Blue pigment has a density of 2.35, which is heavier than Phthalo Blue’s 1.62. So I would expect UB to sink and PB to rise in a thin liquid pour, even though UB is a fairly transparent pigment.
Muddy colors is often the result of color biases, which was discussed in other Just Paint articles, such as this one about Warm and Cool Colors: https://justpaint.org/defining-warm-and-cool-colors-its-all-relative/
In a dirty pour, where the cup is flipped up on end, I would suggest starting with the densest color, such as Titanium White or colors with a high level of Titanium White, and then add subsequent lower density pigments after than.
I hope all of that helps out. Please let us know if you have any other questions.
– Mike Townsend
Wow, such good information. My question is different.
1) I happen to have a plethora of watercolors from my last artistic endeavor.. like about 25-pounds worth. Is it possible to mix GAC or some other product with watercolors to then be able to use as acrylic pour?
2) Another question, I ‘m interested in doing a mixed media project where the pour method would be a small portion of the project. Do you have any thoughts about that?
I am so looking forward to your answer as I have been collecting my materials and I’m excited to get started.
Hello, Joanna.
Thank you for your questions.
1) I’ve never been a big fan of combining acrylic mediums with watercolor paints. They do not seem to mix evenly, resulting in speckled effects. If you do want to experiment, try several types of pigments and see how they react to being mixed into acrylic medium.
2) If you create pours on poly plastic sheeting (4 mil plastic sheets offically known as polyethylene), you can readily peel them from the plastic once they are dry. This allows you to create several pours and use the ones you like and place them where you want. Some Acrylic Gel such as Soft Gel can be used as the glue.
– Mike Townsend
You have a lot of good information here however, when I did a search for the “pros and cons of silicone in acrylic pouring”, the following link showed up: Understanding the Techniques of Pouring Acrylics | Just Paint
https://www.justpaint.org/understanding-the-techniques-of-pouring-acrylics/
Aug 15, 2016 – Acrylic pours are relatively slow drying paint layers and dust can easily become imbedded into the film. …. At this point in time we do not endorse the use of silicone oil in painting mixtures that are expected to last. There are …… If I see the result some pro’s have I ask myself if this can be achieve in one pour.
So I clicked on it only to find nothing in the article about silicone. I did a search on your site also and still could find nothing about the pros and cons of adding silicone. I don’t currently use silicone and I’d like to know why some people avoid it. Is there an article that will tell me this?
Hello, Pegatha.
It’s possible these excerpts are among the many responses in this comment section. I’ve provided several responses that discuss why we are concerned that adding silicone oils to paint mixtures are of concern to us. The biggest one is that it’s a non-evaporating oil, so it remains within or on the surface of the paint layer. There have been no studies to understand if this is a problem or how much can be safely added (if there isn’t an issue).
Hi, would ethanol work instead of isopropanol ? What are the different products you tried that work ?
I saw someone use dishwashing soap and obtain some cells. Would the soap become a problem after drying ?
Hello, M.G.
Thank you for your questions.
I would not suggest using ethanol, as it doesn’t seem to create the same cells as isopropyl. Dishwashing soap has sudsing agents and often other additives like perfumes, so if you want to get to just trying the main active ingredient, use the GOLDEN Wetting Agent, which is a concentrated surfactant. We do not suggest using high levels of surfactants as they can quickly overload the mixture, causing tacky surfaces.
– Mike Townsend
Hi Mike,
I recently finished a couple of canvasses and sprayed a coat of gloss finish on them. I was only able to give them about 24hr to dry the gloss coating before having to travel with them in a backpack by plane. I had them facing each other with a piece of parchment paper between them to keep them from sticking together. However, by the time I reached my destination the parchment had been pressed to the faces of the canvass too hard and when separated you could see ‘wrinkle marks’ in the gloss finish in the light. By wrinkle marks, I mean it appears dull or scratched as opposed to a smooth gloss finish. My question is, do you think that spraying another coat of gloss would ‘fill’ in the marks and appear smooth again or are these paintings ruined?
Hello, Neal.
Thank you for your questions. Much of this depends on the type of gloss finish you sprayed onto the surfaces, and not seeing these paintings in person it’s hard for us to know for certain if another coat would even the surface. Some topcoats require some light sanding when there’s too much time between the coats. The GOLDEN Archival Spray Varnish Gloss can be removed but most other spray varnishes cannot be removed without damaging the artwork. You may be able to do some light sanding (very carefully of course) to evenly dull the surface, and then when a fresh gloss coat sprayed, the clarity and evenness SHOULD come back. If you want to delve deeper into this discussion please email (with images of the surfaces if possible and brand name of the gloss product) we can take a closer look and see if there’s a solution with the least amount of risk to the artwork. email [email protected]
– Mike Townsend
Hey Mike
I saw this article months ago and found it very informative, then I came across it again last night with all the additions to current date. It is incredible that you have continued to respond all this time. It is now much more than just informative it is absolutely amazing and I want to thank you for doing this.
Pamela
Hello, Pamela.
Thank you for these kind words. I’m glad there are so many artists who have benefited from this information and hopefully many more will continue doing so!
– Mike Townsend
How could you block out areas and after drying remove to paint in those areas?
I think paper stencils would get too wet, Vinyl paper (self adhesive) any ideas and have you tried this thanks
Hello Kaki.
We are not aware of a stencil that would be easy to remove after applying and allowing thick layers of acrylic paints to dry.
– Mike Townsend
I am very confused as all the info/products mentioned are only available in the USA & I am in the UK! It’s impossible to work out what the equivalent products are called here in the UK. I even bought a book to help me only to find it too was written by someone in the USA so I am no wiser. Every time I search for acryllic pouring supplies on the internet I just get suppliers in the States and only Liquitex comes up as being available here and I don’t know what that is! I watched an article on You Tube where the guy was using Elmers Glue, Floatol then water and Spot On Silicon oil none of which are available in te UK under those brand names. I have acryllic paints so just need the rest of the stuff but I don’t now what to buy. help please? Mo
Hello, Mo.
Sorry to hear about your difficulty in locating certain materials in the UK.
In regards to the GOLDEN products such as Fluid Acrylics and GAC 800, there are quite a few stockists that carry our products. Please refer to our Store Finder at goldenpaints.com, although you may wish to start with this store: https://www.jacksonsart.com/brands/golden
We cannot assist with locating other brands’ products or alternatives for silicones and other non-artist materials.
– Mike Townsend
Hi. I am sure there are loads of groups but there is a Facebook Acrylic Pouring UK Group and the members’ exchange of information about local suppliers and advice may be helpful to you. I have some Golden paints I got ‘on sale’ here (still to try) but have found they are pricey in the UK and GAC 800 not to be seen until I found Jackson’s!). Nevertheless, I have just discovered Mike Townsend’s marvellous informative articles and QAs and this technical detail in understandable language is so useful.
Thank you Kath.
One of the big reasons to use a good amount of medium is that it greatly reduces the cost of the overall painting. We have excellent UK retailers, so be sure to use the GOLDEN Store Finder and contact them. Stores offer many sales during the year and it’s always great to support your local “brick and mortar” whenever possible.
– Mike Townsend
What is your opinion on the addition of a few drops of linseed oil in place of silicone as it is a drying oil and sometimes used in other paint applications?
Hello Michelle.
Thank you for your questions. Although it is true that linseed oil is a drying oil, it’s also a very slow drying oil and not meant to be compatible with acrylic mixtures. My guess would be that the acrylic layers might surround the oil droplets but I have no idea if they would remain stable or if in fact the oil will produce cell patterns at all.
– Mike Townsend
Hi Michael-
Greetings from the cold midwest! I have abandoned the idea of using resin, as I’d rather stick with my go-to brand, Golden, and try using pouring medium (GAC 800), with the guarantee of longevity! I’m doing some commissions for a client that I’ve done a number of traditionally painted pieces for. This is my first time pouring, so I’m conducting some experiments, so this doesn’t blow up in my face! I have a few questions. I can email you privately if this is too much.
I will pour on top of GAC 100-prepped wooden cradle boards with 2 coats of gesso on top. Does the gesso also need to be sealed before pouring? I’m trying to create a strong adhesion and not looking to create a removable skin! My goal is to create a glossy, smooth surface, free of air bubbles and texture in the end. Can I safely combine GAC 800 with both fluid acrylic and high flow acrylic while pouring or will this result in different levels and valleys and plateaus in the end?
When does crazing occur or cracking, if that is going to happen? Would it be an immediate thing? My worst nightmare is a painting forming cracks months later when hanging in someone’s home.
Also, in dealing with edges, is it best to use blue tape extended to create a dam? At what point should it be removed and what can be done if a dam forms? On some experiments I hate to slice off the rim and the painting didn’t look so great.
I’m painting in a 70 degree room in the middle of the winter and it is in the 20’s outside. If my painting is dry to the touch, when is the soonest I can apply a varnish?
Thanks in advance for answering my questions and for this very informative article and all of your research!
Jennifer
Hi Jennifer.
Thanks for your questions. I’ll try to answer all of them here, but if need be, please email us at [email protected]
Your questions:
Does the gesso also need to be sealed before pouring? – On GAC 100 sealed boards it probably isn’t necessary with GOLDEN Gesso. If you want to be certain, mix the GAC 100 1:1 with your gesso to reduce absorbency and apply that as the final coat.
Can I safely combine GAC 800 with both fluid acrylic and high flow acrylic while pouring or will this result in different levels and valleys and plateaus in the end? – THere’s no issues with adding these paints to the GAC 800, but read my more current article about adding paints to GAC 800 to learn the general thresholds for paint additions.
When does crazing occur or cracking, if that is going to happen? Would it be an immediate thing? My worst nightmare is a painting forming cracks months later when hanging in someone’s home. – If the painting hasn’t crazed after a week of drying, it’s highly unlikely that it will develop crazes later on. Cracks… maybe, as with any painting over time.
Also, in dealing with edges, is it best to use blue tape extended to create a dam? At what point should it be removed and what can be done if a dam forms? – Edges are always tricky to deal with. I like to use blue tape to create a raised edge during the pouring process, and then after allowing a few minutes on a level, raised surface, I’ll carefully remove the tape to allow the paint to flow over the edge. Some artists will pre-tape the sides before paints are applied (just to the edge of the panel, not above it) and remove this tape after everything is dry. This makes for a very clean edge without paint drips.
I’m painting in a 70 degree room in the middle of the winter and it is in the 20’s outside. If my painting is dry to the touch, when is the soonest I can apply a varnish? – Acrylic paints can take 3 days or more to dry. Ideally, wait a week before varnishing, to assure the paints are solidly dry.
Let us know if you have any other questions!
– Mike Townsend
Thanks, this has been helpful but I am still having a few issues. Will email.
This is an enlightening article. I am trying to have a full understanding of how cell formation occurs. So far you have answers many questions. I am left with wondering one thing. In the Pigment Density chart, it shows a specific gravity for each. They are only a few decimals apart. Does the thickness of your mix have any effect on its specific gravity, or is it a constant?
Thank you
Bill
Hi Bill. Thank you for the kind words.
Each component to the formula is important to help develop patterns.
Pigment density is a relatively tight range, so a few decimals can allow for one color to stay suspended while another sinks down in the wet pour. Actual viscosity of the paints is definitely something to be aware of, as if the mixture is too thick it will not allow for much sineresis (phase separation) to occur. If the mixtures are too thin, you’ll get more movement but it may not remain until everything becomes solid. Then there’s surface tension differences, which is typically adjusted via paint surfactants, alcohol and the largely popular silicone additives. Testing and adjusting mixtures help to set up more consistent applications. Of course, then there’s the role of the studio environment where temperature, humidity, and other factors are at play. – Mike Townsend
Thank you for the reply. Your comments on using silicone made me shy away from using it. It makes perfect sense. I started with that additive, but have enjoyed the outcome so much that I do not want to take the chance of running its longevity. It is a fun process and creates some really beautiful effects. I am currently trying to learn as much as I can in order to control the process, especially with cell formation. I have been painting a lot of sci-fi style paintings and can see this as a beautiful addition to my work.
Thanks again.
Bill
You are most welcome Bill.
– Mike Townsend
Hi Michael,
I have a quart of Golden Acrylic Medium – High Gloss that someone gave me. What’s the best way or ratio to use it when mixing paint for a pour? Thanks!
Hello Joan.
If you have Golden Gloss Medium – which was previously named Polymer Medium (Gloss) – you can use this for pours. The pours however need to be applied very thinly to avoid crazing. Adding water can help and also as colors are mixed in the combination tends to even things out.
– Mike Townsend
Hi Michael,
Thank you for the great article – very informative!
Can you use GAC 800 mixed into epoxy resin? One of my favorite artists (Gail Knight in the UK) does incredible resin pours mixed with some media and the shapes seem to hold really well – kind of like GAC 800. She also talks about weighting down her canvases so the paint goes to a particular spot. Looking at her art, it really looks that way but I have no idea how a stretched canvas would be weighted down. Thanks for your input!
Gail Williamson
Hello Gail.
You are very welcome, and thank you.
There are artists who pour resin over acrylic painting with success, and there are some who use the acrylic paints wet into wet with epoxy, but we have not done any formal testing here to know if this is could create an issue with the paintings long term. I do not believe that there’s much to be gained from blending GAC 800 with epoxy. I’d prefer using the GAC 800 for color layers, then the epoxy for the uniform deep gloss layer at the end of the process.
– Mike Townsend
Hi. I am new to the acrylic paint pouring technique and have a few paintings I want to do over and reuse my canvas. I used Basics paint mixed with glue, floetrol and silicone as my medium…I don’t like my first couple of paints. After gently using alcohol and then lightly wiping with a little soapy water. Can..or should I use GAC 800 to put over my painting and let dry then re-use my canvas to start over?? Or do I have it all wrong?😓 Thanks, Riley
Hi Riley.
Thanks for your comments and questions. The concerns are with the underlying layer of paint, glue, floetrol and silicone there could be adhesion issues and sensitive layers that could crack when you try to paint over. That would be a waste of materials. You can either re-gesso it, and if any of the issues appear it’s not a huge loss. You can also remove the old canvas and staple a new canvas on it but it’s often more cost and work than a new pre-primed canvas. Therefore, gesso it, and ideally use it as a practice piece. You can try new mixtures and techniques. I hope that helps!
– Mike Townsend
Hi Mike,
I am having issues creating cells with Isopropyl alcohol. I have tried 70% and 99%.
I’m just starting so I’ve been experimenting with what i have before I invest on more products. I’ve been using regular acrylics diluted with varying amounts of water and alcohol. I’ve also tried using household “mediums” (modge podge). But there is Absolutely zero cell formation. There have been some nice pour patterns (they dont dry well but a proper conditioner would help with that I’m sure).
I was going to try heat and silicone but after reading your feedback on that I’ve opted out and would like to stick with alcohol if i can get it to work.
Thanks
Hello Seuzy.
Thank you for your questions. It’s hard to know why you are not getting any cell patterns while you work. Perhaps the colors are not laying over each other enough, or the mixtures are still too thick. You may need to spritz some alcohol on at the very end to help coax more cells to develop.
– Mike Townsend
Can I add alcohol inks(jacquard pinata) into GAC 800? Would it the need to be varnish with a uv protection?
Hello Anthony.
Thanks for the questions. You can blend alcohol inks with GAC 800; they should be compatible. Dye based colorants are not lightfast, and therefore should be protected from UV light. The GOLDEN Archival Spray Varnish, MSA Varnish, or Polymer Varnish Gloss would be acceptable over the GAC 800 but I have not tried them over alcohol inks. Therefore, we cannot say for certain there will or will not be any sensitivity issues.
– Mike Townsend
Thanks, I was more concerned with paint film integrity, but you make a great point about the lightfastness. Time to experiment and if anything works then varnish.
Hello! I had beautiful white cells and when it dried they are gone! Do you know why they dried and disappeared?!
Hello Sawyer.
Thanks for your questions. I do not know exactly why they disappeared from wet to dry, other than if the paints are thin enough they continue to flow and move for quite some time and this changes the patterns from wet to dry. Thicker paint mixtures may help with this.
– Mike
Hi Mike,
This was a really informative article. I got a lot out of it. I was wondering if you could post a simple step-step for someone new to pouring? I do a lot of different kinds of art but I have never done a pour. I would be grateful for you guidance on getting started.
What I have learned from reading your articles is low paint to GAC 800 ratio, alcohol not silicone, and high fluid acrylics are best. The article about density wouldn’t come up. But I gather that the higher the number the more dense the paint and heavier colors sink while less dense colors will rise.
So, could you post something like: 1 mix GAC with high fluid acrylics in a 10:1 ratio.
2. Prepare your pour in order of density.
3. Pour each layer and allow to dry for x amount of time between each layer.
I have no idea what the steps should. 🙂 Just something that’s easy for a newbie to follow.
Thanks!
Hello Shauna.
Thanks for your feedback and kind words about this article. I like the idea of a step by step for pouring.
The best way to get started is to use the key points you listed, GAC 800 and High Flow Acrylics (Fluids are also fine to use) are easy to work with. Alcohol amounts are helpful and you can also spritz some on at the very end if you don’t get enough cells from the blending. Here’s the link to our Pigment Density Chart: https://goldenhub.goldenpaints.com/storage/uploads/pigment-density-of-golden-artist-colors.pdf so take a look at this and see if it opens up for you. Otherwise it is on our goldenpaints.com website in the “Technical Information” section. Density is a good way to organize your color pours, where you start with the lightest density color and work your way towards the most dense, like Titanium White. The low density colors want to rise and the high density colors want to sink, and this creates some dynamic textures and cells. The alcohol just helps them along.
– Mike Townsend
When you suggest using density, starting with the lightest density color and finishing with the highest density color, as a way to organize your color pours, are you referring to layering a “dirty cup” pour that will not be inverted or flipped, just directly poured onto the substrate? I want to be sure I understand, because in an earlier post, you said, “In a dirty pour, where the cup is flipped up on end, I would suggest starting with the densest color, such as Titanium White or colors with a high level of Titanium White, and then add subsequent lower density pigments after that.” Thanks.
Hello Carolyn.
The overall concept regarding density is that lighter colors will want to rise, especially with the aid of a little isopropyl alcohol, and heavier pigments will want to sink. If you put the low density pigments on the top they won’t want to go anywhere, so cell formation will be limited. If you are doing an flip cup the densest color is pour in first, then move into the lighter pigments. The flipping then should invert the order so that the higher density colors are (mostly) now on top.
– Mike Townsend
Nice article, and I appreciate the orthodox information from the company source, assuming you understand the chemistry behind this all the best. I am wondering about toxicity when using a torch or heat gun to achieve the cells. I can’t find anything definite on safety issues, but wanted to be sure. What happens to the acrylic paint under heat? Thank you so much!
Hello Jenni.
Thank you for your comments and your questions.
We do have concerns when using a torch with acrylic paints.
Acrylic polymers like many other forms of plastic can break down from excessive or prolonged heat and breathing these off gasses are a concern. Also, plastics can ignite if exposed to a hot enough temperature creating further fumes.
Silicone, when heated, can release formaldehyde. Here’s an article about this as it pertains to hair product usage: https://www.womensvoices.org/2016/07/05/is-formaldehyde-free-really-formaldehyde-free/.
Much of this needs to be studied to fully understand the concerns for artists using creme brulee torches on paintings. Unfortunately, there is little information available.
– Mike Townsend
Thank you for this amazing article and for all your patience and kindness in replying to everyone throughout the years! I’m been experimenting with pouring for a few months now and follow some amazing artists doing it as well. One thing that I havnt been able to achieve used by artists like emma lindstrom and Lauren O’meara is at the every end of the pour they drop on something mixed with paint and it starts moving and creating a circle with the colour dot staying in the center. Some use masks while dropping the product so I’m guessing it’s strong.. I don’t think it’s alcohol because when I tried doing that with alcohol is does not achieve the same effect. Would you happen to have a clue as to what would make this effect? I tried adding flow aid as well but no success. Basically once it’s dropped there is an immediate movement (similar to alcohol) of a solid circle that grows outwards and the colour dot stays in the center.. It keeps moving outwards bring up the colour underneath
Hello Mireille.
Thank you for your positive comments about the article. I am not familiar with that products these two artists are using. Typically though, the use of an additive such as alcohol is successful due to having such low surface tension that it pushes the paint pours away from the droplets. Of course silicone oils are very popular but again, I do not know what the artists are using themselves to attain this effect. Keep experimenting!
– Mike Townsend
Please what the idea behind your art work
Hello Agyenim.
I do not understand your question. Please rephrase it.
– Mike Townsend
This is a very interesting and helpful article. Thank you for sharing. I am new to pouring and, by nature, have to experiment. I am curious if you know exactly what is happening to cause the alcohol to react in the manner to make cells? Is it the evaporation (the upward movement of the alcohol in the paint), or is it some kind of chemical reaction, both or neither. The reason I ask is that I am thinking of experimenting with other additives and it would be helpful to know if I need to be looking in the area of highly evaporative substances or certain chemicals. I’m thinking that a substance even cleaner than 91% alcohol (still has impurities) will dissipate even more from the paint layer. If this action is what is causing the cells, then the result hopefully will be cells galore and larger. I’m going to first try Bestine Rubber Cement Thinner which is 100% N-Heptane. It evaporates almost immediately (you can watch it dissipate) and leaves no oily residue. Any thoughts? Again, thanks for the article and I appreciate any assistance you can give me in my newfound pouring quest.
Hello Phil.
Thanks for your comments.
There are several factors at play when it comes to the creation of cell patterns. The most critical is known as the Raleigh-Taylor effect, which relies upon differences in surface tension and density. http://iopscience.iop.org/article/10.1088/1742-6596/208/1/012083/meta. I imagine there are many kinds of additives that could potentially cause this effect, but we have only tested the ones mentioned in the article and in this comment section.
– Mike Townsend
Thanks for this article, really helpful and well written!
Thank you Thomas! Much appreciated.
– Mike Townsend
Thanks for the advice to sweep the floor and wipe down surfaces around the area you want to paint. I’ve built a new room for my home, and now comes the time when I need to paint it. Cleaning the area and getting a flow aid to help with the painting process are some measures I’ll take to make sure that the whole thing goes over smoothly.
Fantastic news, Larry.
There is a ton of “stuff” floating around in studios that are attracted to the wet surface of the paint. This has caused many headaches when painting and varnishing. Even a fresh coat of paint on the walls will do wonders for reducing dust in the air!
– Mike Townsend
Hi Michael,
This article (not to mention the comments section!!) has been extremely helpful to me since I started getting into pouring last year, and I appreciate your thorough knowledge and explanations.
I’m really just wanting to ask you if you authored the book Understanding the Techniques of Pouring Acrylics Learn How to Pour Acrylic Paint for sale on Amazon
It was published in 2017 and is a verbatim copy/paste of this article, pictures included.
I paid for it, only to recognize the content instantly and figured I’d just let you know.
Anyway. Thank you and hope no ones raking in the dough on on your behalf 🙂
Thank you Elizabeth, both for your kind words about the article and the information about the Amazon “book”.
It is an unauthorized and plagiaristic use of our content and I’ve passed it over to legal to take care of.
Regards,
– Mike Townsend
Hello:) I have a question regarding outside temperature when creating fluid paintings. I don’t feel comfortable painting inside because I have a toddler, but I have a toddler and live in Michigan. If I paint in my garage in colder temperatures, will the paint or resin not perform as well or become ruined when drying? How do people create this type of art safely when they live in a small home and have kids in the house? Thanks in advance.
Hello Kristin.
Thanks for your question. During the late sprint, summer, and early fall months you should be fine for painting and allowing the paint to dry. However, as the temperatures begin to dip into the 50’s, you need to be especially careful. Colder temperatures will create a false thickness to the paint (think “molasses in January”). The other issue is drying. Acrylics generally require a MINIMUM temperature of 49 degrees Fahrenheit to properly dry. More ideally, standard room temperature range between 65 and 75 is best. The issue you’ll have during the winter is while you might be able to maintain room temperature while you paint, it’s the 3 days long period that is required for paints to become solid dry. If paints cure in too cold (or too hot for that matter) you are much more likely to develop cracks and crazes.
Perhaps you can think of a room in your house that has a good locking door and enough ventilation to draw evaporating ammonia and other additives out a window using a window fan. Or, you may need to try and find an alternative location in a school or other community place that would allow you some space to do some painting. Not ideal, of course, but better than not painting at all!
– Mike Townsend
I would like to do a pour painting on a large wood table. Do you recommend this? I’m concerned about the paint being too thick and cracking.
Hello Debi. I think it would be fine to pour onto a large wooden table. If you are concerned about cracking/crazing just tilt the table to spread the paint out thinner, then level it back to dry. Keep the table out of direct sun and moving air until it is touch dry to further reduce crazing. – Mike Townsend
Hi Michael,
I’m super appreciative of you for sharing your wealth of information. I’ve spent hours and hours, days and days with my daughter trying to get a grasp of this process that we’ve only recently heard of. After reading your article and your replies to everyone, we are confident we can simply go with your knowledge and instruction to begin again after so many failed attempts & purchases of the wrong materials.
Do you have a tutorial video we can watch?
K – We only have these videos regarding pouring: https://www.goldenpaints.com/videos/big-paint-pour-setup-with-gac-800 and https://www.goldenpaints.com/videos/big-paint-pour–with-golden-gac-800. – Michael Townsend
Thanks for the great information. I have watched a number of videos and I am confused about the “torching” of the painting. What is this for and how close do you get to the painting. Most of the videos are only playing music and not explaining what they are doing.
Also, I have seen several videos where the paint is poured in a sink strainer and it makes a beautiful madalion. I tryed the only strainer I could find (not exactly like in the videos) and I did not get the same results. Mine looked more like I had flipped the cup and not run thru the strainer. What can I do to get that look?
Hello Sandy.
Thank you for your questions. Torching is done for two reasons. Torching is a way to pop surface bubbles in a pour, and it is done to coax the development of cells in the pour. Torching has carried over to acrylics from a technique used in 2-part epoxy resin pours. When the resin is warmer it becomes less viscous and bubbles are easier to rise and pop. Silicone oils also follow this reaction to heat as well as silicone’s surface tension becomes lower as well. Bear in mind that heating silicone and acrylics may also release vapors into the air, and if one overly heats wet acrylics it may interfere with the film-formation process. Therefore heating pours should be done sparingly and in adequate ventilation with proper protective gear.
The question about using the strainer is really about using a device to modify the flow of the paint. Try cutting uniform slots into a plastic cup and see if that results in better patterns. This can also allow you to do smaller areas where a colander isn’t practical. – Mike Townsend
When I do WHITE swipes with craft paint, they tend to crack off later. I want to upgrade my white paint to Golden.
Which white would be better for swiping: zinc or titanium?
High Flow or Fluid for the white swipe?
Hello Elaine. Thank you for your questions. I would suggest to use the Fluid Titanium White, which can be extended with the GAC 800 for the swipe technique. You might want to keep a higher paint level (start around 5:1 GAC 800 to Fluid Acrylic), but I have done this successfully with my standard 10:1 ratio. – Mike Townsend
Hello
I have used silicone for the first time in pours after a successful ones without it I thought I would give it a try.
To start with they looked brilliant however after about 24 hours I now have very small clear liquid formed on the top and obviously wet. I think this must be the silicone but haven’t heard this before, does this sound normal.
I probably stupidly heated it again when still wet after about 15 hours of drying. I want to use the silicone again but not if this is the outcome as it has probably now ruined the pictures.
Any advice would be very much appreciated.
Thanks
Matt
Hi Matt. Thanks for contacting us with your questions.
Yes, the clear liquid is the silicone oil “sweating” out of the drying paint layer. This is typically blotted off the surface for the coming days and even weeks. Some artists have used blotting type papers and fabrics to do this. I have read where some use powdered talcs and corn starch on the surface to remove the last amounts, but I have not tried this technique personally. It is important to allow this process to happen and remove as much as possible before attempting any topcoating. It is also important to realize that silicone contamination is a main factor for “surface defects” in paints and clearcoats, usually in the form of “fisheyes”, “orange peel” and “cratering”. There’s no need to rush the removal process as fresh paint films can be ruined by aggressive removal techniques. – Mike Townsend
I’ve been doing a lot of research on pouring before I actually attempt it and this article was VERY helpful. I do still have one question though, if i wanted to seal my pours what would be the best archival method for that? Also, I’d like some of my pours to be matte and others to be glossy, I love how resin looks for the glossy but wanted to know if there is a cheaper alternative since resin can be pretty pricey.
Hello Rachel.
Thank you for your comments and questions.
If the pours are all acrylic, you can use the GOLDEN Varnish products such as the waterbased Polymer Varnish, or the solventbased MSA Varnish. Varnishes to tend to be the best approach for adjusting and unifying the overall sheen of a painting.
Varnishes are best for thin, longterm protection, but they are not usually applied with the thickness levels that you would get with resin pours. For that, you can try the Clear Tar Gel, but now you begin to run the risk of “crazes” developing during drying. So if you do try this product out, be sure to spread it relatively thinly for any singular coat. It is difficult to achieve the same look as resin, so expect some differences in handling and product options.
– Mike Townsend
Michael, using you recipes for Fluid Acrylics ( 10 parts GAC-800, 1 part each paint and alcohol), and High Flow Acrylics ( 2 parts GAC-800, 1 part each paint and alcohol), would it be better to premix just the GAC-800 and the paints, and then add the alcohol at the time I’m ready to paint, than to add the alcohol, too, when I’m premixing, since the alcohol tends to want to leave the mix? If I mix only the paint and GAC-800, how long may I store it before using? Of course, with pouring, I want cell formation, but don’t want to use silicone, etc. Thank you for such an informative article.
Hi Becky. Thank you for contacting us with your questions.
If you pre add the alcohol into the mixtures, it is imperative that the jar lid seals really well. Otherwise, you could certainly just add the alcohol in right before you begin pouring.
– Mike Townsend
Hello, thanks for the amazing article, was very insightful. I just have two questions- I have golden heavy body acrylics with me, could you please tell me the pouring recipe for this to create cells. My second question is is it okay to use Dimethicone instead of silicone oil? Thanks you.
Hello Bhargavi.
Thank you for your questions. The article that has the paint recipes for pouring with Heavy Body Acrylics is located here: https://justpaint.org/paint-additions-into-gac-800-for-pouring-applications/. This will allow you to use the paints at the proper consistency. However, the long-term effects of adding silicone into acrylics is still up for debate. If you do use silicone additives with your paints, you may encounter negative side effects such as a poorly cured paint film, adhesion issues, etc. Dimethicone is a type of silicone oil. Silicone oils are non drying oils. There are silicone “Fluids” which do evaporate from the paint films. Also, isopropyl alcohol can create cells, especially when using a pigment density sequence with heavier pigments on the surface of low density pigments.
– Mike Townsend
Thanks for this article, this is a really interesting article, will try Acrylic Pourint out soon.
You are welcome Malen.
– Mike Townsend
Nice article, thanks for sharing this post.
Great Topic and amazing content!
As the acrylic nowadays has been very helpful in many of the fields, rather being in liquid form, plastic form or any other.
Looking forward to read such interesting content in future.
Hi Michael,
Thank you for this article. I have a few questions. You suggest diluting 1 part GAC 800 to 1.5 parts water. I was told that more water than overall paint or medium will cause the paint to lose it’s stability and compromise the results. Can I use this suggested diluted medium in acrylic pours using heavier body paints with good results?
Also in another section you also suggest diluting GAC 800 10 parts to 1 part paint. Is this for a specific type of application or intended result? I’m a bit confused.
I’m relatively new to paint pouring and just needing some good basic info on how to use mediums. I would greatly appreciate your clarification and suggestions.
Thanks!
Piera
Hello Piera.
Thank you for commenting on this article and asking your questions. The part about adding water to medium is in regard to thinning our tube acrylic Heavy Body paints. “A great approach for thinning Heavy Body paints without a loss of film strength is to first mix a thin acrylic medium such as GAC 100 with water (1 part medium to 1.5 parts water, and then use this mixture to thin the paints as much as desired).”
The concept is to use a pre blended mixture of GAC 100 and water to thin the thick paints rather than just water (which is possible but tends to create matte color washes rather than a liquid paint) or just medium (which is also possible but it tends to require a substantial amount of medium to thin the paint, which results in transparent glazes of weak color).
If you are going to pour using the Heavy Body Acrylics, then add the paints to GAC 800 (without adding water), as long as you do not exceed 20% paint levels. The thicker paint also makes the medium thicker and less useful for pouring.
Finally, the great thing about pouring acrylics is that are few steadfast rules, because you might want to try pouring all kinds of mixes with various mediums and water additions to create unique effects. The key is EXPERIMENT and PRACTICE on a small scale to assure you are getting the kind of effect you desire before potentially messing up a large painting surface.
– Mike Townsend
Hello Michael & Golden, I’ve been using your products for my pours for about 3 year now. By far Golden gives me the best color & interesting patterns, although I use a less expensive paint for teaching students. I have a client who wants me to pour on a wooden countertop after they sand it down. I’ve never poured on raw wood, so I’m looking for information- should the wood be varnished? Should I use acrylic varnish over the entire wood surface? The pour will be allowed to run free form, so I can’t really pre-plan and use gesso under it. I thought about using transparent gesso which would give it some tooth, but also seal it. Do you have any suggestions?Thanks for your help, and thanks to Golden for creating such high quality products and provide so much information for the artist.
Hello Pat.
Thank you for your kind words and questions.
You could start with a sanding sealer on the wood to even the porosity of the wood. This would serve as a clear primer and should not be noticeable after the work is clear coated. If you wanted to use one of our products, you can use the Fluid Matte Medium, and allow for 2 or 3 days drying before attempting the pour. Please realize that different woods react different other After you do the pours, allow the paint at least 3 days to fully cure before top coating the entire surface. You can use commercial polyurethanes or other wood clear coats. Minwax Poly-Acrylic is a good brush on suggestion : https://www.goldenpaints.com/technicalinfo/technicalinfo_woodstain
Can you tell me what is the difference between Golden Gloss Pouring Medium and Golden Color Pouring Medium in Gloss? I just bought the one that didn’t have the word Color in it and don’t know if I should use it now.
Hello Kathy.
Thank you for your questions. We make GAC 800, which is just called “GAC 800” and we have a Color Pouring Medium (Gloss) and a (Matte) product as well. There is not a product called Gloss Pouring Medium that is currently available.
Please let us know if you have any other questions!
– Mike Townsend
I am brand new to all of this so please forgive me. I bought some DecoArt Pouring Medium to mix with my paints. Will I still need to add alcohol or anything else? Thanks!
Hi Karen.
Thank you for your questions. Additives such as alcohol are not necessary to do poured paintings, but if you want to have cells and other patterns emerge from the pours you may need to add alcohol.
– Mike Townsend
What is the difference between GAC 800 and Color Pouring Medium Gloss?
Hello Angela.
Thank you for your question.
Currently, the two products are very similar, (Color Pouring Medium (Gloss) and GAC 800) and based on the same acrylic resin, but moving forward we anticipate creating changes and improvements to the Color Pouring Mediums. At present, the two products will perform similarly and a person who has GAC 800 currently can continue to use it for pouring. For moving forward, if pouring acrylics, we would recommend sticking with the Color Pouring Mediums to stay current with the advancements. But you can assure artists who have purchased GAC 800 or have it in their studios, they can use it for pouring and get the same or similar results as the current Color Pouring Medium (Gloss). The Color Pouring Medium ( Matte ) is a unique product.
Regards,
Mike
Hi Mike, I am glad I came across you. It is good to read someone who takes a product and technique deep beneath the surface and explains the workings there. I have a question about gac 800. Creating cells has become a big thing and I’m one of the few, maybe a silent majority?, who is not real wild about cells unless I can control where and how they appear. I want to know for sure: does gac 800 make cells? I’m looking for a medium that does NOT make cells and I’ve narrowed down my search to gac 800. I also use Golden fluids for most of my work plus a few select colors from Matisse and one from Da Vinci. Will they work well with gac 800? I’m in the process of reopening my art studio and not in a position to do my own r&d. What I am doing now is buying art supplies, mostly paints and with the high prices, I have to buy smart, so I ask questions from those I trust with an answer. Thanks again for your work and writings. keith
Hello Keith!
Thanks for contacting us with your questions, and your kind words!
GAC 800 or the Color Pouring Medium Gloss are both equally able to create pours without cells, when used with a bit of thought behind the products and technique.
If you want some more accidental cells, compared to the excessive cells that are generated when using silicone or alcohol, you can use the varying pigment densities to your advantage when you mix colors and then allow colors to cover one another. Thinner paint layers overlapped are more likely to generate cells as the denser pigments want to dive down and lighter pigments try to rise upwards. https://goldenhub.goldenpaints.com/storage/uploads/pigment-density-of-golden-artist-colors.pdf
If you don’t want any cells, then try to use colors that are in a similar density range. For example, if you choose:
• Dioxazine Purple PV23 1.44 (Density)
• Pyrrole Red Dark PR264 1.45
• Quinacridone Magenta PR122 1.45
These colors are similar so they don’t have the above mentioned movement. If you choose colors further apart from one another, you increase the chance of cells developing as they overlap.
You can certainly use other brands of paints with our paints and mediums. They should be compatible. You usually will notice something off very quickly if two paint systems are not compatible, as they won’t want to mix easily, and often the texture goes from a smooth mix and into a textural one that looks like cottage cheese. This is most often do to differing pH levels causing a pH shock. Sometimes, they will mix back again smoothly with enough mixing, but if they don’t, then using them is a bit risky.
“…one of the downsides of using GAC 800 is a loss of clarity” refers to the fact that the GAC 800 and the similar resin based Color Pouring Medium Gloss do not dry to a water clear film. You don’t typically see this haziness when mixing the paints with the medium, but if you try to use the mediums without color, over previously painted colors, you might notice this permanent haziness. This is most noticeable over dark colors like purple, blue and black.
The acrylic mediums are milky white in the wet state. As they dry, they lose water and the mediums become much clearer. So, when people mix high levels of medium with their paints, they will have a light pastel tint of their base color, until it dries and then darkens. For example, Color Pouring Medium Gloss mixed 10:1 with Fluid Phthalo Blue Green Shade will look like Sky Blue in the container, and when poured out. But as it dries, the deeper color returns, making the wet pour very different than the dry pour.
To work around this, dab a bit of the paint mixture onto the jar lid, and let it dry. This allows you to know what’s in the container better than just looking at the wet paint inside. Also, if you want to minimize this wet/dry color shift, you can always add some Titanium White into each color mixture. Of course, this means you don’t get to work with some deeper colors like red, but it can help even things out.
– Mike Townsend
This article is really informative, thanks for your work! I will try it out for sure. Keep up the good work!
Earlier in the post you mention the standard 10:1 ratio for Golden 800 with High Flow paints, BUT when you covered isopropyl alcohol you suggested 2 parts GAC 800, 1 part High Flow and 1 part alcohol.
I figure I’m misunderstanding a critical point for the last mix ratio. Can you please help explain?
Hello David.
Thank you for your questions. In the first section, the pours I’m looking to create are more solid colors, with distinct color edges. For this I want to keep the mixtures on the thicker side and also if I use a 10:1 ratio for each mixture, each color more or less behaves like the others. However, when you want to create cells and adding the isopropyl alcohol, the paint needs to be thin enough to encourage the creation of cells through the pigment moving. Since writing this article, I’ve experimented with many ways to create the patterns, and have found that flicking or misting alcohol onto the surface of a pour tends to produce effects that are more likely to remain during drying. Thinner mixtures can create great effects but the dried film often looks nothing like the wet paint.
I hope that helps explain it better. If not, contact us at [email protected]
– Mike Townsend
Quick question – are your ratios based on volume or weight? And does it matter?
Thanks.
Hello Mary.
I have done both, because of all of the testing we do here and the need for accuracy is critical. In the studio I usually measure by volume, and often even that is done by eye or making marks with a sharpie on the mixing container.
– Mike Townsend
Very informative article. I enjoyed reading it. One question: Do you have a good idea how to generate the perfect mixing ratio? I still often struggle with that. I now use a kitchen scale and weight my the blending solution, acrylic colors and water. So far that has given me the best results…
Hi Michael,
I don’t have a question right now (though I’m sure I could think of thousands!), but I just wanted to commend you on your thoughtful, helpful, in-depth replies… to everyone! You put so much care & thought into each & every comment. It’s so nice & refreshing. I learned a lot & I’ll definitely be back!
Thank you, Lisa.
I greatly appreciate your kind words!
– Mike Townsend
What is the difference between using the GAC800 vs the Golden color pouring medium (gloss)? I’m not sure which one to buy for acrylic pour.
Hi Pat.
Thank you for your questions. Currently, they both will work about the same, so you can use whichever you can obtain. If you have both to choose from, then use the Color Pouring Medium Gloss.
– Mike Townsend
Thank you for a well written and easy to understand lesson to begin my acrylic pour journey.
Thank you Linda.
I’m glad you enjoyed the article!
– Mike Townsend
Thank you for such a fantastic article! I refer back to it constantly. While I can normally match the consistencies using soft body paint plus gac 800 and high flow gac 800, I wanted to know if there was a way to create a “paint” without any pigment (I realize how silly it sounds), that can be mixed with gac 800 to the same consistency. I’ve tried mixing soft body mediums and gac 800, but it never blends enough. I want transparent layers that move the same as the opaque layers. How can I achieve that?
Hello MJ.
Thank you for contacting us with your questions, and your kind words about the article.
The GAC 800 should be the only acrylic medium that you need, and simply adding paint directly into it should mix well. For paints thicker than our Fluid Acrylics, it can be much water to put the paint into a small mixing cup, and add a little medium at a time. Stir the mixture until it’s smooth using a spoon or palette knife, and then add a little more medium and stir it in. Continue this way until the mixture is pourable. You will need to reach ratios in the 20-30 parts GAC 800 to 1 part paint range, in order to achieve the degree of transparency you desire. Also bear in mind that some colors are inherently more transparent than others. Quinacridones, for example, are highly transparent and make beautiful glazes.
Great info! Thanks Michael. I have been so frustrated of late because I wasn’t producing cells. Now things are clearer and will get back to the drawing board (or canvas) very soon. I hear there is a list of Golden Colors gravity levels and was wondering how I might get the list?
Hello Julie.
Here’s the link to that density chart:https://justpaint.org/pouring/ You may need to log in to see this chart, but I believe it should be a direct link for you without having to do so.
Let us know if you have any other questions.
– Mike Townsend
Hello Michael,
I have read this article many times and each time I learn something new. I have had success with the golden pouring mediums and alcohol. My question is about the alcohol evaporation time. Is it necessary to add the alcohol to the pouring mixture right before pouring or can you do it the day before? I’m wondering if the alcohol can evaporate from the pouring mixture before you get to pour it on your substrate? Also, I usually save my pouring paints in the fridge for the next time I get to pour. Do I have to re-add the alcohol each time I use them? Thank you
This isn’t so much of a question, but more of a comment. I love the finish of the gloss pouring medium but I love the working consistency of the matte pouring medium. If they do end up changing the gloss pouring medium I hope that they make it thicker. Thank you!
Hello Cecilia.
Thank you for the kind words about this article. I used to pre add the alcohol, but you really need a tight container to prevent the alcohol from working it’s way out of the paint mixture. It might be easier to make base color mixtures and then add the alcohol right before you begin. This way the mixtures can be used for uniform color layers as opposed to ones with patterns and cells. I also like to flick or mist a little alcohol onto the surface of the manipulated painting, which gives me a bit more control on where the patterns will appear.
Also, great comment about the Different Pouring Mediums. The Matte and gloss can be mixed together, but we will keep your thoughts in mind while we test the prototype mediums. I wonder how many other people would prefer a thicker gloss pouring medium?
– Mike Townsend
Hello Michael,
Thank you for your quick reply. I thought of another question. What would you recommend to use as an additive to the pouring medium to get more open time? Should I add a retarder, airbrush medium, or the open medium? Also, can you spray the paint surface with water to keep it open longer or would that blend the colors together and make them muddy? I find that I can only do about three sprays of alcohol on my piece before the paints start getting too thin and muddy. Thank you!
Cecilia
You are most welcome, Cecilia.
We usually don’t recommend adding retarders like the products you mention, in thick product applications. They can help to increase painting time, but during the drying process to achieve a coalesced film, they can create a tacky, soft surface that is prone to problems such as water sensitivity, and dirt and dust accumulation. If you mist the surface of the wet pour with water, or alcohol (or water and alcohol) onto the surface, it would slow down the time it takes for the paint surface to skin over. If you mist water onto the surface, it shouldn’t thin the actual paint unless your technique requires a lot of panel tilting back and forth that would cause the water and paint to mix together. Slight tilting should not pose a problem.
= Mike Townsend
Thank you for the very informative article! I am new to this artform and really want to perfect my results. I am, however, experiencing an issue I can’t seem to solve. Once I have tilted the paint and have the canvas covered, as it sits little craters start showing up that reveal the canvas underneath. I’ve tried dropping small amounts of the leftover paint into the holes but eventually they also spread away leaving the same hole to the canvas. I am using liquitex pouring medium with sometimes a couple drops of water and one drop in only a couple of the mixed colors. I mix the paint and let it sit for an hour or so before I begin pouring. I have tried using a torch to “pop any air bubbles” but sometimes it seems to make it worse. I haven’t been able to find much about this. I would appreciate your help! Thank you!
Hello Laura Lu.
It sounds like you are dealing with a surface tension issue. There are “surface defects” that are caused by various problems, such as orange peel, cratering, dimpling, etc. Here’s a website that helps ID each type, and how to help correct it. https://www.ppcoatings.co.uk/wp-content/uploads/2016/06/Coating-Failure-Defects.pdf If you can identify the type of issue you are dealing with, then please contact us at [email protected] (with images if possible) so that we can help to solve the problem.
– Mike Townsend
I was intrigued by the discussions on the comment section it is much longer than the article. A lot of people really are into this paint works. I just take note of the learning curve that was mention in the comment, maybe I should study more and learn from the northern beaches painters club in our place to shorten northern beaches paintersy learning curb. Great discussion Thanks a lot.
Hello, Jess.
Yes, I too really enjoy having the comments evolve and new questions pop up over time! As you can see, we try to advise in a way that permits experimenting and testing, but also want to make sure people understand the concerns we have and why. The thoughts about silicone being used have changed over the time this article was published, as some artists found out the hard way as to what non-drying, super-low surface tension additives can do to a drying paint film.
– Mike Townsend
Hi there!
I’m looking to create Dutch Pours much like Rinske Douna. However, I love Golden Fluid Acrylics. All of her instructions use Amsterdam and Windsor Newton paints. I’m not sure what to use to get the same delicate fluid effects with some cells and a little lacing. Do you have any advice on Golden products to achieve the same results?
Hello, Lynn.
There’s no reason that the Fluid Acrylics would behave differently than other brands of liquid paints. I would follow the artist’s recipe and process on a trial pour and see how it goes.
– Mike
Hey Mike
Thank you for this article, I like Acrylic Pouring a lot! I especially love the fact that you don’t have to be a good drawer or painter and can create colorful artworks.
Keep up the good work 🙂
Martina
I am really happy that I found this article as it has helped me in my art practice. It is a comprehensive guide to the techniques of pouring acrylics and there are so many useful tips in here which make it an ideal reference for beginners, artists who want to learn more about their craft, or those just starting out. The author has done a great job at explaining all the different types of paints, how they differ from each other, and ways one can use them effectively.
Thank you, Randy. I’m glad the article has helped you.
– Mike Townsend
Hello! I have learned a lot about painting with acrylics from your great article. Thank you very much Miachael.
You are most welcome, Maletin. I’m glad the article is helpful for you!
– Mike Townsend
Hello, I am thinking of trying this for this first time. I have all of these clear acrylic panels that had been used to separate cubicles during the pandemic. Do you think these will work? Any suggestions about how to prime them?
Hi Bob.
Wipe the acrylic panels down with isopropyl alcohol, glass cleaner, etc to remove adhesives and fingerprints, then paint as desired.
– Mike
Amazing article, Thank you for sharing it with us Michael!
Hello,
I have been seeing a lot of professional painters using acrylic cell pours as an underpainting and then painting in oil on top.
I don’t know if the acrylic cell pours were made using Dawn dishawer soap or Isopropyl Alcohol.
In either case, would it be as archival as painting with oil on top of regular acrylics, or because of the soap or alcohol it would make it less archival?
Some artists also say “oil painting only” in their info, example Rick Leong1, but me and other oil painters can’t see how you could do a bubble / cell effect in oil paint, if that is something that exists that you could point to! Thank you!
1 https://www.artsy.net/artwork/rick-leong-bog
Hello, Emily.
Isopropyl alcohol completely evaporates before the paints have started to dry, so it should not have an impact on subsequent paint layers. Dish soaps are made with surfactants, perfumes, and sudsing agents that are not going to readily escape the paint, even after drying. It is possible that a layer of surfactant can impact the adhesion of the next paint layer.
– Mike Townsend