“Nothing should touch the surface“ is our first advice for packing paintings. We recognize that there are a variety of robust crating and packing methods and materials for shipping paintings, but cost and accessibility can sometimes make those options out of reach for artists. In the following we want to share a simple and cost effective way of packaging paintings for shipping, using corner and edge protection made from corrugated cardboard, so that nothing is touching the painting’s surface. Appropriate packaging for the shipment of paintings is important, so that typical damage such as abrasion of paint layers, squashed corners, or deformations in the canvas can be avoided. Acrylics are thermoplastics, meaning they become stiffer in colder temperatures and softer and more malleable in warmer ones. Packaging material can then easily stick to acrylic paintings or cause ferrotyping, a type of damage whereby the packaging material would imprint its structure into the acrylic paint surface. This type of damage is well illustrated in the JP article Rolling acrylic paintings for shipping or storage.
Materials Needed
- Cardboard
- Cutter
- Cutting mat
- Ruler
- Staple gun/ Velcro/screws and screw driver
- Pen
- Packing Tape
Corner Protection
Start with a rectangular sheet of corrugated cardboard. If the cardboard is approximately double the width of its height, the corner protectors will be more evenly shaped. (The example in Image 2 is a little on the narrow side.)
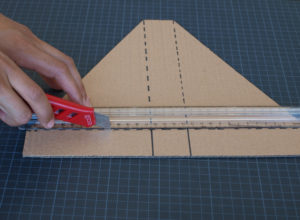
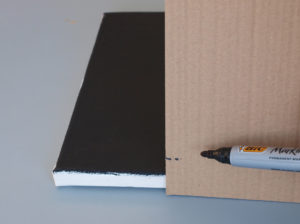
Hold the cardboard against the edge of the painting and mark the depth of the painting plus an extra inch (2-3 cm) (Image 1). Continue drawing a line along the bottom edge of the cardboard at the marked distance. This will be the depth of the corner protection, which should be large enough so that the painting fits easily without contact with the paint layer. Find the middle of the board and mark the same distance along the center of the board (Image 2).
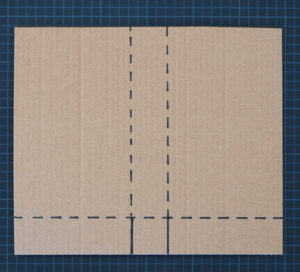
Image 1: Marking the depth of the corner protection: depth of painting + 1 inch/2-3 cm
Cut off the corners as shown in Images 3 and 4.
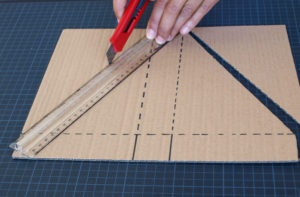
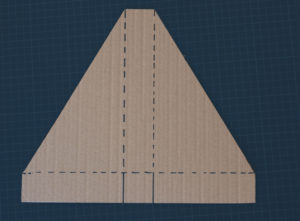
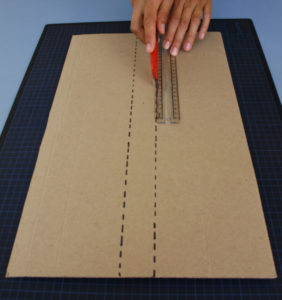
Score the marked lines without cutting through the cardboard (Image 5). Only the two short continuous lines are to be cut (see Image 4). Fold the cardboard where scored, into a triangle and staple or tape the overlapping cardboard sides (Image 6).
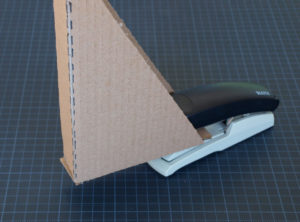
Attaching the Corner Protectors
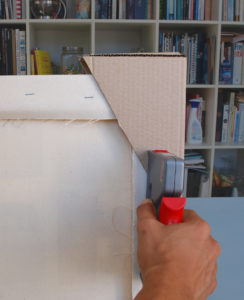
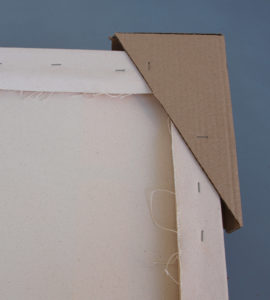
Staples, tape, screws, Velcro, or other hardware, can be used to attach the corner protectors to the reverse of the stretcher bars (Image 7). For thicker and heavier cardboard, screws, possibly with screw washers, might be necessary. Velcro would be suitable for paintings that are frequently packed and shipped. If the edges are painted, it will be important to leave a little space between the triangle corners and the sides of the stretcher. Otherwise, the cardboard might stick to the paint layer (Image 8).
Edge Protection with Cardboard Rails
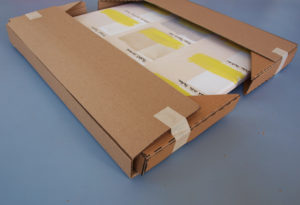
Once the corner pieces are attached, cardboard rails or collars can be used to protect the edges as an optional step. This might be needed for larger paintings. Use a cardboard piece that is as long as the sides of the painting. In the middle, two lines are scored at a distance as wide as the depth of the corner protectors (Image 9). The edge protection is folded around corner pieces and taped (Image 10).
Outer Packaging
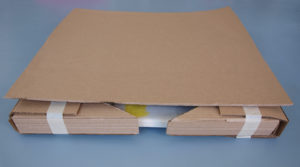
Cardboard, foam core sheets or similar lightweight panels can be used as covers on top of the corner protection (Image 11). If the painting has no backing board (see Backing Boards for Canvas Paintings), then another cardboard sheet can be placed underneath the painting. Now the painting can be wrapped in bubble wrap, polyethylene plastic sheets, or paper, depending on how it is being transported.
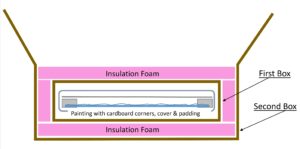
Paintings that are shipped by mail require outer packaging with proper padding, so that there will be less of a risk of damage from the friction due to rapid movement and handling. Double boxing, i.e. a box in a box, provides extra protection to artwork in transit, in particular, accidental drops, forklift accidents or simply the weight of other objects (Image 12). Mirror boxes, U-Haul or FedEx Boxes, corners from the packaging of frames or other packaging material can be recycled. Oz Clips can be used to attach a painting to a sturdier outer box and more materials from the hardware store, such as insulation foam board, can be used for padding and packaging.
Finally, notes with instructions for unpacking, repacking, acclimatization periods, or other requests should be placed on the outer packaging for the recipient. Again, we would like to point out that this method of packaging might not be suitable for all paintings or situations. It offers temporary protection for transport with inexpensive and easily available materials. Paintings should not be stored in these packing materials.
In Safe Handling and Transportation of Acrylic Paintings a variety of packaging options are covered, from rigid cases or crates to soft packaging and packaging framed paintings. The video How To Pack Paintings For Shipping shows a similar approach to the one here discussed, but it is only suitable for small paintings, while this method can be used for medium sized and larger paintings.
About Mirjam Auf der Mauer
View all posts by Mirjam Auf der Mauer -->Subscribe
Subscribe to the newsletter today!
No related Post

I would never place corner protection directly over a canvas painting itself because I don’t want to leave an impression on the canvas. Your method might work if the corners were extended out beyond the front and the triangle of cardboard over the painting surface were cut out.
Hello V, that is correct. With this method the corner protection should not be touching the surface of the painting at all.
Great advice, thank you so much for sharing!
Thank you Olivia. We are glad to hear that this information is helpful.
Hi Mirjam!
I have been shipping this way since I learned it at Golden in 2018. Hope you are well!
Hello Teresa,
thank you! So good to hear from you. Happy & creative new year!
Super idea! Thank you.
Crystal.
I need to move about 40 paintings that are on wood with no support that are 4×4 ft because that’s how they were created and that’s how they were hung. They were in a situation where the closer to the wall the better. And now I’ve got to merely get them across town without stepping up the paintings by stacking directly on top of one another. And given the size if I only do the corners? The middle of the paintings are bound to sag some of them won’t some of them will depending on how thick the paint was and flexibility of the wood, I have put polycrylic on the back of them to preserve the wood knowing this is not going to be visible I can go with more industrial style or furniture protection. The fronts have been around for a while. They were all painted between 2002 and 2011. They were recently returned to me and they need to go to an auction house as I restore them. They want me to bring about 40 of them out of the hundred I have and then we’ll do another 40 or so later on but I’m trying to think how best to get these there without them making a lot of contact. I’ve used both grumbacher final fixative and Windsor Newton varnish for both oil and acrylic paint. However this is not providing a permanent protective layer other than stabilizing the wood from further decay and allowing me to unify the surface since they’ve been treated badly over the years by the people who were taking care of them and we’re supposed to have them on the walls. Since the trip is short I’m thinking it maybe contractor grade garbage bags might be the trick to reduce the friction and it won’t stick to the varnish Plus that type of garbage bag is like a thick plastic drop cloth. But still using a matte spray varnish over oils and acrylic and bone with other media that needed to be protected on each painting leaves sort of a dust as the particles atomized and settle on high points on the wood grain. Sometimes you can run your finger across them and get a white smudge should I just use a delicate brush to get rid of that possibly access spray varnish? I’d like to make some quarters but I think in this situation it guarantees contact and pressure. When I could stack them inside the black plastic bags and try to stabilize any shifting. What say you? I appreciate this instructions on the corner so come in handy for my other works
Hello Cabe, this sound like a complicated situation. For the conservation questions, we recommend consulting with an art conservator. To brainstorm possible options for packing these paintings to move or ship them, it might be best to have a phone conversation with us. Ask for the Materials team when you call GOLDEN at 607-847-6154. We look forward to hearing from you.