Large paintings present an increased difficulty level when it comes time to apply an “isolation coat” or a varnish layer. Spraying in lieu of brushing makes sense when a smooth, defect-free surface is desired. After all, there are reasons vehicles are spray painted instead of using a brush! While one may be receptive to the concept of spraying, most artists simply do not know where to begin, especially when selecting equipment. This is a valid concern because it’s not easy to decipher which equipment is most suitable for your specific needs. Artists may also be nervous about spraying products because it’s a foreign approach for them. The terms used are unfamiliar and technical. The studio workspace needs to be set up a bit differently to accommodate overspray and minimize airborne contaminants. Rest assured that learning how to use spray equipment is very similar to working in a new painting medium or employing a new painting technique; practice makes perfect and it takes time to learn how to do it right. If you know of someone that uses spray equipment such as a fellow artist, furniture craftsman, or automotive refinisher, it would be wise to seek their council.

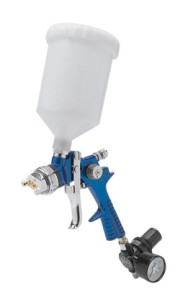
When buying spray equipment for the first time, the most practical approach is to start on the lower end of the range. There are decent spray guns available for very little cost. A HVLP (High Volume Low Pressure) gun we often suggest is a 1.4mm nozzle “Vaper” brand spray gun available at tool outlets such as NorthernTool.com. This $40 spray gun provides a decent spray pattern for thinner products like MSA Varnish or the GAC 500/Airbrush Transparent Extender (2:1 ratio) “isolation coat.” This gun is sufficient for achieving satisfactory results and even if you decide to move towards better equipment, you’ll now have a great baseline for comparison.

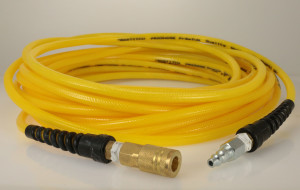
You will also need hoses to connect your spray gun to an air compressor. Longer hoses allow you to run the air line to the studio from another location where the noisy compressor may reside, resulting in a quieter working environment. All connections need to be air tight, and Teflon plumber’s tape is effective in preventing air leaks. The hoses and spray equipment should all be joined with quick-release connectors. These items can be purchased online or at a local hardware center. An air cleaner/moisture trap is also very handy to eliminate contaminates from being sprayed onto your artwork. Many moisture traps have air regulators which allow you to adjust the air pressure in the studio rather than having to keep going back and forth to the compressor to adjust the “psi” or pounds per square inch. PSI relates to the physical air pressure level; A more viscous paint will require more pressure to adequately spray compared to a thinner paint.

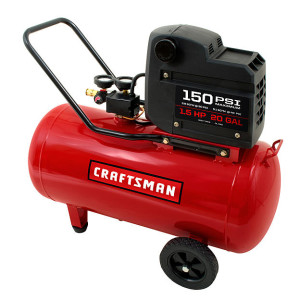
The most costly purchase (and potentially the most confusing as well) for your entry level stage is the air compressor. It is important to select an “oil-less” or “oil-free” model with a generous air tank, usually 10 or more gallons. This allows for a clean and smooth pressure while you spray. You can choose from many brands and models. Since this is an expensive piece of equipment, you might want to check around your family and friends’ garages to see if they own a compressor. Classified advertisement websites and the local paper are great sources for finding equipment less than retail as well. Just make sure the used equipment works properly before buying it.
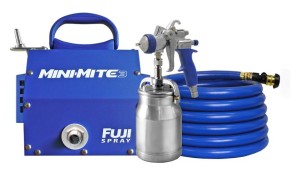
While this suggested set-up is intended to allow artists to get into spraying a large area with a relatively low startup cost, there are also “all-in-one” spraying set ups. The manufacturer has paired the spray gun with a compressor in order to take some of the guesswork out of spraying. These tend to cost more money but the need to figure out pressure settings, or what might be causing spraying issues is often reduced. Fuji Spray Systems has several set ups of HVLP spray equipment. These setups do work well but you are essentially locked in, as they will likely not work with a different spray gun, or a new compressor.

When you get your equipment set up, you should test it all put together to assure it’s working well. Simply fill the gun with water and check out the pattern quality and play with the adjustments on the spray gun and compressor to learn what they control. After that, move onto spraying the product you need to spray, but do so on test panels first. You can start with large pieces of cardboard coated with a dark color house paint. The sheen should be somewhat similar to the kinds of paints you work with. You’ll probably need to readjust the controls when you graduate from water to product, because the isolation coat mixture or varnish will have a different viscosity and flow rate. Before you jump headfirst into coating an actual painting you care about, be sure to practice your technique and follow the tried and true spraying application methods rather than “getting creative”. Here are some links to give you an idea of established methods: http://www.proceedsystem.com/wiki/index.php/Proper_Spraying_Techniques & http://www.proceedsystem.com/wiki/index.php/Spraying_a_Panel. As always, if you have any questions or issues, just contact a GOLDEN Materials Specialist!

Thanks you for the information.
Okay, so I did some research, and since I already own a Makita Mac700 air compressor, and I really don’t want to purchase a large air compressor, what about using the following: Iwata 4931 – Lph80-124G Gun/Cup(Pcg2D-1)? It makes a 5.5 inch fan spray pattern. On my next payday, I plan to purchase the Iwata and may leave feedback on how it works for me.
I have another question for you that is really the reason I am writing this reply. I have been making panels using hardboard mounted with wood glue and brad nailer brads onto ripped 2×4 frames, routing the edges clean, wood putty, sanding then 2 coats of gesso followed by a thick coat of Golden Absorbent Ground. I make the image using ballpoint pen, pencil, staining & watercolor effects using Golden High Flow Acrylics. I spray a very thin coat of the mixture of GAC 500 & Transparent Airbrush extender followed by my favorite topcoat: Using a very large pallet knife, I spread a thick layer of Heavy Gel Gloss. Lately, I’ve been getting small bubbles appearing in the lower levels of the thick coat of this layer. Should I be wetting (perhaps with an atomizer) the panel before knifing the gloss to prevent the bubbles? Or do I need to brush a layer of something a bit thicker like a mix of GAC 500 and Acrylic Glazing Liquid? I really like the knife marks on the thick, glossy coat, so I would prefer not to use self leveling gel.
I would appreciate your feedback.
Hello Steve, Thanks for contacting us. The compressor and spray gun should work well for you, although the air tank on the compressor is relatively small, so it’s likely the compressor will need to continuously run while you spray in order to maintain the required air pressure. It’s possible the thin coat of GAC 500/Airbrush Transparent Extender isn’t enough to seal the wood, and another coat or two might make all the difference for the bubbles in the thicker gel layer. You don’t mention what your “favorite topcoat” is. Is this a GOLDEN product(s)? Some topcoats might have sensitivity to the acrylic mediums, and I’m wondering if this topcoat is even necessary if you have enough of a sealing coat of the GAC 500. Keep an eye on temperature and air movement. Forced warm air can sometimes create bubbles, so it’s better to limit direct airflow for at least a couple of days if possible. You might also want to try a thin skim coat of the Heavy Gel Gloss, allowing it to dry, prior to the more substantial layer. You can always contact us directly at [email protected], or me personally at [email protected] if you want to elaborate. Some photos of your process and issues would help greatly, by the way! – Michael Townsend, Materials Specialist.
Thanks for your quick reply, Michael!
Actually, the Golden Heavy Gel Gloss serves as the topcoat, which is my favorite. I really like the sense of depth it adds.
After reading your response, I think I figured out what happened. I’ve been trying to rush things because my personal goal is to complete as many paintings as possible, so in the last two panels, I skipped the step of brushing a layer of Golden Acrylic Glazing Liquid, because it takes a day to dry before I can add the Heavy Gel. Perhaps I should no longer skip this step, in which case, I will need to mix the Glazing Liquid with something to speed up the drying process. I have GAC 200 and GAC 500. Would one of these help speed up the drying process? Once I add the Heavy Gel layer, I leave the painting at least 24 hours in my spray booth, which is about 4 ft x 4 ft x 8ft made of PVC pipe and 2 mil clear plastic sheeting, so it dries pretty slow with no draft.
I think I should email some photos in an email. Thanks again,
-Steve Franklin
I do not have the kind of studio space it would require to set this up myself. Do you have any idea of resources where (Los Angeles) I could have my paintings varnished?
Hello Bettie,
We do not have a list of companies that do this kind of work, but I would suggest visiting http://www.AIC.org as they have a “find a conservator” section, where you can contact local conservators to work on your paintings, including varnish application. Another suggestion would be to see if a local frame shop provides this service. Lastly, if there is a furniture repair shop nearby, they may do this as well. Very often they have the spray equipment and a dust free environment for spraying coats of lacquers, shellacs and polyurethanes, so they should be able to spray products like the GOLDEN MSA Varnish. If you do find someone that is willing but doesn’t know our products, you can always have them contact our Technical Support Department, at 1-800-959-6543 or [email protected] – Michael at GOLDEN
I’ve been flirting with the idea of investing in a HVLP spray gun, but I find it a little intimidating. I am currently using an electric paint sprayer, which is good, but bulky and heavy so not so practical for certain projects.
I noticed this post is a year old, so, would you add or change any of your tips after a year using this compressor and spray gun?
Thanks in advance!
Hi Brian,
The information is still relevant. If you have an electric model the HVLP gun should provide a smoother application and overall a better spraying experience, especially with varnish. I like to have people start with the $40 Vaper unit for it’s low cost and decent performance. Then, if you outgrow the gun and want even better results, you at least know what you want out of the better gun. For many artists, the $40 gun works just fine for what they need it to do, so they have saved a lot of money and avoided the overkill of too much spray gun for their needs.
– Mike
MIke,
What do you suggest as the next step up (or a higher quality version) of the Vaper unit? Is there another model that is higher quality that gives you more steady results?
In advance, thanks!
Hi Cory,
Thanks for asking your question. As you move up in quality (and price) there are quite a few spray guns that distance themselves from the entry level spray guns like the Vaper. Anest Iwata’s “Impact spray gun” are a good choice. The 1.8 HVLP “Gunsa” is reasonably priced and this is a good overall brand of quality guns.
– Mike
Hi Mike,
Thank you! I swear I’ve been scouring the internet for years looking for this information! My question is also about size. I want to use this system for even, stroke free isolation coats on my acrylic painting but in most cases I won’t paint larger than 18×24.” Is there a system that is smaller but will give me enough power to do a painting that size?
You are most welcome, Leilani.
It is very true that this information isn’t easily accessible, especially with the artist in mind. Either you learn the hard and expensive way, or work in an automotive garage or cabinet shop to learn about the tools and techniques.
For smaller works, you can use “touch up” spray guns. They are smaller versions of the standard HVLP guns but bigger than airbrushes. The link is for reference only, so shop around for similar models. This is the same brand (Vaper) as the one in the article which are well made but very reasonable.
– Mike Townsend
Glad I found this blog! I’m looking to purchase my first system for varnishing my paintings as well. I currently have a 3 gal. 1/3 HP 100 PSI Oil-Free Air Compressor. Would that be enough power to spray Golden varnishes evenly with one of these spray guns you recommended? Thank you.
Hello Serena.
Thank you for contacting us with your questions.
The answer to your question is that it depends more on the spray equipment than the varnish (or other products) you would like to spray-apply.
I found what sounds as a similar sized compressor at Harbor Freight. If you look at the specifications of this compressor it provides this detail: “0.6 CFM at 90 PSI, 1 CFM at 40 PSI”. Spray guns will have the same information in their specs. For example, here’s one gun that would struggle with this compressor. An HVLP gun that would work better is this one. But even the second one would struggle with the small compressor you have. The key is not the air PRESSURE, it’s the air VOLUME.
So, the answer is NO. The compressor you have can work well with an airbrush but not an HVLP type spray gun like the 1.4mm Vaper that I listed in the above article . The kind of compressor better suited for spraying varnish would be something in the 20+ gallon size.
I hope that helps with your question. Contact me if you have any other questions!
– Mike Townsend
Hey Mike,
Fuji spray systems are some of the best out there. You’re correct in that running water through the paint sprayer is a good first step in getting a feel for the tool.
One thing that I would recommend is holding the trigger initially as new systems usually have a backup of air and the initial spray usually spews out until the hose fills.
The compressors at Harbor Freight are ok but I’m not crazy about their return policy. They do carry a pretty awesome HVLP sprayer by Central Pneumatic. It’s awesome for finishing work – cabinets, furniture, even automotive restoration.
Thanks for sharing Mike.
John
Thank you John.
I very much appreciate the comments and I’ll try to incorporate your thoughts on the priming the hose into the above article. It’s great that you are willing to help educate beginners that usually will not have any prior spraying experience. There are very few online resources to try and simplify the use of these incredible tools!
– Mike Townsend
You’re welcome Mike.
Yeah, I been spraying for a few years now… I started my little blog earlier this year just to help some people out and reflect back on some of my knowledge. Nothing crazy though, just a hobby project to keep myself busy.
Regarding Harbor Freight, I just picked up a 23 gauge pin nailer that worked like a charm. It kind of coincides with the the compressor tank (if you have one) but what’s great is you really don’t need to touch up your spray jobs when doing crown or custom cabinets.
Worth the 30 bucks!
The 18 gauge leaves some deep marks that need putty. Speaking of which, another cool tip to filling holes is to simply use a small smudge of non shrink compound. Never been a fan of putty lol.
Hi,
The paint sprays you mentione, Which paint sperays better for me?
With which I can paint my house, furniture and other myself. It would be great for me if you could tell me a little bit Please?
Hello Benjamin.
Thank you for your questions. I do not know what sprayer would be best for your needs, but spraying varnish requires equipment intended to spray varnishes and other thin liquids. Automotive spray equipment is a good place to start.
– Mike Townsend
Hello Michael!I need a compressor to use to paint my door with varnish.For the first timer who will use a spray compressor.What will you advice that i can buy that more affordable price?And can use easy that cannot waste a lot of varnish that i can use to paint all the doors in my house.And do you think there is available shop for compressor that i can buy here in the Phillippines?Thanks in advance!
Hello Lhorie. Thank you for contacting us with your questions. You can locate the kind of compressor you’ll need to spray varnish in the Phillipines. Here’s one that I found via online search: https://www.lazada.com.ph/products/best-sellerdekes-aircompressor-heavy-duty-air-compressor-portable-compressor-air-tankoil-free-980w-industrial-air-compressor-air-pump-household-220v-30-litersoil-free-system-100-pure-copper-super-select-large-buffer-silent-high-power-micro-tube-i3060366391-s15083866143.html?clickTrackInfo=query%253A%253Bnid%253A3060366391%253Bsrc%253ALazadaMainSrp%253Brn%253A3f0d5c14142791bbbcdd0a4625b01f91%253Bregion%253Aph%253Bsku%253A3060366391_PH%253Bprice%253A4999.00%253Bclient%253Adesktop%253Bsupplier_id%253A500166426531%253Basc_category_id%253A10100244%253Bitem_id%253A3060366391%253Bsku_id%253A15083866143%253Bshop_id%253A1687698&search=1&spm=a2o4l.searchlistcategory.list.i40.477b78ceQBVdwX
Use an interior/exterior varnish for wood. Spar Marine Varnish which is a solvent based polyurethane varnish. https://www.lazada.com.ph/products/pye-wood-varnish-polyurethane-varnish-i3039771372-s14969540684.html?clickTrackInfo=query%253Apolyurethane%252Bvarnish%252Bfor%252Bwood%253Bnid%253A3039771372%253Bsrc%253ALazadaMainSrp%253Brn%253Afc5adeed666accc6507d810aa885cdc0%253Bregion%253Aph%253Bsku%253A3039771372_PH%253Bprice%253A878.00%253Bclient%253Adesktop%253Bsupplier_id%253A500188401021%253Basc_category_id%253A22616%253Bitem_id%253A3039771372%253Bsku_id%253A14969540684%253Bshop_id%253A2814563&search=1&spm=a2o4l.searchlist.list.i40.4a737c70Y1ocka
– Mike