 I am going to present a stretching procedure that may sound heretical and very much at odds with what artists are taught about canvas preparation from their earliest studio days. I ask that readers please suspend disbelief and give a try to some of the special techniques that follow. If these procedures are embraced, artists will find the results astounding, almost revelatory. Like so much in our lives, the truth is in the details. Pay attention to the details and beautiful results occur. But please be forewarned: once stretching a canvas according to the procedures that follow, there may be no going back to ways used before.
The concepts I will describe are not entirely new or unknown. But a lot of times we do things out of habit, convenience or because we were shown to do them a certain way. Some of the techniques will require extra effort, care and preparation. I believe the results will speak for themselves and will be well worthwhile, insuring maximum longevity for canvases beautifully prepared.
My experience is based upon 40 years in art and conservation from the viewpoint of a lover and student of art, art materials and techniques, a practicing painting conservator, and as an educator. Much of my understanding of canvas preparation came from my graduate school training under legendary conservators, Caroline and Sheldon Keck at the Cooperstown Graduate Program in the Conservation of Historic and Artistic Works (now the Buffalo Art Conservation Program). My initial learning has been modified by years of further research and observation.
Stretched Canvas
The stretched canvas has been the painting format of choice for close to 500 years. Alternate formats, such as painting on wood panel and wall installations (lime plaster fresco or canvas glued to wall) offered their own advantages; they also had the limitation of being site-specific, weighty, unwieldy, or difficult to move. The introduction of stretched canvas allowed for paintings of appreciable scale that could be stretched onto open wood grid frames, producing pictures of light-to-moderate weight that could readily be transported and relocated.
Of course, as with any format, the success and longevity of the artwork will depend upon how fine the preparation is, how sound the construction is … and if the art is properly displayed, stored, cared for and handled over time. One after another, stretched paintings reveal their history: how and why they age, and favorably or not.
Goals of Canvas Preparation
There is a direct correlation between proper canvas preparation and painting longevity. For canvas paintings, the suspension of the fabric is of paramount importance. A well-stretched canvas is a well-suspended one. If well suspended, well painted and well cared for, a painting may go quite some time before intervention is needed.
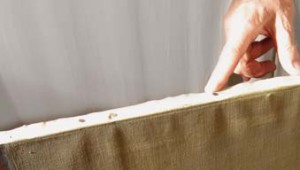
If canvas suspension is not uniform throughout, variations in tension result. Extremes in canvas pull (overly tight or overly loose) and planar distortions (sags, puckers or draws) will have adverse effects over time. Strain is transferred to the sizing, ground, paint and varnish applied atop the fabric. These forces lead to cracking, lifting, buckling and flaking of the design layers. We are all too painfully aware how physical and visual alterations may conspire to detract from the appreciation of a treasured artwork. (See image 1)
My goal is to share with you a technique that insures beautiful, uniform canvas spring and tension, very much like that of a trampoline. Previous failures that may have been experienced in achieving flat, planar, and taut canvases that hold up over time may be largely mitigated with this system.
I usually like to start discussion with preparatory steps before getting to the actual fabric stretching. There are numerous fine points that contribute to first-rate canvas preparation. Due to space limitation, I will confine this discussion to the stretching procedure itself. I then encourage artists to explore the additional materials and references offered at the close of the article (see: “Canvas Stretching Resources,” page 5). Additionally, go to goldenpaints.com homepage for “Information Sheets.” Let’s begin by looking at how canvases are traditionally stretched.

“Stretching From the Centers Outward”: The Mistaken Traditional Technique
The most often used method for stretching has been to mark the canvas centers (top, bottom left and right), stretch and tack the center points, and then to proceed stretching, working from the centers outward. Some artists do this a few tacks at a time, moving onwards to opposite locations, until reaching the outer corners. Other artists will tack a half a side at a time, working from the centers outward, and rotating a quarter turn at a time, as if making a pinwheel. All techniques that restrict the center body of the fabric, leaving the outer regions until last, guarantee an unsatisfactory stretching dynamic. The central threads are locked in place at the outset. As stretching and tacking continue, the fabric is resistant to respond as it is restricted in the middle and can only be stretched in the region not yet tacked. Increasing tension is built as the corners are approached. In fact, by the time the corners are reached, tension is so tight there is very little stretching that can be done at all. (Images 2a, 2b, 2c)
If one were to take a canvas and make parallel lines every inch in both the warp and weft directions, stretching from the centers out would reveal a very observable distortion. The lines would be parallel as stretching begins in the centers, but as the corners are neared, the lines would be pulled inward and it would be very difficult to bring the outside line to the stretcher edge. (Image 3)
This sets up an overly tight corner tension. Now, skip a few years ahead and imagine the side or corner of the painting being knocked. This is sure to induce diagonal cracks across the over-stretched corner.
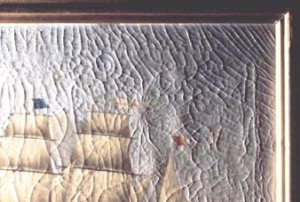
Then, imagine the painting becoming slack at some point, especially in the soft middle. When corner joins are expanded by keying by an eighth to quarter of an inch, a tremendous tension is produced in this short distance across the join. This same eighth to quarter of an inch width is insignificant across the much larger distance of the canvas middle. Thus, in order to bring up a soft belly, an extreme amount of keying has to take place at the corners where additional tension can barely be withstood. No wonder painting canvases often break at the corners and paint forms classic mechanical crack patterns traversing the corners. (Image 4)
Reverse Forward: Stretch From The Corners Inward!
My recommendation is to reverse the procedure, to perform the stretching working from the corners inward. I realize that people have been burned at the stake for lesser offences but I’m confident once you try this you will become a believer as well!
Step-By-Step Proper Stretching Technique
- Select a workspace with good light and maneuverability. Prepare a clean large worktable, sawhorses or floor area. If using the floor, be sure to lay down a clean piece of polyethylene sheeting to prevent dirt transfer from the floor.
- For successful stretching, the studio space must be closed off sufficiently so that some semblance of a constant, moderate environment may be maintained throughout the procedure. Ideal conditions for painting materials lie in the ranges of 64-76ºF and 44 to 55% relative humidity. A small dial or digital thermometer/hygrometer enables the reading of room levels at a glance. Stretching will be much easier if the room is on the warm and humid side; materials will be far less flexible and plastic if the room is cold and dry.
- For expediency in this demonstration, I recommend a roll of commercially prepared, primed canvas (ready-to-go, since basic alignment, sizing, and priming have all been taken care of at the factory). Handle the pre-primed canvas carefully; though generally durable, it is very easy to put permanent crimps or breaks in the continuous priming.
- Unroll the canvas, study the fabric and determine the orientation of the weave. Ideally, the fabric should be equally firm in both the warp and weft directions. Invariably, one direction is found to be tighter than the other direction that is found to be stretchy. Plan the painting orientation so that the tight direction of the canvas will run vertically, top to bottom on the stretcher. This will guard against inevitable sag from the pull of gravity over time.
- Now temporarily lay the stretcher on top of the fabric. Assess the amount of margin that will be needed beyond the stretcher dimensions and add an ample margin, say 3 or 4 inches of working fabric, beyond each side. Do not be stingy, maxing out the fabric and leaving only a ½” beyond the stretcher. This will make stretching difficult. (Image 5)
- Line the stretcher as best as possible parallel to the weave and faintly mark the fabric, tracing the extreme edges and corner of the stretcher with a pencil. Don’t forget to mark the 3 to 4” beyond the stretcher as well. Set the stretcher aside.
-

5. Insufficient tack margin allowance makes stretching very difficult. Next, draw weave indication lines to assist stretching accuracy. Lay the point of the well sharpened pencil in the groove of the weave at one of the corner marks, and draw a continuous line that follows the weave, extending to the corresponding other side. Often times, the weave has a distinct curve to it and the line indicating the weave will not line-up with the equivalent mark by the time one gets across the fabric, being off an inch or two. It is the true line of the weave we wish to follow. I often draw a second line one-quarter inch in (or out, if the first line is way off base) from the first line, so that I may observe parallelism and any inaccuracy very quickly. My preference is to have the lines inside the outer marks, so that the lines remain visible on the front of the canvas as I perform the stretching (face up). If the plan is to stretch with the fabric face down, the lines will need to be outside the perimeter marks, so that they may be observed on the sides of the stretcher.
Drawing pencil lines of the weave is usually easier in one direction than the other; the latter weave direction can be trickier to follow and the pencil may wish to jump threads, not following an easy straight line. Please note, it is impossible to draw careful lines if pressing against a rough floor or table; the surface under the fabric must have a smooth cardboard, panel or laminate surface, otherwise the pencil will jump out of the weave groove every time an irregularity is traversed.
If the weave is too fine or filled with gesso, the indication lines may be lightly drawn using a straight-edge as a guide.
Stretching From the Corners
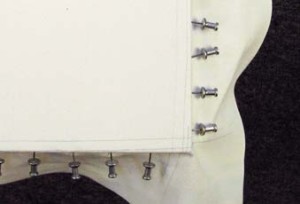
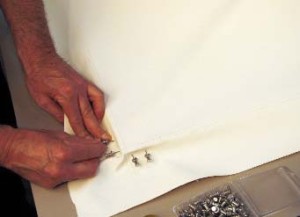
Place the fabric on the stretcher and line up the parallel pencil lines with the outer wood bead. If reluctant to totally abandon the center point marks, you may temporarily set the canvas with pushpins in the stretcher sides at each of these points. Now set the four corners of the fabric, placing push pins (See Note 1) along the outsides of the stretcher to the immediate left & right of each corner. Prejudge as best possible the tension anticipated when all the pins would be in place. Now remove the center pins, leaving the entire middle of the canvas free, as this would have restrictive effect upon the canvas during stretching. Starting from the corners, use the canvas pliers (See Note 2) to gradually coax and stretch the fabric. Avoid fast, forceful movements; these could break the priming or threads. Secure margin with pins, advancing two or three pins at a time. (Image 6) Keep moving to opposite locations and continue stretching from the corners inward, bringing up no location significantly in advance of any other. (Image 7) The central region will remain untacked and loose until the last pins are placed. Pay attention to the pencil guidelines throughout the stretching process; they should align straight and equidistant (parallel) to the outer bead, indicating that the canvas has been pulled up uniformly true and even.
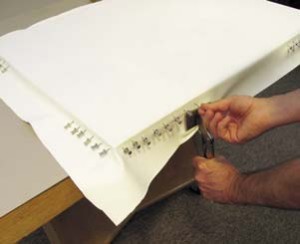
When a canvas is stretched and pinned starting from the corners, the unset center portion is unrestricted. As stretching continues, the center is gradually pulled up, but with no undue, irregular tension. I am sure readers may be worrying, “what if I end up with a big welt of fabric left over in the middle with nowhere to go?” Please do not worry. This simply will not happen.
What does happen however that is, once entirely pinned, the parallel reference lines adhere to their parallelism throughout. More importantly, the canvas now exhibits an unrivalled suspension, uniform in tension, on the order of a trampoline. (Image 8) This can be observed if the stretched canvas is stood along its long side and if a strong tamp is made with the hand at one end of the canvas. This will create a wave which may be observed to follow clear across the canvas and then, like ripples in the water, this wave will echo back and return to the sender. This phenomenon will not occur with a painting stretched from the centers outward because differentials in canvas tension will absorb and stop the wave movement. Awesome, huh?
Securing Stretching Margins To The Strainer/Stretcher
It is wisest to set aside the stretched canvas pinned on its stretcher for a day or more before setting with staples/tacks (See Note 3). With climatic shifts and the passage of time, the canvas will relax and settle onto the stretcher, giving a true indication of how even or not the stretching is. If puckers, draws or slack passages appear, the pins may be removed from those locations and the canvas re-stretched as needed. When the desired canvas suspension is achieved, the canvas may be placed face down against a clean wall or floor. If the latter, lay clean paper, glassine or polyethylene sheeting on the floor, to be sure grit does not become embedded in the priming.

For the cleanest painting edge look, the fabric may be wrapped around to the rear and tacked with staples to the stretcher reverse. This also keeps most of the tacking well away from the frontal image plane. Do not remove or trim extra fabric. Remember to leave generous canvas margins to provide work edges for when the canvas needs re- stretching or conservation in the future. Never cut away fabric at the corners. Finish the corners, neatly folding and tucking the fabric under and to the back. (Image 9) Some artists distribute the fabric over two folds; others choose to gather the fabric in a single fold.
The pins should not be removed from the stretcher edges until the canvas is completely stapled or tacked. (Image 10) While the pushpins are holding the front of the canvas under tension, the fabric should still be pulled with finger grip just prior to setting each staple on the reverse.
CONCLUSION
I realize that many of you at this point are non-believers, thinking, “I’ve always stretched from the centers outward, that’s the way it’s always been done. Besides, it is too many steps and I don’t think it could make that much difference.” Once you try this procedure, however, you’ll be convinced it is a truly superior way to prepare your canvases. This is one time stretching the truth really is so! I wish you the best in preparing beautiful supports for your painting.
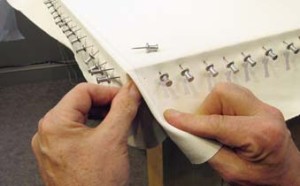
NOTE 1:
Hundreds of Little Helpers
Aluminum pushpins are invaluable for temporarily setting stretched locations as one moves along. Metal head pushpins with long pin shafts work beautifully; shorter, more commonly found plastic head ones, are awkward to use and often pop out, releasing attachment points.
Purchase several packages of the Moore®100-5 Aluminum or Stainless Steel pushpins (quantity: 100 per package; pin length 5/8”). They may be used again and again.
When inserting pushpins, tilt them upward slightly to counteract the pull of the canvas so they won’t pop out. Spinning the pins while pushing helps to drive them into the wood. If dealing with a dense, hard or aged wood, a plastic head hammer (clear yellow) may be used to tap the pins into the wood. Do not set the pins too deeply; this will make removal difficult and will limit easy readjustments (you may use a staple gun as well but make sure you set the staples at a similar angle as the pins and again, do not set too deeply).
My preference is for pins to be evenly placed at 1-1/4 inch intervals. The 3-inch to 6-inch interval between staples or tacks that is often observed on modern paintings is simply inadequate; a few lone points of tacking are asked to carry a formidable load. This results in uneven canvas tension, undue slack and cusping (a scallop-like appearance a la Viennese curtains) of the fabric.
NOTE 2:
Stretching Pliers Design
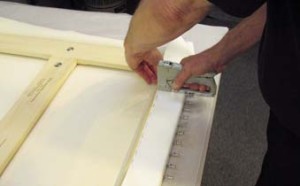
Fingers and hands are unable to grab onto canvas and pull with the strength that well designed stretcher pliers are able to. Pliers come in a variety of types but examples available in art stores are often limited. It is worth researching suppliers online and asking artist colleagues which pliers they use and how effective they are in practice. (Image 11)
The most commonly available pliers are ones with small rectangular jaws with interlocking “s”- wave profiles (reminiscent of crinkle-cut french fries). This design increases surface area of contact and guarantees a powerful lock against slippage. Unfortunately, the sharp jaws often also guarantee crushing and weakening of the ground and fabric, sometimes to the point of breakage.
My preference is for pliers with relatively flat-faced jaws; sometimes the face surface is cast or tooled with a mild textural pattern to insure against slippage. The jaws must be good-sized in surface area and of superb quality and leverage to grip sufficiently. I use ones with stainless steel jaws that have been filed and sanded smooth along edges so as not to break or cut the fabric. Most pliers have a central heel protruding just below the jaws. This heel serves as the leverage fulcrum. It is braced against the stretcher wood, the pliers are rotated (pushed forward and downward), and the fabric is pulled tight. Plier handles may be set at different angles, depending upon if the pliers are designed for face-up, sideways or face-down stretching. It is helpful to have pliers for different jobs; a super-sized canvas requires pliers different from those designed for smaller canvases.
NOTE 3:
Staples And Tacks
There are arguments pro and con for both heavy duty and lightweight staples. I try to select those that are suited to the demands of the project at hand.
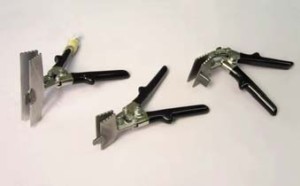
- Heavy-duty staples have a nice flat wire profile that grips fabrics nicely. It does not usually cut across the long flat face, but it makes good-sized holes at the two points of staple entry.
- Lightweight staples of fine wire size make very fine entry holes, but have the potential to cut into the fabric if driven too far.
Any staple, really, has the potential to crush the fabric if the wood is very soft and/or the staple gun delivers with too much power. Whether manual, electric or air-compressor driven, a staple gun that offers tacking power adjustment is best. Also, it is not necessary to go overboard with the staple length. A 5/16 or 3/8 inch long staple is plenty deep. A 3/4 inch long staple is overkill and anyone removing these deep staples will be cursing whomever did the stapling.
Always take great care when removing staples. Use a tapering, tongue-shaped staple remover tool, gripping it firmly and gradually working the tongue under the staple, prying upwards. Never pull upward on the canvas itself to remove staples. And never rush staple removal or allow a tool to slip. Shortcuts or accidents result in punctures or tears to the all-important tacking margins.
One technique for reducing staple crushing and cutting is to introduce an interleaving strip of fabric banding (cotton strapping, linen tape, polypropylene strapping, etc.) as cushioning between the staples and the canvas. This system is particularly suited to paintings that require repeated unstretching and re stretching. (Image 12)
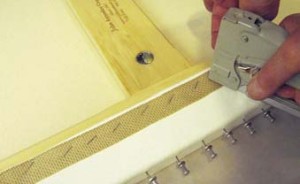
When it comes time to remove the staples, bands may be pulled upwards, pulling the staples out of the wood as well. If not completely freed, the partially lifted staples may be readily gripped and removed with a linesman, bent-nosed or other pliers.
If using tacks, I recommend copper plated steel tacks. They will not corrode the fabric as steel tacks do, and they will respond nicely when using a magnetized head tack hammer for setting. When hammering, grip the wood handle as far as possible toward the base of the hammer (away from the head). This produces a more tangential, 90-degree angle, encouraging tacks to go in straight and flat, not tipping at various angles.
INFORMATION SHEETS
Environmental Conditions for Successful Canvas Stretching
Selecting Artist Canvas for Painting
Stretching Unprimed vs. Pre-Primed Canvas for Painting
Stretcher / Strainer Frame Options for Canvas Painting
Stretching Canvas Face-Down, On-Edge or Face-Up
Unstretching and Restretching Existing Canvas Paintings
Protective Backing Boards for Canvas Paintings
MATERIALS CHECKLIST
Thermometer/hygrometer
Tape measure
Graphite pencil
Straight edge
Stretcher pliers
Moore® 100-5 Aluminum or Stainless Steel Pushpins
Plastic head hammer (small, e.g. 5 oz.)
Staple gun w/adjustable power
Staples
Copper plated steel tacks
Tack hammer (small, 5 oz., magnetized steel)
Tongue-shaped staple remover
Linesman and/or bent-nose pliers
Primed linen or cotton canvas; Unprimed linen or cotton canvas
SUPPLIER
Custom stretcher/strainer support manufacturer, canvas pliers,
and canvas goods.
John Annesley Company
259 Brandt Road PO Box 181
Healdsburg, CA 95448
(707) 433-4238 (888) 471-4448
Fax (707) 433-1831
SELECTING A CONSERVATOR
American Institute for Conservation of Historic and Artistic Works
AIC: Find a Conservator
BIBLIOGRAPHY
Gettens, Rutherford J. and George L. Stout.
An Encyclopedia of Painting Materials,
NY: Dover Publishers. 1942/1966. 333 pp.
Gottsegen, Mark David.
The Painter’s Handbook – Revised and Expanded,
NY: Watson-Guptill Publications. 2006. 357 pp.
Per James Bernstein
About Golden Artist Colors, Inc.
View all posts by Golden Artist Colors, Inc. -->Subscribe
Subscribe to the newsletter today!
No related Post


Hi – It’s James Bernstein, author of the article. In the transfer of the publication from the previous golden website to the new, dedicated Just Paint website, a number of the images that accompany the text have disappeared and been replaced with other images that do not seem to correlate (e.g., the racks of Golden paint color swatches in image 2a have nothing to do with canvas stretching). When able to, would you kindly research this and pair the original images with the text in the reformatted article. Thank you so much.
Best regards, Jim
Hi James,
Sorry for the confusion. We’ve got the images fixed now. 🙂
I find this article helpful as a custom framer with a particularly difficult canvas to stretch. However, won’t the action of shoving pushpins into the canvas leave little holes all around the perimeter? It seems like that would not be a great solution to a gallery wrap, where the sides are meant to be seen. Any thoughts?
You could always put a ribbon of canvas (its width the same as the stretcher’s depth and color suited to that particular painting) that hugs the visible sides, starting and ending at the center-bottom point (the least visible). I’ve seen this done with for whatever reason with a few museum pieces in floater frames, and it isn’t noticeable unless you’re really looking for it. I wouldn’t know what adhesive to use that would be reversible by a future framer or conservator, but I wouldn’t think it too hard to find out.
Hello, Thank you for this fantastic writing.
I am in search for a way to hang large format – 2’x5′ and larger – digital pigmented varnished paper ( Canson® Infinity Velin Museum Rag 250 or 315 gsm – Matte prints. Would this system work for fine art paper. I need the work to be conservation quality appropriate for museum hanging.
Can you stretch another canvas over an existing painted canvas (to paint on it?) I am severely space limited…
Hi Selena –
The author of this article, Jim Bernstein, is a well-known conservator who is expert on all these types of issues and is quite approachable, so would encourage you to reach out to him directly. You can find his contact information on his website here: http://www.jamesbernstein.com/James_Bernstein_Website/Contact.html I do know that there is a common technique in conservation of stretching a painting over a blank canvas, usually called a loose lining, and so yours is simply in reverse! But whether there are any issues to be aware of, I would defer to Jim. Let us know if you don’t have any success and we would be happy to help further.
I stretch & paint in large format. 8’×15′ would this technique work on this scale as well? It’s less expensive to stretch my own than to purchase and this technique sounds like it would be much easier than from inside out. Foundation is everything to me so this makes sense. Thx for this article & insight.
This article is fabulous and will certainly employ this on my first stretch. so thanks!
I have but owe question.
As the outside lines are drawn to the outside of the bars, I surmise that you when you pull a side taught with the pliers that the drawn line then should end up pulled over to the side of the canvas.
About how much ‘stretch’ is correct – meaning how far down the side of the canvas should I expect to see the drawn line for say at 18″ x 24″ frame?
Hello Karl,
It is hard to say how far the marked threads would stretch over the edge of the stretcher bars. It certainly depends on the weave density of the canvas and also on the weave direction. There would be more stretch in the warp direction (along the length of a bolt) as the warp threads have more crimp (waviness) and thus can give in more. In comparison to cotton or linen canvas polyester canvas would bare stretch at all. As long as you get you reasonable tension on your canvas it should be fine. We are happy that you like this method of stretching and are glad that you are willing to try it. It certainly is a good learning experience.
Best,
Mirjam
James Bernstein This is interesting, but I was not clear how it progresses from corner to corner. Do you go diagonal katy corner? or pinwheel?… a video would be fabulous or a diagram with arrows and numbers indicating the steps/locations in order.
Thanks
Hello Elizabeth,
thank you for your question. As long as you move forward, stretching always opposite sides, it should not matter what order one follows. You are right, this would be a great topic for a video. We will put this on our list! Thank you for suggesting that.
First of all thank you guys for such insightful information, i know this article has been posted for some time but i have a few questions. would this method work with a piece that is already painted on? also as far as margin the stretch goes, you guys recommend 3-4″ when i paint a good amount of the time my paint passes the margin space area even onto the wall, will this cause damage to the artwork when stretching? i still plan to stretch the canvas with 3-4″ space but i’m worried the paint will damage the overall piece. thanks again for all your guys hard work, especially during this covid pandemic.
Hello Ramiro,
thank you for your comment and please excuse our late reply. When stretching painted canvas it is usually best to first pin the painting in a couple of spots- a few pins in the middle and in each corner- to make sure the painting is positioned right. Then you can go ahead and staple the painting on. Since you won’t be able to see the canvas weave you might as well go from the middle towards the corners when stapling. There is always a higher risk of painting edges getting abraded, regardless of whether they are painted or not. Particularly if the painting is not framed. While you stretch your primed and painted canvas and bend the painted margin over the stretcher bars, there is a risk of the paint layers breaking open. Particularly in dry or cold environments. To work against that, you can try warming the margins directly before stretching with a hair dryer. This will make ground and paint layers more flexible and may help that the layers won’t crack open. Although we would not expect these cracks to pose a structural problem, they are primarily an aesthetic issue.
We hope you stay well & safe and continue to enjoy painting!
Mirjam
In my first attempt, the pushpins have worked very well, but I stapled on the back from the edges to the center and it appears to have introduced some unevenness. I’m concerned that when I remove the pushpins the canvas will have slack areas. Should I have stapled the canvas from the centers out, as it appears to be done in the photo?
Hello Peter,
It should not matter where one starts stapling on the canvas, since the pins should hold the canvas in place. Especially when using an interleafing fabric band (as in image 12), it would be the easiest to go from one corner to the next in a circle. You can always correct uneven tension by either removing some staples and stretching that area again, or by keying out the stretcher bars. It should be fine to key out stretchers before painting. It mostly becomes a concern, when excessively keying out aged oil paintings with stiffer paint layers.
Thanks so much for this post! I’ve often battled with puckers while stretching canvases, especially panoramic ones like these https://bill-horne.net/painter-imagery/ and the working from corners approach works way better than my old school method 😉
Hi Bill – That’s awesome to hear! It certainly revolutionized the way I stretch canvas, where, like you, I have adopted the corners-in approach.
Hello
Thanks for this wonderful article. However, one critical question still remains, the same as another commenter’s:
“I was not clear how it progresses from corner to corner. Do you go diagonal katy corner? or pinwheel?”
A reply states: ” As long as you move forward, stretching always opposite sides, it should not matter what order one follows.” However it is still unclear what is meant by ‘opposite sides’
As the method works outward a pin at a time from each of the corners, I would assume ‘opposite’ means the opposite corner, not the opposite side. Which side would be opposite a corner?
Please clarify, Thanks Again!
Mark Luthringer
Hello, Mark.
I believe you are interpreting the reply correctly. This method starts with pinning the canvas, then stapling/nailing from the corners, then inward to the center of the stretcher bars. This approach is opposite to what most artists traditionally do, working from the center of the stretcher bars and then securing them towards the corners.
Initially, you would secure opposite corners first, then once all 4 corners are secure you continue securing inward towards the middle. You can continue working from opposite corners as you do this, but you can also continue in more of a clockwise pattern. The author would suggest to keep kriss-crossing opposities.
I hope that helps!
– Mike Townsend
I might have been doubtful at first, but the step-by-step guide and the reasoning behind each move convinced me. Can’t wait to give this a shot and see the amazing results for myself.
This is fascinating! Straight to the top of the bucket list.