Overview:
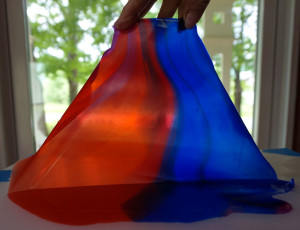
An acrylic “skin” is a dry acrylic film that can be made of paint, medium or a combination of paint and medium, that is not attached to any substrate.
While acrylic skins can be made with just about any GOLDEN Acrylic Medium, Gel, Paste or Paint, our Fluid Acrylics work particularly well since the consistency allows for easy pouring and spreading onto a casting surface. Fluids can be easily blended with any number of mediums or gels to thin, thicken, increase translucency, or alter surface sheen. Usable skins can be cast in one application, but building up your skins in thinner layers will actually speed up the drying process. In this series we are using GAC 800 with the Fluids as it also has the advantage of reducing crazing in pours.
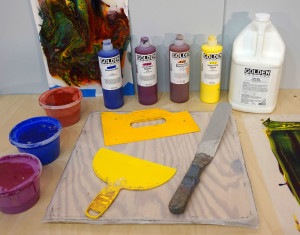
What You’ll Need:
- Polyethylene plastic or “plastic sheeting”, commonly found in hardware stores (at least 4 mil thick) can be used as a surface for casting skins. Large polyethylene sheets can also be ordered from stores handling plastic supplies. Acrylics have poor adhesion to this kind of plastic so acrylic skins can be peeled off easily. Glass can also be used. Do not use Plexiglas or any other acrylic sheeting as acrylic paints and mediums will adhere well to these surfaces. Very large skins are best made with Gels and cast thicker so they can be handled more easily. Thin skins tend to tear and fold in on themselves, making it difficult to pull them apart.
- Fluid Acrylic colors of your choice
- GAC 800
- Spreading tool (palette knife, trowel, plastic joint compound spreader)
- Tape or staple gun
- Board or table of some kind that can accept staples or tape
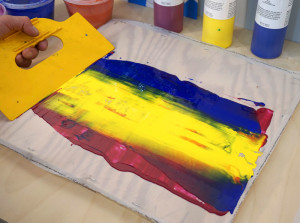
The Process:
Staple or tape a piece of poly plastic sheeting to a board, such as a piece of smooth plywood. If there are wrinkles or creases, these will be cast into the dried skin, so if you need a completely smooth surface, use only plastic that is not creased or a piece of glass. Stretching and stapling the poly sheeting can help in this regard. You can simply pour and drizzle Fluid Acrylic paint onto the plastic or surface which will allow release of the dry skin. Let it dry overnight or for several days, depending upon the thickness and weather conditions. Very thin areas may tear or be too delicate after peeling up, so be aware of the thickness of the paint film during your application process and if you find it is too thin, add another coat.
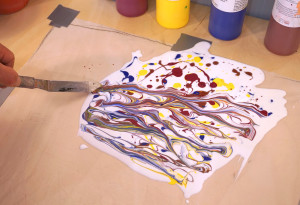
For variable translucent and wet into wet effects, pouring Fluid Acrylics onto a fresh puddle of GAC 800, or any clear or translucent painting medium, offers some wonderful possibilities. This method also helps insure a thick enough film for easier handling. You can pre-blend GAC 800 and a small amount of Fluid Acrylic to create very translucent films that can be added to a collage to create optical color mixing effects. To avoid bubbles in the film it is best to allow those mixtures to sit overnight. And of course, you can use all these techniques to create a mixture of opaque and translucent areas. The wet acrylic can be allowed to flow naturally or manipulated with various tools. Another option is tilting the board so that the acrylic flows. Each method will allow for its own range of effects and experimentation is the best teacher here.
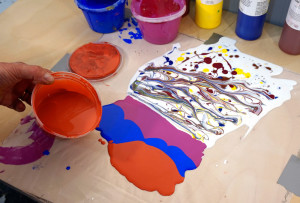
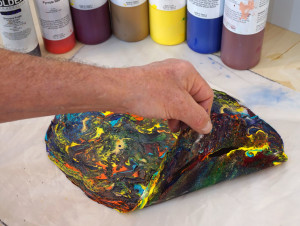
Depending upon the weather and environmental conditions, the drying time will vary. When completely dry, carefully peel up the skin, taking care not to let it fold on itself, as it can easily stick together.
The side of the skin next to the plastic or surface it has been cast upon will be very smooth with a distinctive look, while the top surface will be somewhat textured depending on how it was applied. These two very different surfaces give you a range of options for use. A good way to store skins, is to place them back down on a sheet of plastic and store flat with another piece of plastic on top or a sheet of silicone release paper. You can also roll the plastic as long as no skin is touching another skin.
Uses for Acrylic Skins:
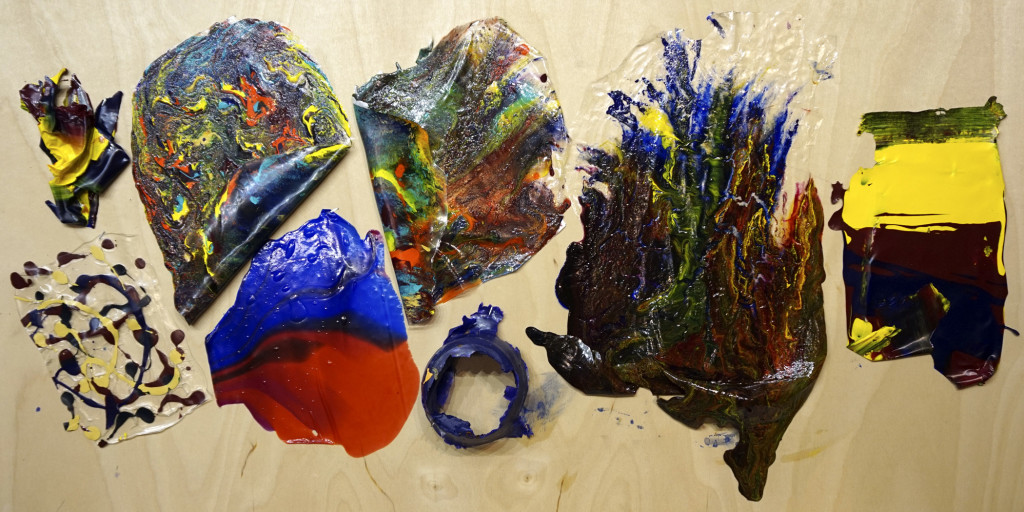
The most common use for acrylic skins is for collage. They can be easily glued down using one of our Gel Mediums or even just pressed into wet acrylic paint. Some artists have used skins as support-less paintings, but these will be very delicate and prone to damage. Possibilities exist with “free acrylic skins” attached to rigid structures, or with non-reactive plastic mesh or cheesecloth inside the skins to combat stretching from their own weight. Skins can be glued down flat with a medium or gel or they can be wrinkled or bunched or folded.
When cold, acrylics skins may be broken into pieces. When warm you can bend, twist, roll or fold them and collage them in a variety of ways. They can also be cut with scissors to make any shape you want. Very glossy skins can be stuck to glass and will stay put for a long time. Take some time to experiment making and using acrylic skins. We think you’ll find it can add a very effective tool to your studio practice.
About Scott Bennett
View all posts by Scott Bennett -->Subscribe
Subscribe to the newsletter today!

I’ve been making sheets of acrylics for a while, and find that they are much easier to peel off of parchment paper than off plastic. Then you can use the same sheet of parchment to store it for a while, such as until you have enough to complete your project, even stacking them, as they don’t stick.
Hi Nancy,
Thank you very much for your input. Parchment paper sounds like a good idea. We would not recommend wax paper as there could be some residue left on the skin that might discourage adhesion when using the skins as collage elements. We don’t know if there is any residue left from parchment paper, but would think less than with wax paper. Thanks again!!
Thank you for your article! I have been working on making skins and find that even once they are thoroughly dry their surfaces tend to be a bit tacky – for example they will stick to themselves. I am wondering if there might be something to treat the surface of the skin to harden or smooth or so that it would no longer stick to itself?
Hi Julia,
Fine art grade acrylic films, especially glossy ones, will tend to be a bit tacky, especially at warmer temperatures. Acrylic gets softer and more flexible when warmer and harder and less flexible at colder temperatures. We are not aware of any product or material that can harden an already dry acrylic film, and hardening would tend to also make the skin brittle, which means that it would be more delicate and could crack more easily. I do know that some artists have used talc powder to make tacky skins less able to stick to themselves and other surfaces. If you do this, we would recommend using a damp cloth to remove any talc from the surface before adhering the skin to another surface. You might want to try the idea that Nancy ( see above comments ) suggested about using parchment paper to store your skins. I have always found it best to use them as soon as possible for collage so they do not get damaged.
Use matte varnish to cover already dried skins to be smoother, or use a matte medium to make the skin to begin with. Matte is not tacky. When finishing the skin in your work, add gloss varnish if you want the shine. 🙂
Hi Ruth,
Thank you for your comment!
It is true that matte acrylic films will be less tacky than glossy ones. All acrylic paint, medium and varnish films can still become softer and potentially tackier at warmer temperatures, as they are thermos plastics. So one should still be cautious with matte surfaced acrylics with packing, shipping and transporting works. The best method is always to have nothing touching the surface. Here is some good information on that topic :
Safe Handling and Transportation of Acrylic Paintings: https://justpaint.org/safe-handling-and-transportation-of-acrylic-paintings/
Here is a short video about one way to pack small paintings: https://www.youtube.com/watch?v=v7HPKy5sW30
It is also important to note that any of our Matte Varnishes should always be used either over our recommended isolation coat ( properly thinned Soft Gel (Gloss), or at minimum over an even glossy layer of medium. Matte Varnishes can malfunction if used over surfaces that are too absorbent. They can over-absorb causing the matting solids to appear uneven and cloudier than normal. It is also important to understand that our Varnishes are true conservation grade varnishes that are removable for future conservation efforts, and very specific application methods are necessary for the best results. We do not recommend painting on top of our Varnishes, with a few exceptions where our MSA and Archival Varnishes can be used as inter-coats on water sensitive surfaces.
See more details in our Varnish literature below:
VARNISHING RESOURCES: http://www.goldenpaints.com/technicalinfo/technicalinfo_varnishresources
Varnish Application Guidelines: http://www.goldenpaints.com/technicalinfo/technicalinfo_varnapp1
Intro to Varnishing: http://www.goldenpaints.com/technicalinfo/technicalinfo_varnapp
Link to varnish and topcoat product page: http://www.goldenpaints.com/products/varnish-top-coat
Isolation Coats: http://www.goldenpaints.com/technicalinfo/technicalinfo_isolationcoat
Should you Varnish your Painting?: https://www.youtube.com/watch?v=bfi6H2dFlcw
anyone know what is used or where to buy the coatings on coated jeans or faux leather thanks I did use acrylic but really stiff thanks
Hello Ruth,
Thanks for your question. If you are interested in trying acrylics again, you could try using our GAC 900. It is a medium intended to be mixed with acrylics in a 1:1 ratio or even parts. This will increase launder-ability and give it a softer hand that maintains more of the feel of the fabric. We do have some concerns using this on the faux leather, but with the denim it should work well. There are many different kinds of “faux leather” materials and often these are made with some type of plastic. We understand that materials like this are often waterproof, and in our experience there can be adhesion issues with water-based paints on waterproof fabrics. There also can be poor adhesion to shiny non-porous surfaces. If there is a level of absorbency, there might be adequate adhesion. It is not something we have tested so it is hard to say whether or not our products would adhere to this material without testing. You could try looking at Angelus Direct, they sell paints for leather and may have something compatible with faux leather.
If you do try our GAC 900 it needs to be absorbed into the fabric and heat set. For more information on GAC 900 refer to this link: Fabric Painting
We hope this helps, if you have additional questions let us know at: [email protected]
Scott Fischer
As the skin remains somewhat tacky, could gold leaf be applied?
This might be possible with glossy skins that are tacky, and you might be able to increase the tack by warming up a glossy skin with a hair dryer, but this is not fully tested and we prefer to recommend a dedicated gold and metal leaf size. We happen to make one that is a custom product and can be ordered via a store that sells our products or directly from us. Here is more information for you about this product when it first came out as an experimental product.
https://justpaint.org/experimental-products/
I recently saw a video of an artist who was making acrylic skins using your soft gel. She made them, and stored them, on a cut open sheet protector (polypropylene). Cut open for the making then, once thoroughly dry, closed for storage in a 3 ring binder. Is there any downside to using the sheet protector?
Hi Cynthia,
One disadvantage would be that they may tend to get ferrotyped, which means that the relatively soft and flexible acrylic surface will be altered by prolonged close contact with the polypropylene plastic. This may or may not matter, depending on the artist. If you like the way a particular skin looks, then it is usually best to store it with nothing touching the surface and using it as soon as possible.
The only other thing I can think of would be that thinner skins may stick too tightly and when peeled off, might tear or perhaps even become too firmly attached. We have seen glossy acrylic skins become very well attached to glass after they have been pressed to the surface for several months. This might happen with the polypropylene, especially if weight is applied.
I was commissioned to paint a men’s summer straw fedora. Since I do a lot of fluid pour abstracts and have made skins in the past for a 55 gallon plastic water barrel commission, I thought I would do the same for the hat.
I made about 5 skins, some opaque and others translucent. Mixed in some metallic flakes and driveway epoxy flakes. Cut large pieces, used soft gel as adhesive, and a hair dryer to soften and shape the piece to the contours of the hat.
It worked extremely well and did add some weight to the hat, but looked awesome and the guy loved it.
Hi Alan,
Thanks for letting us know about this very cool way of using acrylic skins ! There are so many possibilities, and the main limitations have to do with the same characteristics of acrylic paints and mediums in general; that they are relatively soft and flexible ( also a great positive attribute! ), and thermo plastic – a quality you used to advantage by warming to soften them up. This same quality can cause them to stick to other surfaces or become ferrotyped if pressed against another material for a length of time.
For any functional use of fine art grade acrylics, some type of harder topcoat or varnish is typically recommended to add more physical surface protection.
Have you made any videos doing this process, I’d love to learn and watch your art 🤩
Hello Ulisses,
We have two videos which might be informative. The first shows the creation of a clear skin with an acrylic drawing: . The second is a longer YouTube video showing a Golden Facebook event that demonstrates the creation of acrylic skins: .
Looks Like I’m late to the party but I’m starting to adapt small skins for jewelry. I start by making a strong flexible ground by brushing coats of mat Mod Podge onto typical plastic sheet protectors. I store the dried piece while it is still attached to the page protector plastic by rolling them into a cotton rag once dried. I find old bed sheets and tear them into bands wide enough to accommodate the sheets. The cloth makes for good protection and sticking protection for storing until future use. When I finish any particular art piece I find mat Mod Podge is particularly easy to peal off and yet an excellent ground for my work. Cheaper than GAC 800 and superior to my GAC 100 comparatively.
Hi Bob,….thank you for your comments and input. If certain products work for your particular application then we would say don’t fix what is not broken! We would generally not recommend using our painting mediums to make jewelry as they are made to be flexible for typical fine art use on canvas and paper. They are too soft and flexible for use in making jewelry, and the thermo plastic nature can create a softer and potentially tacky surface, which would not be a good property in a piece of jewelry.
We do recommend our GAC 800 and our GAC 100 for blending with our Fluid Acrylics for fine art applications, with the GAC 800 performing very well in creating beautiful, smooth and low crazing pours. In this way, they can also be used to make acrylic “skins”, along with most of our other acrylic paints and mediums.
Hi. I have a acrylic paint skin on aluminum foil, rather than paper or a plastic. Is it possible to remove the skin to use on polymer clay? Thank you in advance.
Hi Mary,
It might be possible to remove the acrylic skin you have on some aluminum foil but much will depend on how thin and delicate the skin is, and whether the aluminum foil is heavy duty thickness or not, as both the skin and the foil could tear during removal. So give it a try. For the easiest method, we recommend using glass or HDPE plastic. You could glue the skin to properly cured polymer clay.
I’m new to acrylic pouring. I’ve been making some skins but most if them are brittle and just snap in half. Can someone tell me what I’m doing wrong?
Hi Penny,
If you used a harder and more brittle acrylic medium such as our GAC 200 or perhaps our Pastel Ground or Hard Molding Paste, then this might happen, especially if the skin is very thin and fragile,… or if you were removing and flexing the skin at a cold temperature. Thinning too much with water could also create a less flexible film. Otherwise, skins made with our Mediums or Gel Mediums will tend to be quite flexible. Try using our Soft Gels or Regular Gels spread applied onto a piece of glass. You can blend them with our paints for added color. You can also make skins from just our paints without Mediums, but adding Mediums or Gel Mediums will save you some of the expense of using all paint. If you would like to continue this conversation via our technical services department, feel free to send us an email at: [email protected] and we will be happy to offer suggestions.
Hi, I just read the “Making Acrylic Skins..” article and am hoping for some advice. I’ve been experimenting with making skins using GAC 500 mixed with iridescent air brush paints (water based) as the end result I want is transparent (or a least translucenct) iridescent layers of different colors. I’m getting layers, but having trouble getting smooth layers and transparent layers. I’m using glass to work on as I want the peeled surface to be as glossy and smooth as possible. I’m currently using GAC 500 as it was recommended in Patti Brady’s book (Rethinking Acrylics). I’m open to using other paints and mediums.
Hello Phyllis,
While we cannot comment on an unknown paint product such as the particular airbrush paints you are using, we can offer some general suggestions for you. A smooth surfaces acrylic “skin” can be created by making the skin on a sheet of glass. When you peel it up it will adopt the very smooth surface of the glass. We are not sure why you are not getting smooth skin surfaces. If you want the upper surface smooth then it is best to apply either a very leveling and low crazing medium such as our GAC 800, or squeegee on a thicker Gel Medium such as our Regular or Heavy Gel. To create more translucency you would just use more Medium and less paint. We recommend using our Fluid Acrylics added to a selected Medium or Gel Medium.
So I have been experimenting with different types of acrylic painting and came across your article that seems very interesting. What I am trying to do is create a pointillism canvas that has circle dollops of acrylic paint on them that are heavy & thick (squeezed onto the canvas from a bottle into little blobs). I am having problems with the dollops cracking while drying. It looks like acrylic paint blended with GAC 800 could solve this issue for me. Do you think that would work?
Hello Chuck,
Much depends on the specific formulation of acrylic paint you are using. If you use our Heavy Body Acrylics by themselves, you should be able to apply “dollops” that will dry with no crazing or cracking. If you are thinning thicker acrylic paints with water, then that will tend to foster more surface defects. Our Fluid Acrylics could work for you also depending on the size of the marks you want to make. And of course you can blend the two paints to create an in between consistency. So you may not need to use our GAC 800, and if you did use it and added water, this would, again, tend to allow for some crazing. If you are using some other type or brand of acrylic paint, then adding in our GAC 800 might help, but you would have to test to know for sure.
Hi Chuck,
Do you know if it is possible to apply any medium to an acrylic skin after it has been formed so that it will harden and stand on its own as a 3D sculpture?
Thanks so much for all the valuable info! I’ve mad some cabochons with skins and some are perfectly wonderful but some get a sort of bluish tint to the whole thing and are ruined. Any suggestions?
Thanks.
Hi Mary,
You are most welcome! From what we understand, a “cabachon” is a tumbled stone, so we are imagining that you might be dripping and placing some of our Mediums and blends of Mediums and Paints onto a piece of glass or polyethylene plastic, allowing to dry and then peeling off to create collage elements that might have some resemblance to a polished or tumbled stone. While this is possible, please keep in mind that fine art grade acrylics dry to relatively soft films, as compared to a stone, and so if you plan to use these in jewelry, they may not wear very well. They will also get softer at warmer temperatures, and can become tacky. If using in painting as collage elements then that is fine. Otherwise, a casting resin might be more appropriate.
As for the bluish tint, this sounds like it could be due to incomplete drying, or it could be the particular sheen you are using. Can you tell us specifically what Mediums or Gel Mediums of ours you are using, and how thickly are you applying them? Thicker applications can take much longer to dry and can show a cloudiness inside that might appear bluish. For ease of communication, it might be easier to take the conversation to email. Please feel free to contact us at [email protected] if you have further questions.
I painted acrylic on raw clay but clay cutters don’t even dent it and I tried using a sharp craft knife but it shredded? How do you cut shapes before baking? Thanks.
Acrylic paint should not be baked. It is plastic and would melt and would give off very unhealthy fumes. If you would like to cut and acrylic skin, scissors could be used.
This is so cool. I have a crazy idea but it needs to be done on the very cheap as I have no budget sadly. There is a camp for students coming up. I would like to do one of these pours with a bunch of students. I would like to do the pour though on a plastic like from the dollarstore – some kind of plastic page that is cheap and solid enough but easy enough to punch a whole to add a ring to then attach to cord. I see you can buy 180 cords with a clasp for like $23 on amazon. If I can get a split ring or whatever for cheap to attach the “pendant” which is cut out of the plastic with the acrylic pour – my guess I can do this for under $40 for 180 students. It will be meaningful because it will be coming out of one bigger piece of art and we are all a family so to speak. Does this sound doable? Ideas on what I can use that I can cut with scissors and punch holes keeping in mind price?
Hello Chris,
Sorry for our delay in responding to your question. The type of plastic you use for this is important as acrylic will not have permanent adhesion to some forms of plastic. You could do an adhesion test on the plastic you are interested in using to see if it might work. Here is a link to our Just Paint Article: We would suggest maybe using a stiff paper like a watercolor paper, Bristol or foam core. You could do a coat of medium on the surface to keep the pour from soaking into the paper too much and breaking it down. You could raise the paper up and allow the pour to come off the sides and if you wanted you could collect these drips from the pour and attach them to the back of the paper pendants. We recommend using contact paper for both the front and back of the pour, the acrylics are thermoplastic and can become soft and sticky if they are handled frequently. The contact paper should help address this and keep everything together as a nice pendant. Paper punches could be easily handled in this situation as well. The plastic can be somewhat of a gamble and potentially costly. If you wanted to use the plastic, we recommend testing for adhesion and potentially still using the contact paper. We hope this helps!
If you have more questions feel free to email us at [email protected]
I am considering making swirled skins with teenagers, cutting them into triangles and assembling them as a “stained glass” piece. Would it be best to seal the triangles together with more medium? Any concerns or recommendations? Thanks so much!
Hello!”a pape”…..This is possible, and you might want to consider attaching the skins to a sheet of plexiglas, as acrylic mediums will adhere will to clean acrylic sheeting like plexiglas. While you can attach the cut acrylic skin pieces together with one of our Gel Mediums such as Soft or Regular Gel, the final piece would be a very soft, flexible and “floppy” acrylic skin. It might be easier to compose the piece by attaching one by one on the plexiglas using a little bit of Gel Medium smeared on the skin or on the plexiglas. It can take a few days or longer for the cloudy Gel Medium to fully dry and become clear. It is also possible to press glossy acrylic skins against glass and have them stick well enough to stay for a long time. This would not be a permanent method, but can be a fun way to use them.
Hello Barbara,
This could be possible assuming the skin was fairly thin, and you added a final top coat that was hard and durable and would function as a sturdy surface for chair seat. This could be a polyurethane varnish or perhaps something even harder such as an automotive clear coat. You could use our Soft Gel ( Gloss ) to adhere the skin to the primed surface. It can take days or perhaps longer for the Gel to fully dry, lose its cloudiness and become clear, so make sure you allow a week or so before adding the final topcoat. Without a hard topcoat, an acrylic film like this will be too soft and tacky, especially at warmer temperatures, and then stick to any material that is pressed to the surface. You might want to do some testing on wood panels to get a sense of the process.
I have a skin of 1.50 x 150 meters and I need to paste it on a cloth.
I made the skin on a plastic with white fluid acrylic.
how do i do it
Hi Margarita,
Assuming that the acrylic was applied to a type of plastic that it will not adhere to, such as HDPE or Polyethylene plastic sheeting, you could peel it off, taking great care not to let it fold back over itself as acrylic can stick to itself very easily and be very difficult to un-stick, and attach to the “cloth” or canvas using our Soft Gel Gloss. It will also be important that the skin not be too thin, as very thin acrylic skins will be much more delicate and can tear and deform easily. If you have only used our Fluid acrylic applied thinly and this skin is about 3 feet square, then that could be difficult to handle. You may need another person to assist you in removing the skin and placing it on the cloth.
Or, if the skin is too thin to handle easily, you could apply a Gel Medium on the dry skin and allow to dry to give you a thicker skin, which will be easier to handle without tearing. This would probably mean that you would be using the other side of the skin as the side that will be facing out in your artwork, so you need to consider this factor. For a skin that large, you really need a thicker paint or medium application, preferably at least 1/8″ thick. Our Soft Gel Matte or Semi-Gloss could work to add another layer of acrylic if the skin is too thin. Matte acrylic films are less apt to stick to themselves. Another consideration is that all skins will have two sides with very different surfaces. The side against the plastic might be very glossy or it might be satiny or lower in sheen depending on the surface texture of the plastic, while the face out side will have the sheen of the particular paint or medium you have used. So you must decide which side you want facing out in your artwork. If you are unfamiliar with this, then I would recommend making a smaller test skin, peeling it off and seeing what the two sides look like, along with learning what it is like to handle a thin skin like this.
If folding over and sticking might be an issue with a larger skin like this, you can also try using either talcum powder or corn starch brushed onto both surfaces of the skin as you peel it off as this can stop it from sticking to itself. But, you would then need to carefully wipe the powder off the acrylic surface using a damp lint free cloth, before gluing it down, as the powder could prevent good adhesion.
Another method that is somewhat experimental, is to apply a layer of Soft Gel Gloss to your canvas or “cloth” that is stretched or secured to a stretcher or on a board of some kind, so it will not deform when it shrinks from the moisture in the Soft Gel,…and allow that to dry completely. Then, with the acrylic skin still attached to the plastic, lay it face down onto the glossy gel surface on the canvas and press firmly, so the skin makes good contact with the glossy gel surface. You might need to use a rolling pin to apply a lot of pressure, with the goal of getting the white Fluid Acrylic to stick to the glossy Soft Gel surface. This will really work best if the “cloth” or canvas is attached to a board so you can apply pressure. A stretched canvas will not have the needed resistance and you may end up loosening or tearing the fabric.
My best advice, if this is the first time you have done this, is to create a smaller test skin and practice peeling it off and gluing to a piece of canvas using our Soft Gel Gloss. Here is some related information for you:
Gels and Mediums as Adhesives: http://www.youtube.com/goldenpaints#p/a/u/0/PCPO-VJQB1s
Collage Video: http://www.youtube.com/goldenpaints#p/u/0/PCPO-VJQB1s
Hi, I am Very new to Acrylic Pouring and Acrylic skins.
I made skins from the same paint mixtures I used in my pours. Basically Acrylic Paint mixed with Floetrol, water and Silicone. I have been using the shiny side of Aluminum Freezer Paper. I read that I could keep them on the same paper and store inside Plastic paper protectors.
Should I not use the left over paints as above and make Acrylic skins with GAC 800?
Should I not store them on the Freezer paper inside plastic paper protectors until I am ready to use them?
Hi Mithi,
We do not recommend using silicone products to make pours as it stays in the paint film and then can cause poor adhesion with any subsequent acrylic additions. This could also make adhering these skins using acrylic mediums or gel mediums difficult. We are also not sure about using floetrol and generally do not recommend it with our products. It is a product made for use with house paints and we think it could end up creating a more water sensitive dry film. As for storing any acrylic paint skins with inter-leafing, while it might be possible to peel them apart, any material pressed to an acrylic film like this, over time, will tend to imprint or ferrotype and change the surface. You may be able to store the skins this way, but you should expect some surface changes, where glossy sheens may be reduced or matte sheens might become glossier. We have very specific recommendations for pouring acrylic color, with the basic formula being our Color Pouring Mediums ( Gloss or Matte ) blended with our Fluid Acrylics in an approximate 10:1 ratio. Our GAC 800 can also be used, but for the most recent developments for pouring, we recommend our new Color Pouring Mediums. Here are some links with more information for you about pouring and about storing acrylic paintings, which can relate to storing skins:
Color Pouring Mediums: https://www.goldenpaints.com/technicalinfo/technicalinfo_colorpouring
Becoming Familiar with Color Pouring Medium Matte: It’s More Than Just for Pours!: https://justpaint.org/becoming-familiar-with-color-pouring-medium-matte-its-more-than-just-for-pours/
Pigment Density: https://goldenhub.goldenpaints.com/storage/uploads/pigment-density-of-golden-artist-colors.pdf
Understanding the Techniques of Pouring Acrylics: https://justpaint.org/understanding-the-techniques-of-pouring-acrylics/
Paint Additions into GAC 800 for Pouring Applications: https://justpaint.org/paint-additions-into-gac-800-for-pouring-applications/
GAC 800 Product Information Sheet: https://www.goldenpaints.com/technicalinfo/technicalinfo_gac800
Big Paint Pour: https://www.youtube.com/watch?v=3RsoxOkMOZg
Pendulum Pours: https://www.youtube.com/watch?v=2EakwlVrX_Q
Safe Handling and Transportation of Acrylic Paintings: https://justpaint.org/safe-handling-and-transportation-of-acrylic-paintings/
Rolling Acrylic Paintings for Shipping or Storage: https://justpaint.org/rolling-acrylic-paintings-for-shipping-or-storage/
WHERE WOULD ONE FIND POLY SHEETING THAT DOESN’T HAVE WRINKLES OR TEXTURE FOR ACRYLIC POURS? THANKS FRO ALL!
Hi Tanis,…..This is an issue that we don’t have a good answer for currently. All of the Poly sheeting we have seen comes folded and or also rolled so has creases. The only thing we can suggest is to use a flat sheet of HDPE plastic or glass, or perhaps try stretching the plastic and stapling to a large board to see if you can get the wrinkles to flatten out.
I realize this is an old post, but Ive struck out in my search for precedent for some of the things I’m considering doing. Would I be able to seal marks made with water soluble media onto painting surface with clear acrylic paint skin? Say I’ve used vine charcoal to define some shapes I’m seeing in my painting, could I spread some gel onto the skin then place it onto the drawn elements to effectively seal them. Looking for an alternative to spray fixative or varnish.
Hello Stephanie, sorry for the delay in our response. It is something that you could certainly experiment with. You could adhere a skin over dry material using a wet layer of gel to bond the two together. The concern here is just if the surface is heavily laden with dry material it can resist adhesion. The product used to adhere can adhere to the top most layer of charcoal and not down through the substrate. You would want to have enough product to penetrate through in order to lock everything down. This could move the charcoal, but the skin is an interesting idea. You may want to test to be sure it will bond to the surface well enough. Let us know if it works out!
Scott
Hello Jim, thanks for reaching out. We would not recommend using acrylics for this application. They are thermoplastic, so if they get warm (body heat) they will become soft and sticky. Additionally we do not recommend they come into prolonged contact with human skin. We hope this helps! Let us know if you have questions [email protected]