By Dana Rice
For the last five years, in my role as Product Manager at Golden Artist Colors, I’ve had the opportunity to work with and explore an incredible range of materials. Just when I thought I was getting a handle on all the different ways these acrylic tools could be used, I had my eyes opened to a whole new direction through the possible combination of the fine art acrylics and digital transfer technology. Certainly an exciting new linking of real and virtual paint processes. I imagine there must have been this same sort of challenge and excitement when the first art photographers realized the possibilities of their new medium and the opening of a new fertile ground they could now explore. Finally over a hundred years later, we have created the possibility of joining these two worlds and the exploration has truly just begun.
Artists have been doing image transfers into acrylics for years, but what if there was a way to make this process cleaner, crisper and give the artist greater control over the marriage of image and acrylic? What if there was a way to move photographs onto surfaces that are totally unique? What if there was a way to re-introduce the idea of individual manipulation of images during the printing process, like the old days of Polaroid prints?
The printmakers have been on the leading edge of this exploration, as demonstrated in 2004 when Dorothy Simpson Krause, Bonny Lhotka and Karin Schminke, known collectively as Digital Atelier®, wrote a book called, Digital Art Studio: Techniques for Combining Inkjet Printing with Traditional Art Materials. This book reveals a host of sophisticated techniques that involve multiple layers of printing, painting, and the incorporation of various other mediums and collage elements into the final piece.
Until recently, the alchemy of these processes had been limited to a small, but ever widening circle of artists. Then, a couple years ago, the development lab here at Golden Artist Colors brought some new ink-receptive products to my desk and announced that with these materials and the educational outreach of GOLDEN, all artists could have access to the direct image transfer process.
Considering these ink-receptive products as part of the larger GOLDEN system of products was an interesting proposition. Here were products that weren’t about color or texture; these products were about what could go through a printer, what the resulting print quality would be, and what I could do with it once it was printed.
The basic premise of these new products seemed simple enough: “coatings that turn any relatively flat surface into a printable surface.” Instead of buying “ink-jet ready”, commercially coated papers, I now had access to the coating myself. But what was really going to happen and where should I start? Since commercial coated papers worked in printers, I figured a good place to start might be with a type of paper, such as watercolor paper.
I followed the Lab’s recommendation, applying two coats of the Digital Ground Clear (Gloss) to the paper, letting it dry and then I was ready to print. I wasn’t sure my printer would take a non-standard paper size, so I cut my paper to be 8.5 x 11. I stuck it in the paper tray of the printer, found an image I liked, and hit print. The paper went through without a hitch and the image was beautiful, cool! But then I thought, ok this looks good, but what would it look like without the Digital Ground? So I ran another piece of watercolor paper through the printer, this time without any coating. Comparing the two printed pieces, I was disappointed to find that there wasn’t a huge difference in the quality. The uncoated paper looked good too. So what’s the big deal with these Digital Grounds anyway?
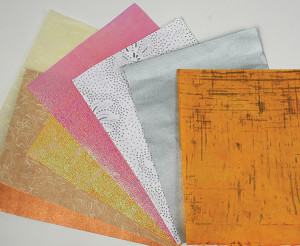 There had to be something more to this, so I called up the folks at Black InkTM Paper and we talked about a variety of specialty papers. They told me that some papers could be printed on through an ink-jet printer just fine, but with other papers, the ink will soak through the top layer of the paper, leaving a dull image, or when a paper contained metallic fibers, the fibers would repel the ink so that the image wouldn’t stick to the paper.
With my next round of experiments I used a variety of specialty papers, some metallic, some not. Now the results were getting more exciting. Several of the papers that weren’t coated with the Digital Ground produced less than desirable images when they were uncoated, but really beautiful, clear images when they were coated. By using the Digital Ground Clear (Gloss) I could combine the image with the print on the paper, making the same image take on a variety of different feelings with each unique paper. During this time I also learned that the Digital Ground White (Matte) made a beautiful white surface, so that the watercolor paper I had started with had greater differentiation if I used the white Digital Ground as opposed to the clear.
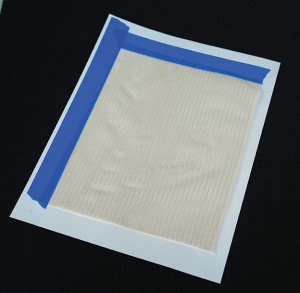 From paper I branched out to fabric. The fabric was equally as thin as paper, and while the application of the Digital Ground stiffened the fabric, sometimes the fabric was still a little floppy. At this point I learned to adhere the material I was working with to a “carrier” sheet. A carrier is simply something standard that a printer would expect to receive. In most cases, a regular piece of printer paper works just fine; sometimes something a little stiffer like cardstock is helpful. After preparing my fabric with the Digital Ground, I used low-tack painter’s tape to hold the leading edge and the right side of my fabric to the carrier. Most of the time just taping these two sides is sufficient since this is where the printer is trying to grab what’s going through.
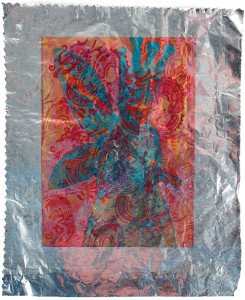 Once I had these examples, I started showing my colleagues what the Digital Grounds could do. They said cool! What else can we try? We looked around for anything thin and flexible enough to fit through the paper path of the printer. What about aluminum foil from the kitchen someone asked. Yeah, let’s try that! After two coats of the Digital Ground for Non-Porous Surfaces, we taped the aluminum foil to a piece of printer paper and stuck it in the printer. We printed a color illustration and wow, the color just popped on the metal foil. With this type of surface the ink takes longer to dry, so it’s still quite fragile when it first comes out of the printer. However, this presents its own opportunity because now there is time to manipulate the ink, erasing some areas, or drawing in others. Similar to the way old Polaroid prints could be manipulated.
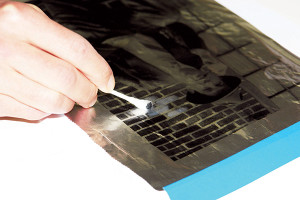 Just to compare, we tried putting a piece of aluminum foil through the printer without any Digital Ground. The ink had nowhere to go and while the image was recognizable when it first came out, as the ink dried it crept and crawled so that the next day the image was totally unrecognizable.
With the success of aluminum foil, we tried Saran Wrap® – could a photograph be transferred to Saran Wrap – wouldn’t that be something! Using the same process as with the aluminum foil, we coated the Saran Wrap with two coats of the Digital Ground for Non-Porous Surfaces, taped the wrap to a carrier and printed. The resulting image came out clear with beautiful colors. One word of caution though, Saran Wrap likes to stick to itself – while the printing and image worked great, it was a bear to keep as an example.
Next up, acrylic skins! If we could put things like metal foil and Saran Wrap through our printer successfully, then thin layers of our own acrylic products should be a breeze. By using layers of acrylic, the door swung wide open for manipulating the look and feel of the printed surfaces. The idea of image transfers, or gel transfers, took on a whole new dimension with the Digital Grounds, by supporting the direct print of images onto gel skins or paint skins. The transferred images could just as easily be line art, black and white photographs, or color photographs.
The trick to creating acrylic skins to go through a printer is that the layer of acrylic has to be paper thin. Too thick and it could jam when trying to go through the printer or the print heads could drag across the top of the acrylic as it goes through the printer – this we learned the hard way!
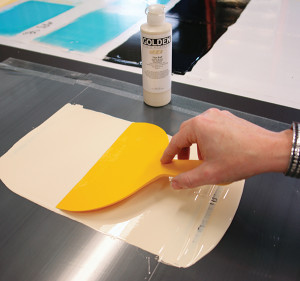 Acrylic skins can be created by pouring and spreading paint or a gel onto a piece of plastic, such as any garbage bag, or moisture barrier plastic sheeting from the hardware store (a Teflon baking sheet or a butcher’s tray work too). I started by creating skins with Fluid Acrylic colors, since Fluids level naturally and it was easy to spread it out thinly with a large palette knife. Light colors like Fluid Titan Buff or Hansa Yellow Light work better than dark colors such as Quinacridone Crimson for achieving un-obscured images. Colors like Interference Gold (Fine) and Iridescent Copper Light (Fine) also produce beautiful images with the interplay of the unique colors. Fluid Acrylic skins were easy and fun, so then I began working my way through a series of gels and pastes. This is where things got a little trickier. Some gel mediums, such as Fiber Paste and Glass Bead Gel are a bit thick to start with, so getting them spread out thin enough was deceiving. They seemed thin when I spread them out, but when the product dried I found ridges left by the palette knife or what seemed thin, really wasn’t.
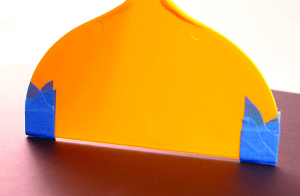
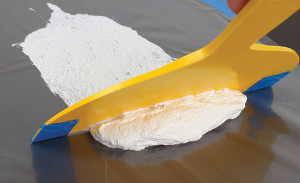 One trick to ensuring a thin skin is to build up tape on two ends of a palette knife, so that when the taped ends are resting on the tabletop, the distance between the blade and the table is equal to the maximum thickness for your skin. Once you get accustomed to laying the thicker products out this way, it becomes easier to gauge how thin the material needs to be to move easily through the printer.
The ability to print on all these different types of surfaces is just the beginning for all kinds of mixed media art, printmaking and photography. Printed pieces can be collaged into larger pieces of work, painted on top of, painted and then re-printed – the options are unlimited. While some inks are becoming more water resistant, most are still quite water sensitive. This can be an advantage when manipulating the inks, but a disadvantage when wishing to preserve the image and then augment it. When working in this direction, it is recommended that the print be sprayed with Archival Varnish (Gloss) to “fix” the ink before working on top of the print. One or two light coats of the Archival Varnish and you’re good to go with paints, gels and mediums on top of the photograph or other printed images.
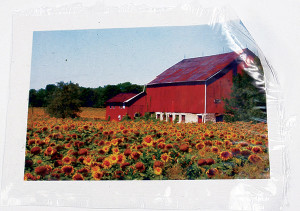 Two new companion products that were released at the same time as the Digital Grounds, Gel Topcoat w/UVLS in Gloss and Semi-Gloss, can be used either on top of a print to offer protection from fading, while providing texture, or, even cooler, they can be used as an acrylic skin. By printing the image on the back of the skin, when the skin is collaged into a larger piece, the print is inherently preserved by the UVLS that is built into the gel!
Regardless of the process when working with ink-jet printers, it’s important to know that printer inks are more fugitive than acrylic. So despite the longevity touting done by printer manufacturers, the standards for those claims are not the same as those for fine art materials. For this reason, it is important to apply a varnish or topcoat to your final image if you want it to endure for the long haul.
As pioneers of new materials and processes, the opportunities abound for melding images with unique materials and for creating a look and feel that leave people asking “wow, how did you do that?”!
Tips & Tricks
The truth about pizza wheels
In the early days of our experimenting we thought that the pizza wheels, or ejection wheels, on the printer had to be removed in order to avoid getting ink on the inside of the printer. We have since discovered that removing the pizza wheels is entirely unnecessary. We’ve had many artists who have not adulterated their printers in any way and have experienced great success on a multitude of surfaces.
Printer paper paths
We often get the question, “what printer model should I use?” The model is really immaterial, what’s important is the path that the paper takes through the printer. There are three basic paths – U-Shaped, L-Shaped, or Straight. The U-Shaped path requires the paper to bend the most, so this will limit some of the types of materials that can be put through this type of printer, but many other things will still go through fine. The Straight path is the most agreeable, but generally only comes with the more expensive printers. The L-Shaped path is available with many moderately priced to low-end printers and will support a wide variety of surfaces.
Carriers – paper vs. Mylar®
A carrier sheet is simply a piece of paper or other material that a printer would expect to have passed through its path; a piece of printer paper, Mylar® or acetate can all work. The main function is simply to provide a sturdy surface for delicate or irregularly shaped substrates. One note, some printers have trouble “seeing” clear carriers such as Mylar and won’t pull the page through. If this happens, try using a piece of printer paper as the support for your surface instead.
How long does it take to dry?
A practical question, the answer to which is always full of caveats. In general, absorbent surfaces can be re-coated in about an hour or less. Non-absorbent surfaces, such as metal foil or gel skins take longer, more like 3-6 hours before they are dry enough to re-coat. Always be sure a surface is fully dry before printing – roughly 2-3 hours for paper and overnight for metal foil.
How many coats do I really need?
The recommended number of coats is two, to ensure good coverage. We’ve found that this advice is a must on papers and most porous surfaces, but on some less porous materials, one well-spread coat gives sufficient coverage to get the image quality you are looking for.
Preventing printer jams
If you’re having trouble getting an acrylic skin through the printer without jamming, even though you have it taped to a paper carrier, try coverstock instead of plain paper, and/or try moving the tape back about an inch from the leading edge, so that the printer grabs the paper, not the tape first.
Not just for printing
Since the premise of the Digital Grounds is to capture ink drops, it can also be used to prepare surfaces for rubber stamping, particularly on metallic papers and acrylic skins that otherwise repel ink.
 Tricks for getting acrylic skins thin
There are a number of tools that can be used to spread out an acrylic, such as Fluid Acrylic color, to make a skin. An extra large palette knife like a baker might use to spread cake frosting works well. Another approach is to use a large spackling blade, such as those used by drywall installers. Using a low-tack tape, build up layers of tape on each end of the blade until you have a thickness of about 1/16 to 1/32 of an inch between the built up tape and the edge of the blade. This way, the acrylic that is spread by the blade, between the tape ends, will have that defined thickness.
Printer models that we’ve used
Despite what I’ve already said about printers and paper paths, I know everyone wants specifics. So, while I know there are many more printers than these that will work just fine, here are the models that we’ve used in the shop at GOLDEN:
- Epson Stylus® Photo Pro R2400
- Epson Stylus® C120
- Epson Stylus® CX8400 All-in-One (a recently discontinued model, but similar low-end all-in-one printers, such as the CX7400 should work equally as well.)
Each of the above printers was selected for different advantages. The R2400 is more expensive, but has a straight through paper path. The C120 is small, light and compact. The CX8400, being an all-in-one, allows us to travel and print without a computer attached.
About Dana Rice
View all posts by Dana Rice -->Subscribe
Subscribe to the newsletter today!
No related Post

Sucks Golden will no longer make the digital ground.
Hi Janine –
Sorry we missed your comment from a couple weeks ago. And thank you for taking the time to let us know about your disappointment around this. We definitely realize that many people came to depend on and enjoyed using our Digital Grounds, so our decision to no longer sell them was not an easy one. The good news is that another product on the market, InkAid (http://www.inkaid1.com), performs similarly and all the various techniques or processes you developed with our Digital Grounds should be doable with their offerings. And as always, if there is anything else we can do to help, just let us know.
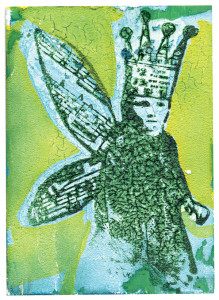
I prepared a wooden panel with gesso and then white fluid acrylic. I transferred directly onto the surface but unfortunately I did not add enough regular gloss gel to the transfer and panel so in sections it is peeling.
I do not care about the background sections that are peeling since I only want the transferred text.
Can I cover the area with GAC 500 or another product to seal the transfer to stop it from peeling? After it is sealed I want to continue painting on top of the transfer with fluid acrylics.
Thank you for your help.
Hi Shireen –
Its hard to glue something down from the top and what we would recommend is trying to get some gel or medium under the transfer so you can press it back down and get it to stick. That would be the best way by far, Just coating the top will still leave the transfer with areas lifting away from the board, and that might come off looking distorted. If there are areas where you cannot get to from the side – say there is a bubble in the middle that is lifting – then you can cut a small slit with an X-acto blade, inject some medium or Gel, then push the area down, covering it with a piece of plastic sheeting and some weight.
Hope that makes sense – let us know if it doesn’t, or if you have any other questions.