
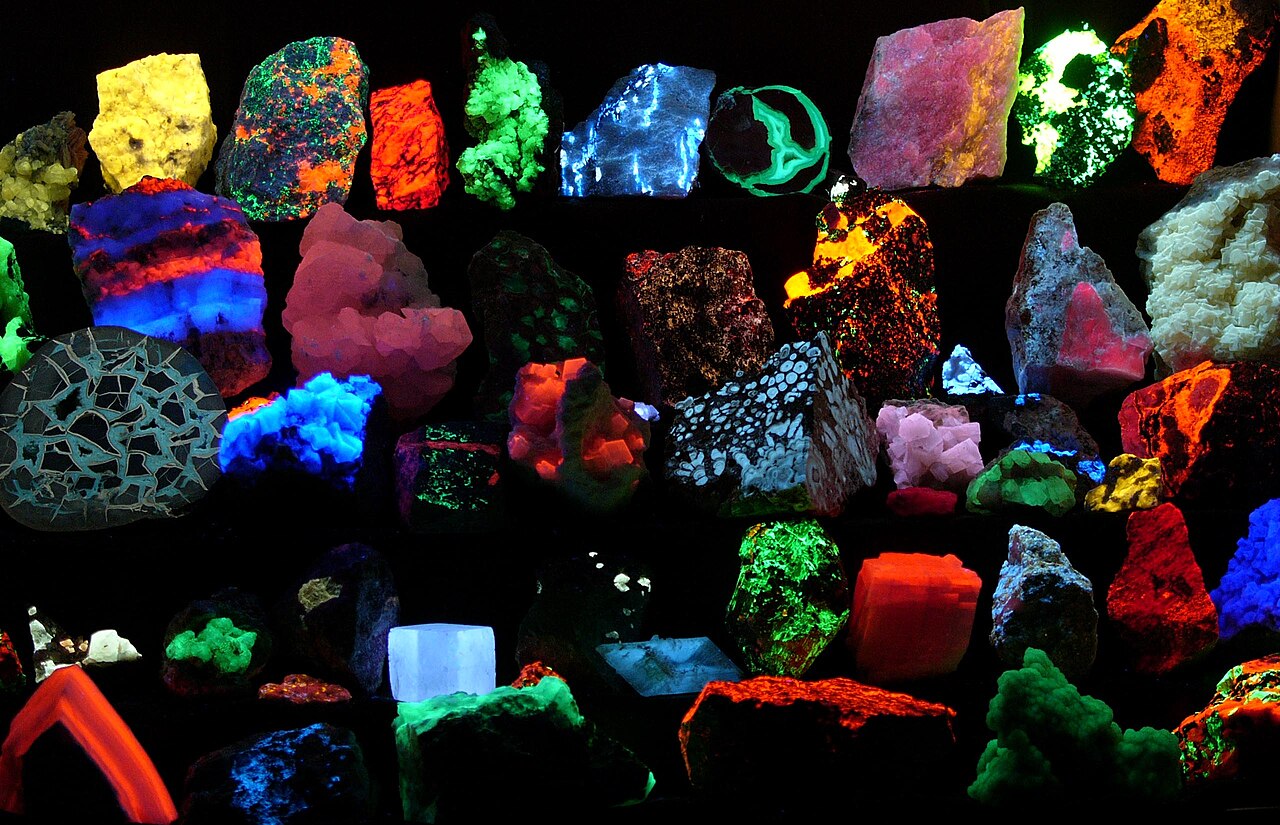
FIGURE 1 – A collection of various fluorescent minerals under ultraviolet UV-A, UV-B and UV-C light.
Chemicals in the rocks absorb the ultraviolet light and emit visible light of various colors, a process called fluorescence.
Today’s artist has access to an abundance of colorants, including Fluorescent and Phosphorescent pigments, which are members of the “Luminescent Family”. Few, if any, other colorants rival their vibrant allure. Whether applied as paint or encapsulated in resins, glass or plastic, these materials have always held an aura of mystery and intrigue. Part of this mystery is how they can energize and produce a luminous effect.
Before we begin, let it be known that I am not a chemist, physicist, or geologist: I’m an Art Materials and Applications Specialist for Golden Artist Colors. The goal of this article is to provide a base-level understanding of why luminescent colorants work and respond to light energy so that you can utilize them in your work.
In 2004, we published the Just Paint article Defining Luminous Effects which reveals how transparent glazes applied over a light-reflective surface work in harmony to increase luminosity. So what makes luminescent materials an even more vibrant option?
For centuries, naturally occurring luminescent materials have been observed and studied but it wasn’t until much later that scientists were able to explain and control the process. Eventually, the mechanisms at play led to synthetic production and our current availability of fluorescent and phosphorescent paints. Finally, harnessing lightning in a bottle was possible.
Scientists Shed Light on Luminescence
The term “Luminescence” was coined by Eilhardt Wiedemann in 1888, meaning “light without heat” (3). Luminescence encompasses a greater range of light-emitting processes, including “Chemiluminescence”, where emitted light is produced via chemical reaction, such as with glow sticks. “Bioluminescence” is a type of chemiluminescence found in living organisms such as fireflies, sea creatures and certain fungi. There is also “Electroluminescence”, where light is emitted in response to an electric current or strong electric field, most commonly seen in LED technology for more efficient light bulbs and giant televisions (1).
![GOLDEN High Flow Fluorescent Acrylics viewed under “Blacklight” conditions.]](https://justpaint.org/wp-content/uploads/2024/10/Glowing-Fluorescent-Acrylics.jpg)
The Fire of Fluorescence
Ultra Violet (UV) radiation was discovered in February 1801 by German physicist Johann Wilhelm Ritter, which allows us to see the light energy that is not viewable under daylight conditions. Fluorescing material emits light that has been absorbed and typically lasts only while the excitation source is present (2).
Excited Electrons Make the Jump to Higher States
Luminescent substances are on a different visual level than the paints and inks artists traditionally used in art-making. These materials are able to absorb shortwave light energy, causing the excitement of electrons to rise to an elevated state. Then the electron releases the energy, creating the visual intensity we know as fluorescence or “glow in the dark”. Ultraviolet light works particularly well to excite the luminescent materials.
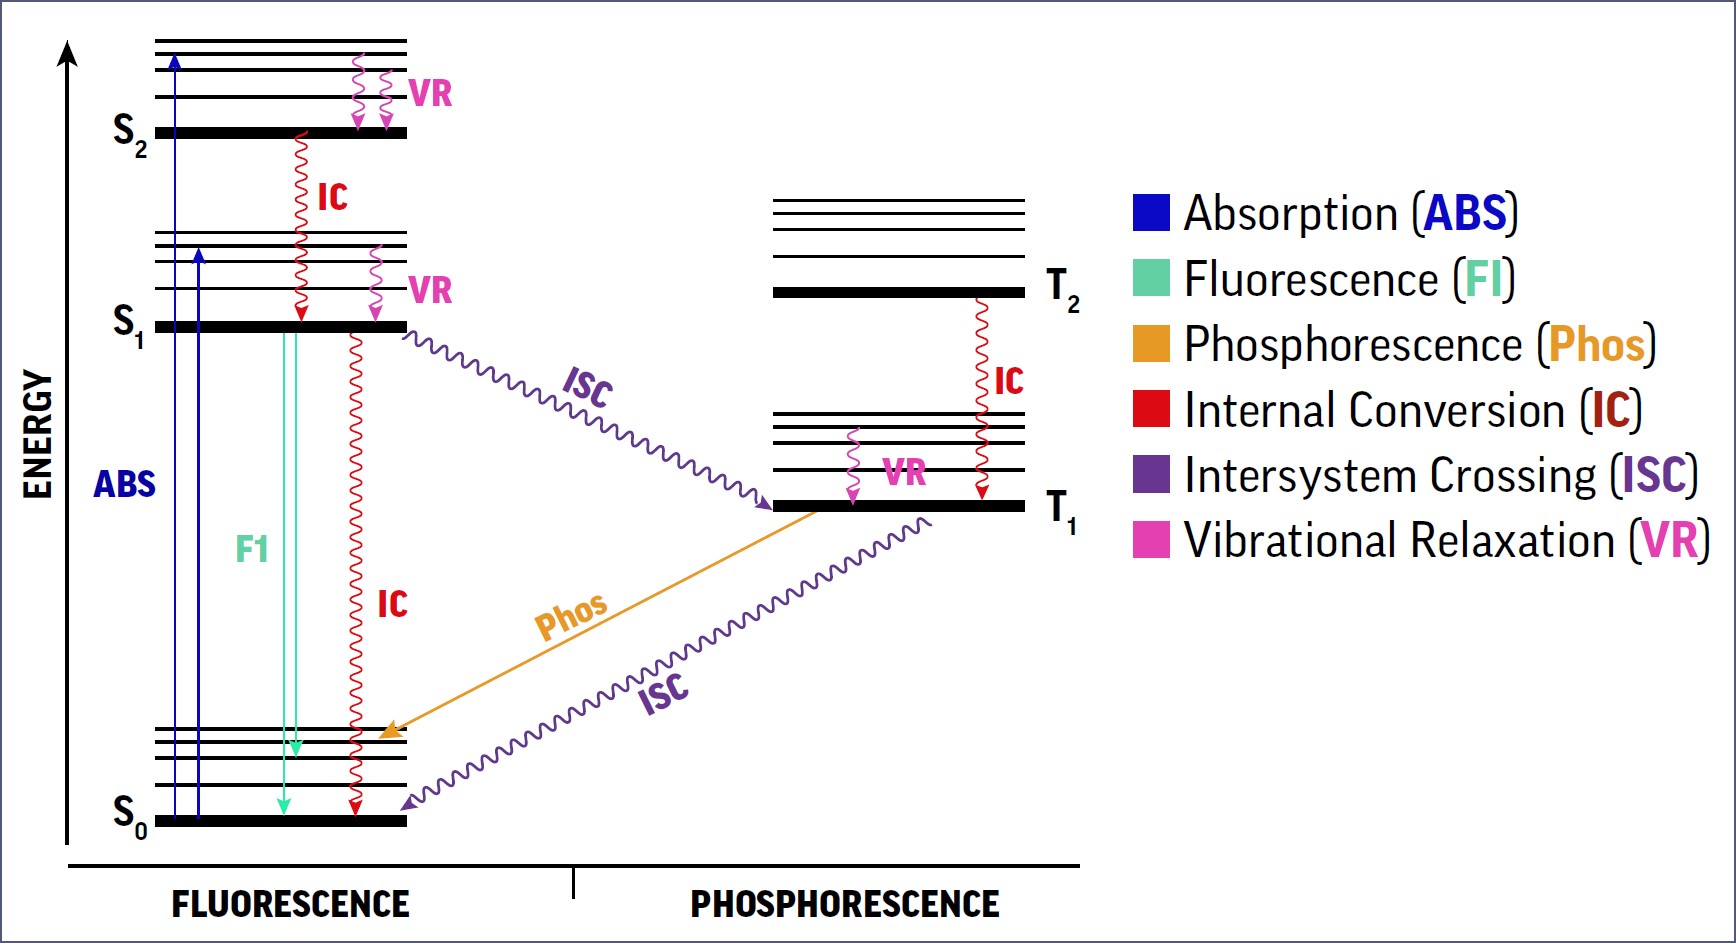
Electrons are paired together in their natural and stable “Ground State”. The energy causes one of the paired electrons to move up to a higher state, but it eventually needs to rejoin its former partner.
A fluorescent molecule ground state is known as “S0”. As it absorbs light energy, electrons become excited and move to a higher level known as a “Singlet State” (S1, S2, and S3). The energy is rapidly released because the unstable electron has to “decay” from this “Exited State” and move back down to the ground state (S0) and rejoin its partner. This energy is released as light energy, causing them to appear more vibrant. (see Figure 3)
The term “Fluorescence” was coined by Sir George Gabriel Stokes in 1852, in his famous paper on the change of wavelength of light, as exhibited by “Fluorspar” and Uranium glass (3).
Fluorspar, the mineral now called Fluorite, is often “Doped” with impurities that can change the mineral’s color. Fluorite is found in a wide range of colors and has consequently been dubbed “the most colorful mineral in the world”, prized by Ancient Greeks like Pliny the Elder, Ancient Egyptians and Romans alike. An intensely deep purple fluoride called Antozonite (or Stinkspat due to a strong sulfur odor), is a natural inorganic pigment and has been identified in a small number of painted artworks from c. 1450 to 1520 (4). However, it is not known whether Fluorite was used simply due to its color, or if somehow the artist knew these pigments were unique, these minerals would not have been viewed under Stoke’s UV light until the mid-19th Century (4). The “Stokes Shift” and his understanding of invisible (light outside of the visible spectrum) made Ultraviolet Light accessible (3). (If a reader can point us to a cited reference where an artist did state this, we would love to learn about it, otherwise this thought is speculative).
A century later, “Daylight” fluorescent pigments – colors overly bright during the day – were invented. In the 1930s, Americans Bob and Joe Switzer, “The DayGlo Brothers”, experimented with ways of combining certain dyes and resins that produced colors far brighter than normal that had the unique effect of “glowing” under UV Light (black light). They used these new paints with great results in displays and signage, especially in movie theater lobbies Joe was a magician whose tricks took full advantage of these new colors and UV lights to entice his audience and fellow magicians alike. (5). These dye-based, encapsulated pigments were further refined into what we now use in Fluorescent paints.
Luminescent Colorants are not Lightfast
One cautionary note about utilizing these seductive paints is that they are dyes encapsulated in acrylic resins, and therefore not lightfast. The same UV light that provides the initial wonderment will later cause these colorants to become pale and dull compared to their original appearance. For information on lightfastness, read Just Paint articles Bottling a Shooting Star: Fluorescent Colors and Recent Lightfastness Testing of Heavy Body Fluorescent Colors.
The Persistent Afterglow of Phosphorescence
Phosphorescent materials behave similarly, but not exactly, when exposed to UV light energy. Their crystalline form traps electrons to slow their decay back to the ground state. Electrons at the ground state are paired up (opposites attract) but are separated as one electron rises to a higher level. Instead of the singlet states of fluorescence allowing for the immediate release of light energy, phosphorescence occurs when the light energy dissipates via “Triplet States”: T1 and T2 (3).
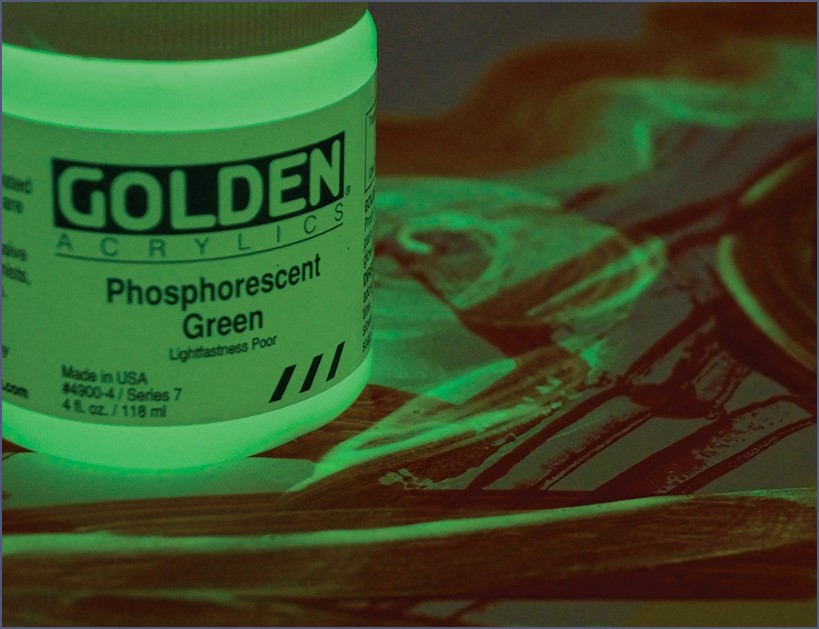
In the higher triplet states, the electrons pair with electrons spinning in the same direction as themselves, allowing them to remain in these higher levels longer. In turn, emitted light energy is still visible even after the light source is removed. Hence, the common term for phosphorescence is “Glow in the Dark” (See Figure 3).
Eventually, like a bouncing ball descending a staircase, the electron loses energy and returns home to rejoin its former partner electron.
The first recorded use of phosphorescent pigment in a painting was over a thousand years ago in China. Artist Z.Hu created a night scene of a cow in a barn that possessed “inexplicable magic” (6). The glowing painting must have been magical, especially with no way to explain how it was occurring.
The first “persistent luminescent material” was discovered in 1620 by the Italian shoemaker and wannabe alchemist Vincenzo Cascariolo. He took a sample of a local volcanic boulder known as the “Bologna Stone”. This boulder was later evaluated and classified as baryte with copper ions. When Cascariolo heated his sample, he discovered the rock was able to glow! He had inadvertently rearranged the structure of the specimen (a process called calcination), and the rock would glow for hours – sometimes days (7).
Four centuries later, the code has been cracked. When specific crystalline minerals are combined with certain metals, phosphorescence can occur. The most common version used in acrylics is a water-resistant Zinc Sulfide (ZnS). There are other chemistries, but they can be highly sensitive to moisture and thus commonly used in solvent-based coatings or encapsulated in resins.
Luminescent paints are not for the recluse. In artwork, fluorescents yield electrifying visuals supercharged with ultraviolet light. When the lights are turned off, the concealed and eerie glow of Phosphorescent Green reveals its secret residence, becoming the sole source of visibility in an otherwise black abyss.
We’ll get into some ways to present and enhance these paints an upcoming article, delving into ways in which artists can exploit their energy, including some unexpected recent test results.
Please let us know if you have any questions or comments.
Michael Townsend
References
- “The Chemistry and Physics of Special Effect Pigments and Colorants for Inks and Coatings”. PCI Magazine. June, 2003.
- Widder, E. A. (2010). Bioluminescence in the ocean: Origins of biological, chemical, and ecological diversity. Science, 328(5979), 704-708. [DOI: 10.1126/science.1174269]
- “Light Activated Persistent Phosphorescence”. Coatings World. April 2024.
- “Purple Fluorite: A Little Known Artists’ Pigment and Its Use in Late Gothic and Early Renaissance Painting in Northern Europe” Studies in Conservation 46(1):1-13 DOI:10.1179/sic.2001.46.1. M. Richter. March 2001
- Encyclopedia of Cleveland History | Case Western Reserve University. R. Switzer. 1997.
- “Persistent luminescence instead of phosphorescence: History, mechanism, and perspective”. Jian Xu. Journal of Luminescence, Vol. 205. 2019.
- “The Bologna Stone Was a Glowing Mystery for 400 Years”. Gizmondo. Ingliss-Arkell. August 17, 2015.

Subscribe
Subscribe to the newsletter today!
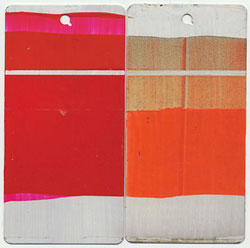
Figure 4 is undecipherable to me. Apparently there are 3 treatments, but no delineation. And what are the horizontal and vertical grooves (?). Please bear down on labeling.
Hello, Chris.
Thank you for the question.
I recycled Figure 4 (and the descriptive text) from the 2014 article: Selecting the Best Exterior Mural Pigments
This is an image of 2 “Q-panels” which are 3″x5″ aluminum cards used in the coatings industry for assessing permanence and weatherability of paints, primers, and sealer products. We use these in our Accelerated Weather Testing machines and on exterior test fences. The left-hand card is a paint layer of Fluorescent Red, unexposed. The right-hand card was exposed to hundreds of hours of UVA and UVB artificial light, which is part of the ASTM Lightfastness rating assessment. Half of this card was coated with our MSA Varnish before being placed into the test machine. After exposure, the cardboard color is all that remains if you do not provide UV protection. The horizontal stipe is from taping the card before the paint was applied, and the vertical line is from the heavy-handed paint brush and a shadow. We probably shouldn’t assume that artists understand what they are, and in the future I’ll include more details on images as to what we are looking at.
– Mike
Good article. Useful information.
Thank you for your expertise.
Thank you, Adrienne.
I appreciate the kind words!
– Mike
Hi Mike. Great article! I finally have a glimmer of understanding the magic of luminescent pigments. At least, it’s within site after I read the article a few times. Thanks for making a very complicated and technical subject understandable!
Thank you Dean!
There is a lot of research out there, and I found myself jumping from one rabbit-hole to the next. Not easy subject matter to absorb to be sure!
Explaining what is going on is a challenge, and it takes several reads and sources before you can picture it in your head. In December, we put theory to practice so be sure to give it a read as well. I’m sure there will be some inspiration for your work.
– Mike
Awesome!
As an artist who loves to delve into the darkness to bring out the light, I found this article to be a wonderful explanation for how the magic happens 😉
Thank you Mike!
Thank you, Jeremiah.
Be sure to tune in for the next article due in December! I’ve been doing some illuminating tests yielding exciting results!
– Mike
What is the most successful way to add lightfastness to fluorescents? Is it the MSA varnish? Or a combination? Thank you for the article! Fascinating.
We’re so glad you enjoyed this article, Rachel. UVLS coatings can help to slow the fade rate of Fluorescent Colors and other fugitive products, but it won’t stop it alltogether. These coatings are also going to limit the light energy from charging the electrons in the paint, so there’s a change in the glow quality. They don’t stop it completely but you should test what 1, 2, or more layers of varnish will do in how the paintings will look in the viewing location. https://justpaint.org/recent-lightfast-testing-of-heavy-body-fluorescent-colors/ https://justpaint.org/fluorescent-colors-bottling-a-shooting-star/ for more info about these paints and protection options.
– Mike
What is the fundamental difference between fluorescence and phosphorescence in terms of energy absorption and emission?
The article sets the stage for explaining the specific mechanisms behind fluorescence and phosphorescence, grounding it in the broader scientific concept of luminescence and its various forms. It aims to demystify these vibrant colorants for artists.
Good Information
Regards, Unissula
Hi Michael,
I have been projecting light and images on a glow in the dark screen with a projector (slides, then digital) for over 30 years. My old supplier is not longer with us, and that paint I used seemed to settle and get hard at the bottom of the can. I am trying Golden Paints Phosphorous Green for a new screen I am using for artists to create work for for a nonprofit, and wondering if there is any settling in the paint you create. My work is often about history, so when the image leaves the screen it leaves a trace. of that image. When the next image is projected, it is infected with the former image. I have found that projecting different colors on the glow surface results in a wide variety of how much it glows, which is a useful art supply. I have only worked with green, but would love to experiment with the other colors. Green gives the most light when using cool colors (purple gets the best result) where red is hardly visible. You probably know why that is. I can let you know how your paint works after the event this Friday, May 2, 2025.
Hello, Karen.
Thank you for commenting and asking your questions.
Our Phosphorescent Green paint can have some “phase separation” due to the size and density of the pigment used. We could reduce or eliminate settling if we chose to thicken the paint up more when being made, but this will make it more difficult to apply evenly over large areas. The pigment should “soft settle” as the container sits, which means it should be easy to mix back into suspension, and not “hard crash” which makes remixing very difficult and often results in pigment lumps that are hard to smooth out.
Please contact us at [email protected] if you’d like to continue this conversation!
– Mike Townsend
Thank you for this insightful and well-written article
Regard Unissula
i’m quite confused on certain fluorescent paint
one is fluorescent pink/rose/magenta
whatever the random brand how to name it
the redder/pinker one is much more common than magenta one
with no color index, it’s usually hard to idendity until actual see them
the other one is fluorescent blue and fluorescent purple/violet
the effect for both of them is pretty weak
especially the fluorescent blue, i can’t say that it’s stronger than PB15 in normal light
and i found PB15 is likely to get mixed in some of them
(give it somehow strong tint strength which does not belong to fluorescent paint
which makes it more confusing
Nourkias,
Plenty of manufacturers add lightfast pigments to improve the poor lightfastness of fluorescent colors. Opera Pink is a popular example, being a combination of fluorescent dye and PR122 (Quinacridone Magenta) pigment. Bright long-lasting color can be achieved by using transparent organic pigments such as your PB15 (Phthalo Blue) over bright white grounds. Fluorescent colors will need to be repainted after a few years to restore the powerful fluorescing effect.