With the rising popularity of alternative painting supports such as Dibond®, aluminum panels, acrylic sheeting and polyester films, we wanted to create some initial testing focused on how well oil paints adhere to these and other non-porous substrates without any ground preparation. We looked at several types of substrates, scuffed and unscuffed, with a couple different oil paint applications. After applying the materials and waiting from one to six months, we performed cross-hatch adhesion tests and scratched at the surface, which led to some interesting results.
Surface Preparation
The substrate materials we tested are DiBond®, raw aluminum, copper, acrylic sheeting and polyester film – gloss and matte. Most of these supports, with the exception of the polyester film, were tested scuffed and unscuffed. For scuffing, we used 220 grit sandpaper to uniformly degloss the surface with horizontal, vertical and diagonal strokes. The metal substrates were cleaned with isopropyl alcohol and the acrylic sheeting was cleaned with soap and water, as isopropyl alcohol on acrylic sheeting can cause micro-cracks. The test paints were selected to represent some commonly used options for the initial layers of an oil painting. We used Williamsburg Titanium White with Italian Raw Umber mixed to a light gray, this same mixture thinned with odorless mineral spirits, Williamsburg Lead Oil Ground and Titanium Oil Ground. These applications were applied thinly so they could dry quickly and have the best chance to form a durable film. We also applied the paints over GOLDEN Acrylic Gesso as a control.
Adhesion Testing
We used cross-hatch and surface scratching to determine adhesion on our non-porous substrates. For the cross-hatch test, we scored the oil paint into a grid pattern and attempted to pull the paint squares off the surface with tape. Since this traditional test did not reveal any failures in our samples, we tried simply scratching the surface with a palette knife and a fingernail to see how easily the paint would come off. This proved to be very revealing. It also has real world implications, as it mimics the effects of something grazing across the surface of a painting or scraping the surface with your tools during the painting process.
Results
We tested adhesion after one and three months for all supports and after seven months on several others. In general, we found scuffing and cleaning the surface before painting provided a huge improvement in adhesion. We scuffed the DiBond®, raw aluminum, copper and the acrylic sheeting. On most of these substrates, the paint on top of the unscuffed section could easily be scraped with a fingernail or palette knife, but the paint applications over the scuffed area are holding strong, and only able to be lifted in a couple cases with very aggressive scratching. Likewise, we had much better results on the matte polyester film compared to the gloss one. For a control we applied the same oil applications to birch plywood coated with Acrylic Gesso and saw no adhesion issues.
DiBond® – Aluminum Composite Material
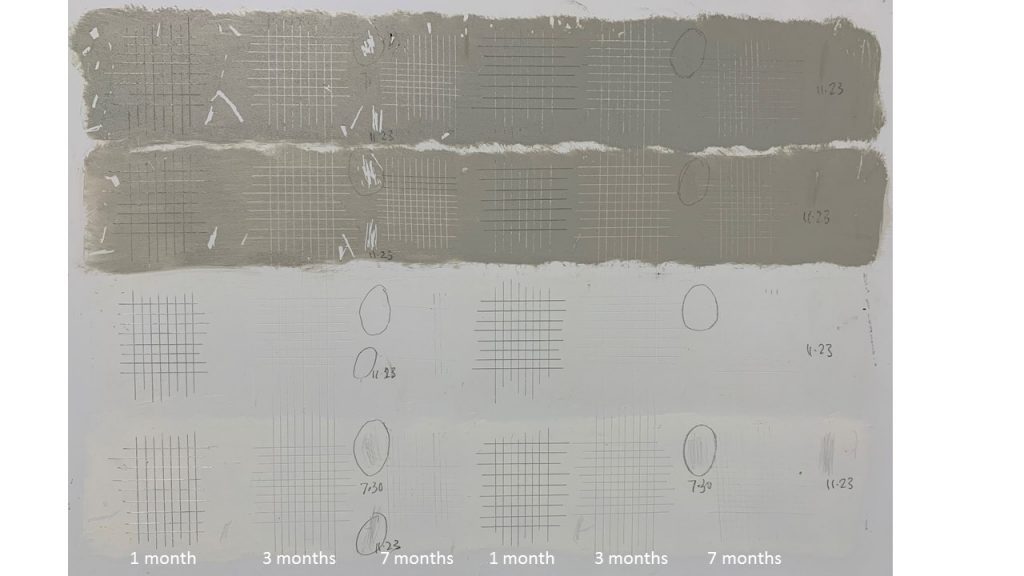
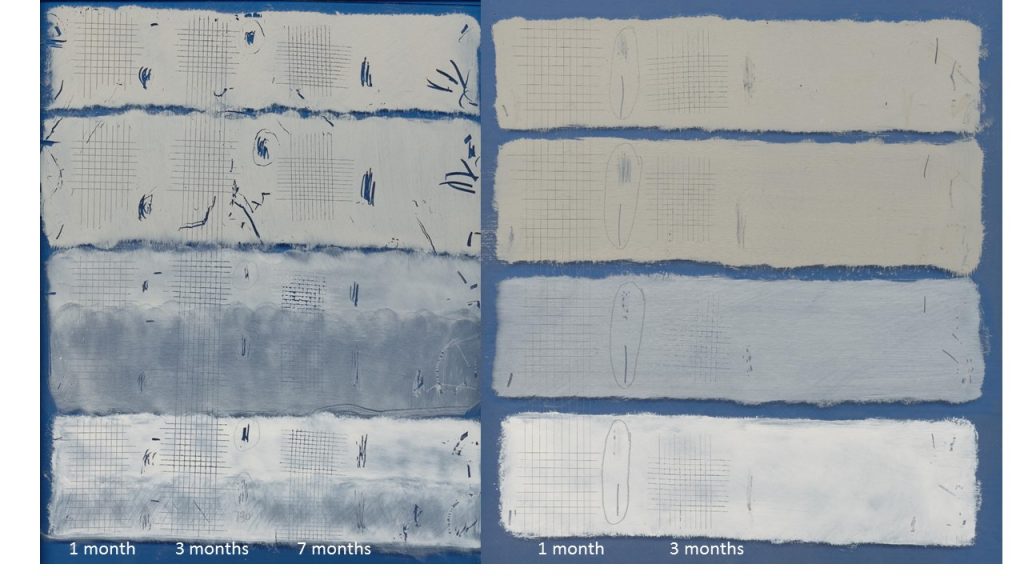
DiBond® is a brand of aluminum composite material (ACM). It is made from a polyethelene core sandwiched between two thin sheets of aluminum with a baked-on polyester finish. It is very strong, durable and lightweight, making it a desirable rigid substrate for oil painting. In the image below, we scuffed the right side of the panel and degreased the entire surface with isopropyl alcohol. We performed the adhesion tests approximately one, three, and seven months after the paint and grounds were applied.
As can be seen on the test panel below, the scratches on the unscuffed side on the left are very apparent. Some of the random scratches are just from handling and stacking these panels in the studio. The titanium / raw umber mixture over this surface shows poor adhesion, as it was able to be scratched off after one, three and almost seven months of dry time. The oil grounds scratched off a month after the paint application, but after seven months of curing became fairly locked down. At that point, it required repeated scratching of the surface with a palette knife to reveal the glossy surface of the Dibond®. The adhesion of the oil grounds on the unscuffed surface seemed to be adequate.
As mentioned above, scuffing the surface made a huge improvement with adhesion. The paint applications on the scuffed surface to the right show almost no failure. Testing about a month after application caused some scratching and scuffs in the paint along the edge of the white / raw umber application. After three and seven months, that same application is completely locked down and no longer vulnerable. The oil grounds were slightly more durable and did not come off the scuffed surface in any of the scratch tests, thus showing very good adhesion.
Raw Aluminum
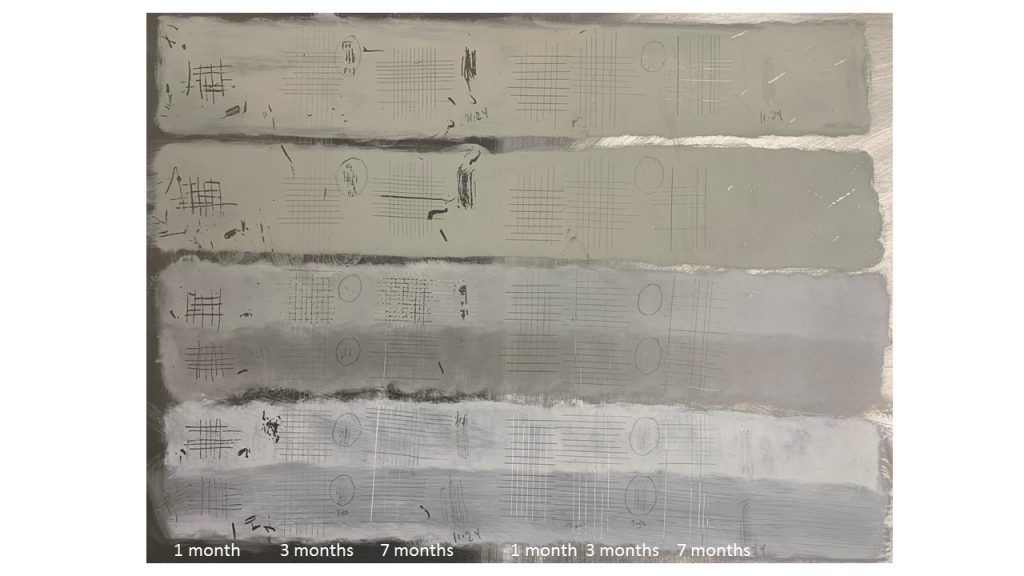
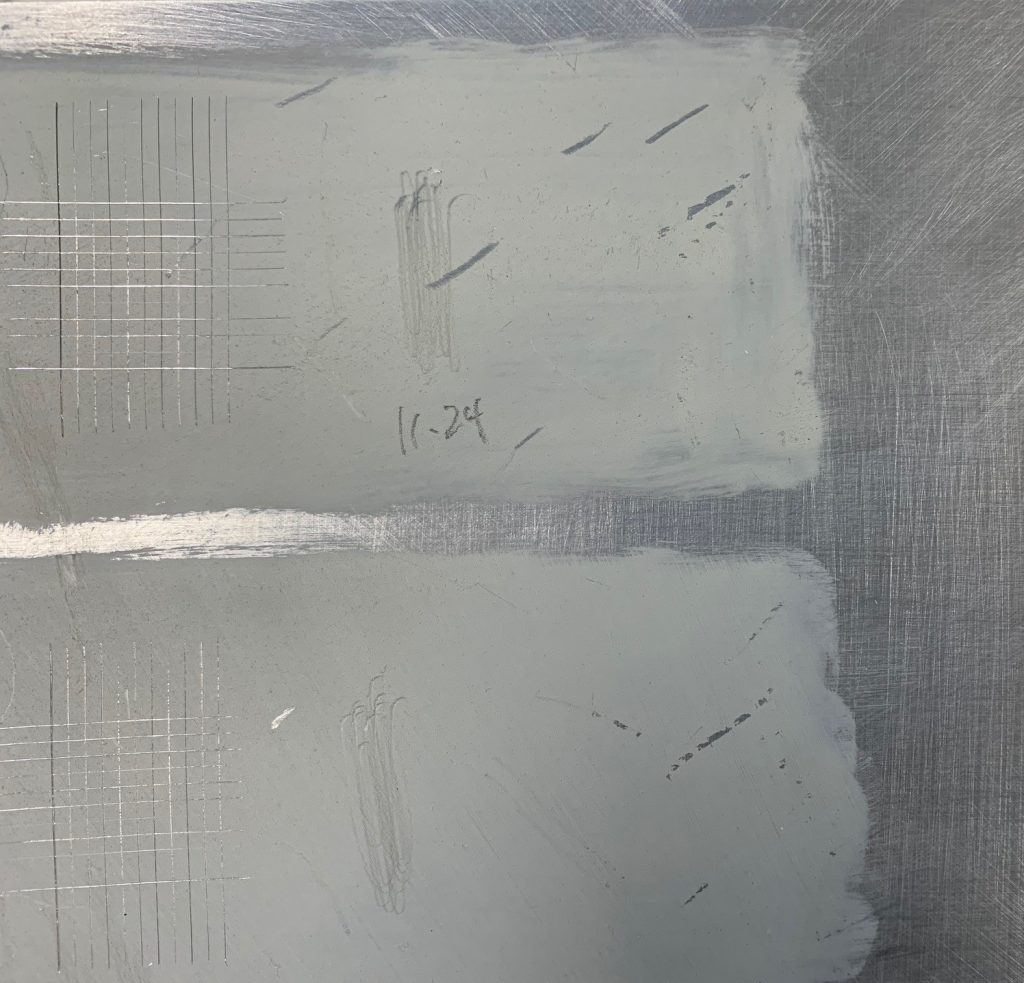
There are many types of aluminum panels available today. Some are coated to protect the metal from oxidization and others are not. The panel below is an uncoated, aluminum honeycomb panel. Whenever using uncoated metals for painting, it is typically recommended to scuff, clean and prime the metal with a designated Direct To Metal (DTM) primer before painting. In this test, we wanted to see if oils had an issue adhering to this surface without priming. As was the case with the Dibond®, the unscuffed surface showed very poor adhesion after the application had dried for one month and remained vulnerable to scratching even seven months later. The scuffed side, on the other hand, performed rather well. There were some minor abrasions soon after the paint application, but after three months, most of the paint was locked down and did not easily scratch from the surface. The only exception was with the titanium and raw umber applications in the upper right of the scuffed section. This paint could be scratched off only in the diagonal direction, which coincides with the final directional scuffing on the surface. (We have included a detail of that area below.) This result was surprising and may have further implications about our recommended scuffing technique. Perhaps circular scuffing would be more effective. We will have to research this issue further. The oil ground applications did not show any issues with scratches that coincide with the diagonal scuffing.
Copper
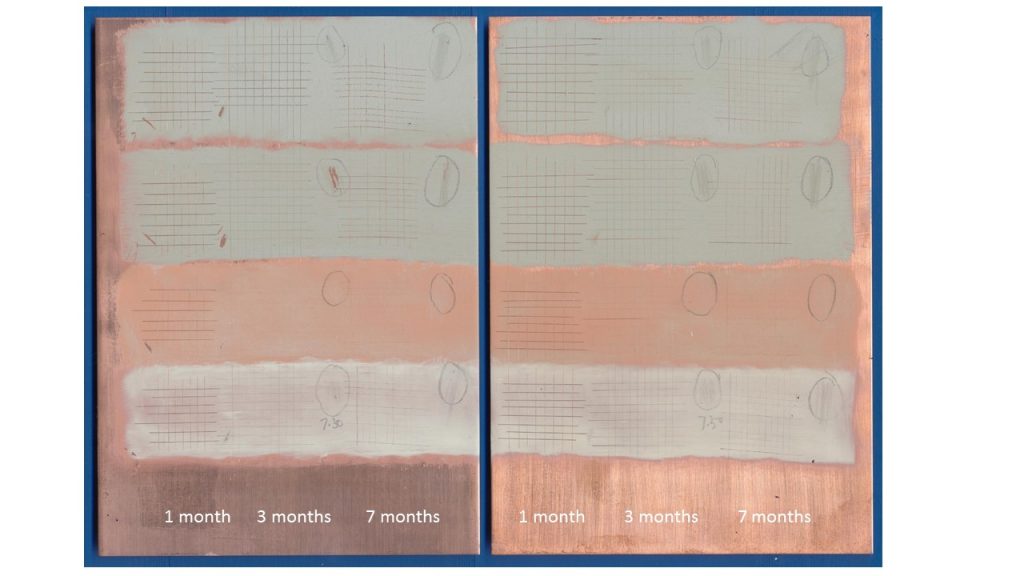
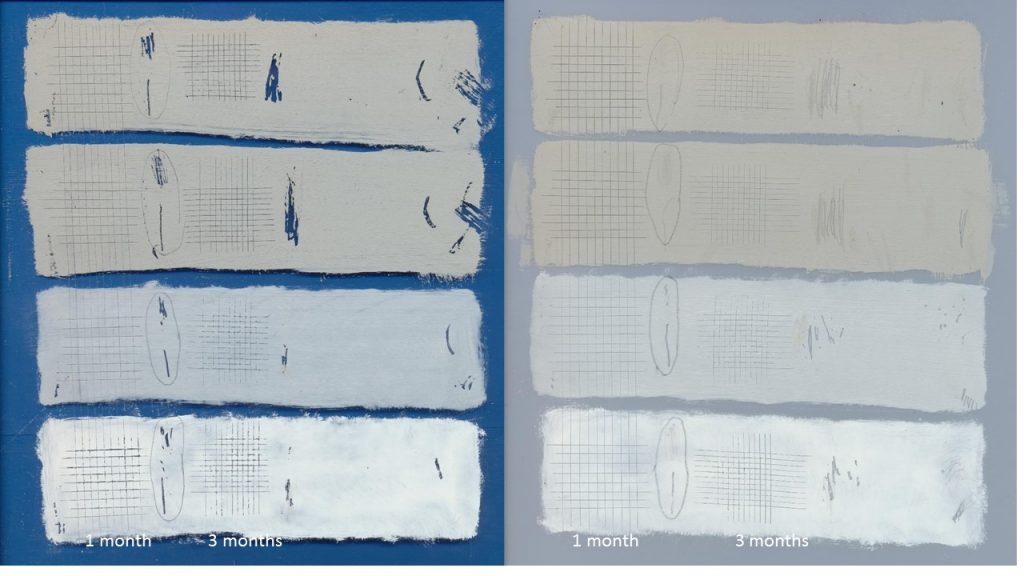
Copper plates have been used as a unique and durable substrate since the first quarter of the 16th century. Most often, the ground on these early pounded and scuffed copper plates was a lead oil ground which was applied very thinly, likely to allow the glow of the warm color to influence the image. In our testing, a thin application also provided more durability against scratching in a shorter period of time than thicker applications. This is likely due to a thinner film curing faster and more thoroughly than its thicker counterpart. One of the benefits of copper is the ability of the metal itself to speed up the drying of the oil applications on the surface. In the image below, the unscuffed surface on the left shows some vulnerability to scratching after one and three months in the titanium and umber mixture, but shows no adhesion issues in any other applications. Likewise, the scuffed surface on the right shows almost no adhesion issues in any of the applications even after only one month. This support seems to provide the best result of all the substrates we tested for this article. Excellent adhesion.
Acrylic Sheeting
There are many kinds of plastic sheeting available and some may perform better than others as a painting surface. For this test we used 1/8″ acrylic sheeting specifically. Some brand names of acrylic sheeting are Plexiglas® and Acrylite®. This material performed well when scuffed and cleaned. When prepared as such, the paint applications could be minimally scratched after one month and continued to improve after three. At that time, we were only able to minimally scratch through the paint down to the surface with aggressive scratching using the tip of the palette knife. As the image below shows, unscuffed acrylic sheeting has terrible adhesion. All the applications could be easily scratched from the surface at each stage of testing. Even the very thin oil ground applications can be scratched off with a finger nail.
Polyester Films
Polyester films are more commonly known by their brand names of Mylar® and Dura-lar®. Like the other scuffed surfaces above, the matte polyester film provided superior adhesion to its glossy counterpart. While we did not scuff this polyester film, it seems the micro-texture of the matte surface helped to provide improved adhesion. But, there were still some issues. After one and three months, aggressive scratching with the palette knife was able to minimally break through all the paint and oil ground applications and reveal the surface. These applications could not be scratched off with the fingernail, but only with the tip of the knife, which is fairly aggressive.
The paint and oil grounds on the gloss polyester film were also tested one and three months after application. Unlike the mixed results on the matte polyester surface, the results on the glossy film showed very poor adhesion. The titanium and umber applications were easily scratched off, and the oil grounds, while slightly more durable, were still vulnerable to scratching with both a palette knife and the less aggressive fingernail.
Conclusion
Of the materials tested above, the scuffed and cleaned copper and Dibond® performed the best. The raw aluminum, scuffed acrylic sheeting and matte polyester film showed some vulnerability, but did rather well overall. The unscuffed acrylic sheeting and gloss polyester film failed and are not recommended. In general, it seems the thinner applications dried faster and had better adhesion than the slightly thicker applications. Thinner initial layers on non-porous surfaces are recommended. Even though some of these substrates performed well, there are some caveats to consider. It is unclear if future oxidization of the metallic surfaces is possible or whether oxidization could impact long term adhesion or the longevity of the paintings created on those surfaces. There are also aging characteristics of oil paints that are difficult to predict and are not readily apparent with this type of short-term testing. For this round of testing, we did not add any mediums – alkyd or regular drying oils, to the paint application, which is something we would like to do as a second installment to see if the mediums provide additional durability or a beneficial resistance to scratching. As always, we encourage your comments. If you have any questions, please do not hesitate to email [email protected] or call 800-959-6543 in the US or 0049 (0)69-348-72-154 in Europe.

Thanks Golden/Williamsburg (Greg) for sharing these results!
I’ve been preparing ACM panels with acrylic gesso, before painting with oils. Would you suppose that the adhesive quality of this preparation would be similar to that which you experienced with acrylic on birch (without issue)?
If I decide to paint directly on scuffed and cleaned ACM or apply an oil ground to a scuffed and cleaned ACM, how would you suggest I scuff? Sandpaper? In any particular direction? Did you find that the scuffing affected the topography or appearance of paint layers? or would an oil ground smooth the appearance?
Thanks!
Hi Joshua,
We have tested Gesso onto ACM panels, Dibond specifically, and found good adhesion. Here is the article with those findings: https://justpaint.org/painting-on-dibond/
In terms of scuffing, we used a 220 grit sandpaper. We probably could have gone to a finer paper, but settled on the 220. On our Dibond panel, we scuffed vertically and horizontally, which worked really well. You could probably use a random stroke too as long as it has a uniform scuff across the surface. A customer recently reported using a orbital sander for this purpose and indicated they had excellent results. You just don’t want to sand through the manufacturer’s paint layer on the surface of the ACM panel and expose the raw metal. The scuffing was not visible through the paint surface we applied. It shouldn’t be visible through an Oil Ground application either.
Let us know how it goes!
Greg
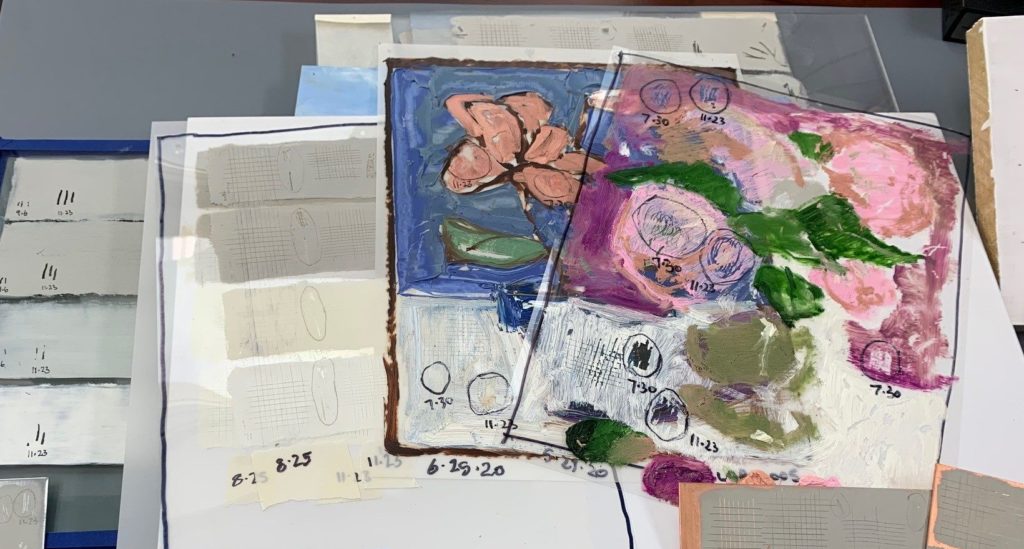
What artist made the beautiful painting right under your title?
Thanks! I made all the studies and test panels used in this article.
Take care,
Greg
This was an informative and well-concieved study of alternative substrates for oil painting. I understand this is an initial study and further review is of course warranted. I really look forward to a full-on study with the possible inclusion of the use of mixed media.
Hi Dillard,
Thanks for your comment. We are happy to consider broadening our testing, What do you mean by “mixed Media”?
Thanks,
Greg
Very clear and informative, as always, thank you! Looking forward to these tests with alkyd.
Thanks Marie-Claire!
That is a very thin coat of the Lead Oil Ground on the Copper…did you apply one or two coats of it? And what brush/tool did you use for applying such a thin application?
Thank you.
Hello Ari,
Yes it is. I used a hog bristle brush to gently work the ground onto the surface and then feather it to a extremely thin, uniform film. I wanted the copper color to glow through slightly. Additional coats should be able to go over top in a couple days after first sets up. The application was based on historical accounts of applying the ground extremely thin and smooth by rubbing it onto the surface with the fingers. This from “Painting on Copper, and other metal plates – Production, Degradation and Conservation Issues”. If you end up using copper to make paintings, send us some pictures at [email protected]. We would love to see what you do!
Take care,
Greg
I found your article very informative. I would like to paint in oils on Zinc plates. i would appreciate any thoughts you have on that type of substrate. I would prefer using a transparent paint to initially protect the surface, rather than a heavier paint. I would also like parts of the metal to show through without distracting brush strokes from a heavy ground coat. I would appreciate hearing from you. Thank you for your help.
Hello Estelle,
We did several oil applications onto a scuffed and unscuffed zinc etching plate. Within several months the oil application was visibly cracked on the surface. We think this is due to the zinc influencing the oil layers and causing embrittlement, which led to the cracking and minute cleaving. We did not test transparent glazes directly over the surface, so cannot comment on the performance of those type of layers. But expect similar results eventually.
Aluminum had much better results and looks fairly similar. It may be worth testing aluminum with the recommendations of cleaning and scuffing before the oil is applied.
Here is an article about zinc oxide and its influence on oil layers: https://justpaint.org/zinc-oxide-reviewing-the-research/
We hope this is helpful!
Greg
Greg —
Really enjoyed this article… and now I have a question.
I am about to paint the entire top surface of an electric guitar body. To prepare for my oil painting, I used 120 grit sandpaper to scuff up this musical instrument, and now — thanks to your research — I believe the oil paint will adhere well.
When the painting is finished, I will varnish it, but I’m wondering if there’s something else that needs to be done. As you might imagine, guitars can be treated roughly, so I’m wondering if a tough polyurethane clear coat can be used to cover the varnish layer, OR is the varnish itself all that I need to protect the oil painting below?
Naturally, I’m concerned that polyurethane and varnish may not work well together. Your guidance would be welcome.
Cheers from Houston,
Steve Kobb
Hi Steve,
Thanks for your comment! We didn’t test oils over guitar body though, so you might have to test a small area to make sure.
It sounds a little tricky. 1. Traditional oil paints take many years to fully cure and still change over a very long time – decades and longer! It would be different with One-shot type sign painters enamel oils. 2. Even with the most breathable type varnishes, it is recommended to let the oils dry for 6 months. and those type of varnishes are not durable enough to handle. 3. Polyurethanes are durable enough to handle, but they form tight surfaces, so will not allow the oil layers to continue curing over time…
There wouldn’t be any concerns if you could do the painting in acrylics.? That way you allow them to dry for a couple weeks, then you can use the Polyurethane directly over top. Some polyurethanes do have the tendency to yellow with time, but there is a variety of options in that category. KBS Diamond Finish is a moisture curable urethane that is very hard and does not seem to yellow. it can be used over acrylics.
Not sure about what to recommend over the oils. If you do go that route, you should probably consider using a good bit of fast drying alkyd medium in the paints. That way they dry fast and are more durable like an enamel. Thinner layers will cure faster. You might be able to go with just that. Or check around to see what the guitar painting community uses over oils. Maybe Nitrocellulose lacquer would work, but we have never tested. Sorry cant give a definitive.
Good luck with the project! let us know how it goes.
Greg
Just as an FYI, aluminum is actually so reactive to oxygen that all of the aluminum you see and are painting on is actually aluminum oxide (aluminum rust). That’s why you don’t have to worry about oxidation with aluminum because all aluminum that comes into contact with air has already oxidized to create a stable rust layer.