
When the opportunity presents itself, we always try to share results from testing being done at GOLDEN, especially when we think it would be of interest and benefit to artists. We know artists love Fluorescent colors and having recently revisited lightfast testing of our Heavy Body Fluorescents, we thought this would be a great way to address some of the common questions we receive regarding the long term stability of these colors. Knowing that Fluorescents are fugitive colors, in this article we will share results from our testing as well as offer some suggestions for artists looking to add a bit more protection to these colors.
Lightfastness Testing Overview
Before we share the results it is important to provide some context for how we conduct lightfast testing at GOLDEN. As with all lightfast testing we do, our recent testing conforms to ASTM D4303, Standard Test Methods for Lightfastness of Colorants Used in Artists’ Materials. That means for this test we did a series of 10 mil color drawdowns (the paint film being roughly the thickness of three sheets of copy paper) of Masstone and 40% Reflectance Tint of our Heavy Body Fluorescent Colors to be tested both indoors with accelerated lightfast testing and outdoors in natural light. For indoor testing we assess lightfastness by exposing samples within a Xenon Arc Testing Chamber for 410 hrs., which is equivalent to several months of outdoor exposure and roughly 100 years of indoor gallery lighting conditions. For outdoor testing, we sent our fluorescent samples to Arizona where they were exposed for a little over 9 weeks until they reached a total solar irradiance of 1260 MJ/m². For a more detailed explanation of how we conduct Lightfast Testing at GOLDEN see our article below:
Lightfastness Testing at Golden Artist Colors
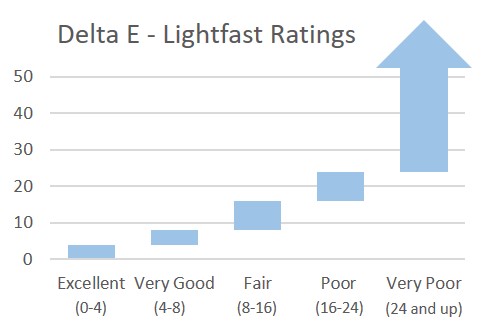
Once samples have completed their test duration, they are brought back into the lab where we scan them into a spectrophotometer to get Delta E measurements on each color. Delta E, for our purposes, is basically a number that represents the difference between the control sample that was unexposed and those that were exposed to Ultra Violet Light. The more change, the worse the lightfast rating. For these data sets below, we will be looking to see how much these colors have changed when exposed to UV in these different environments as a predictor for how they will age over time. For more detailed information on Delta E as well as Fluorescents see these articles below:
Delta E: A Key to Understanding Lightfastness Readings
Fluorescent Colors – Bottling a Shooting Star
Lightfast Testing Results
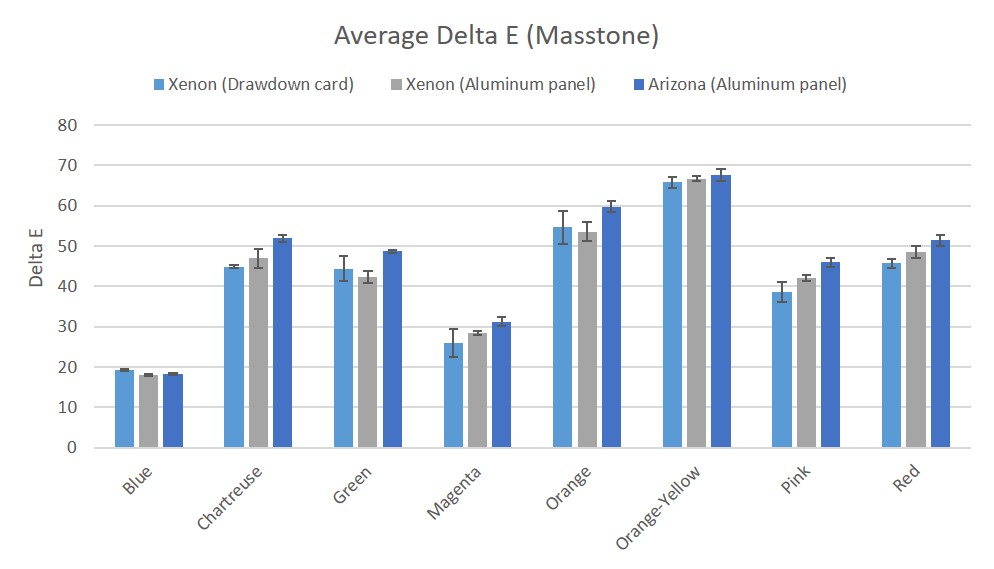
In the graph above are the average Delta E measurements for the unvarnished, Masstone of Heavy Body Fluorescent Colors. This graph is organized by Fluorescent Color and within each color, separate bars represents either Indoor Xenon testing done on a lacquered drawdown card or aluminum panel and Outdoor testing in Arizona on aluminum panel. As expected, all colors except for Fluorescent Blue sit above 24 Delta E meaning they are rated as Very Poor by ASTM Standards with Orange-Yellow tapping out at almost 70 Delta E. As one might expect, outdoor lightfast testing was slightly harder on these colors, but the overall pattern is consistent between testing methods.
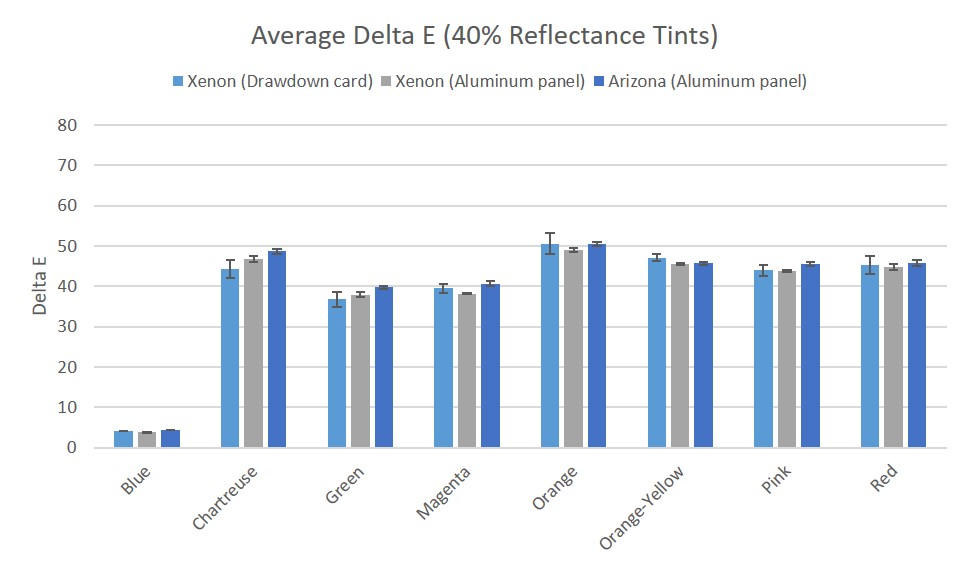
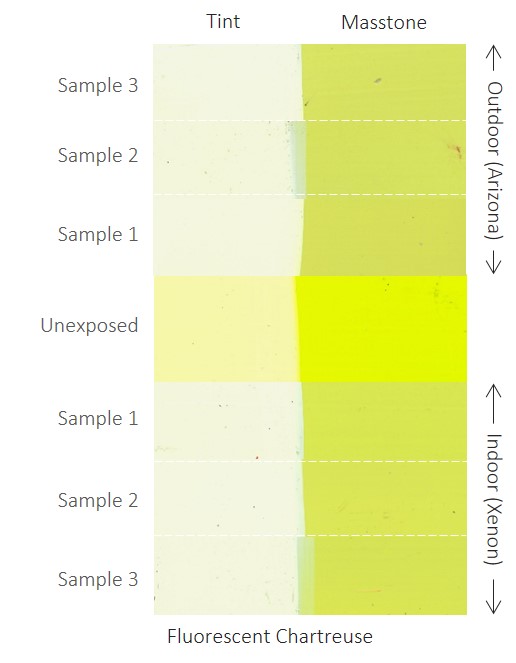
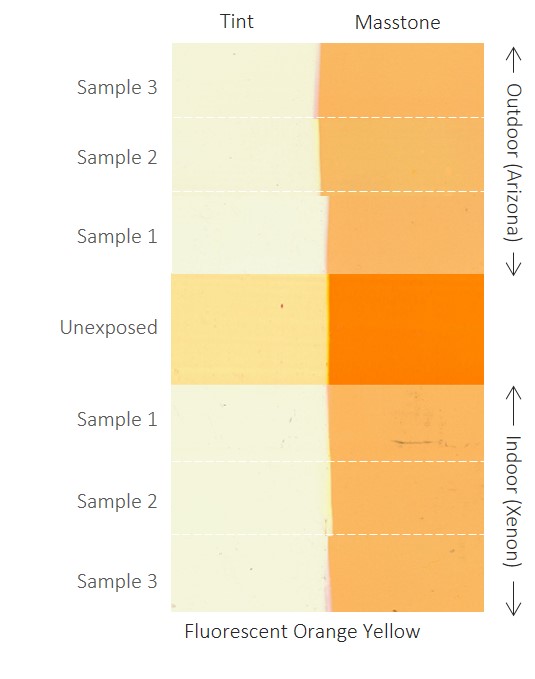
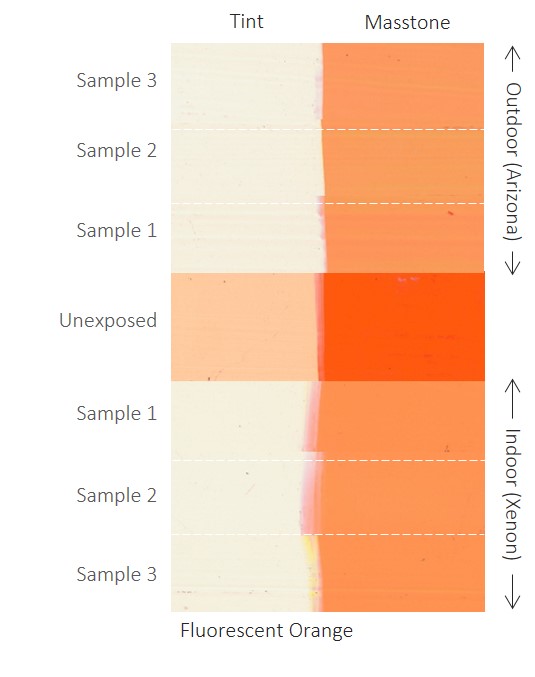
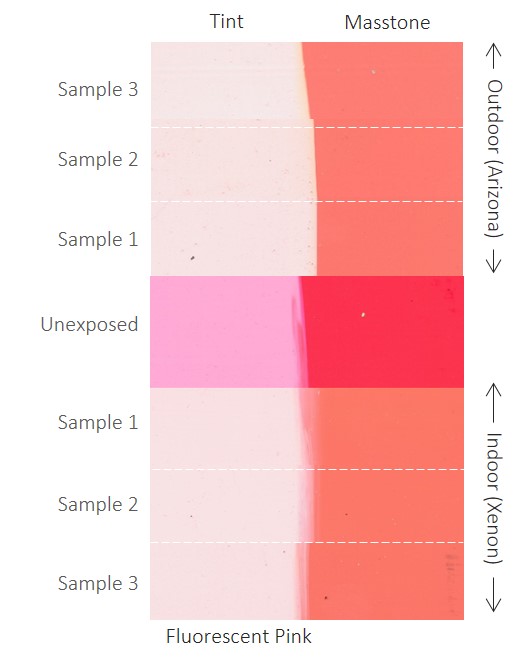
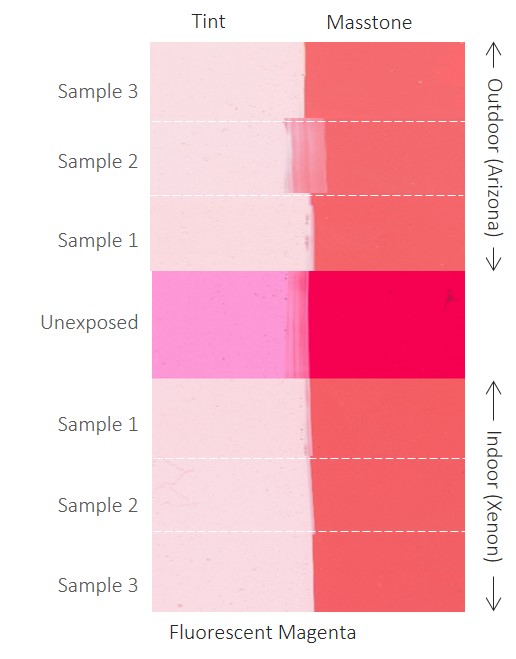
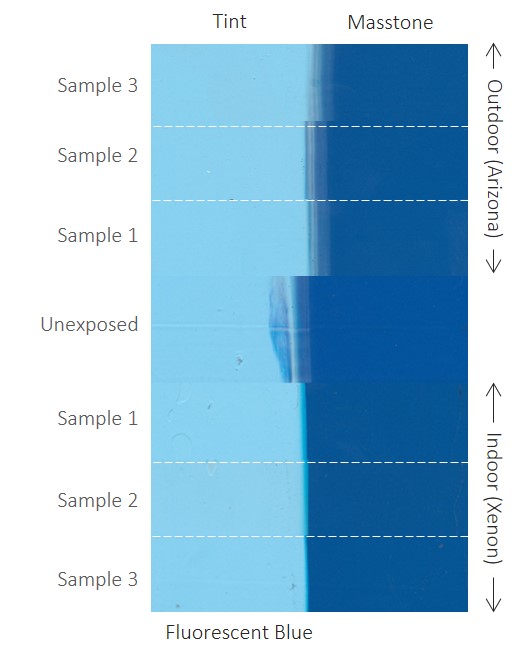
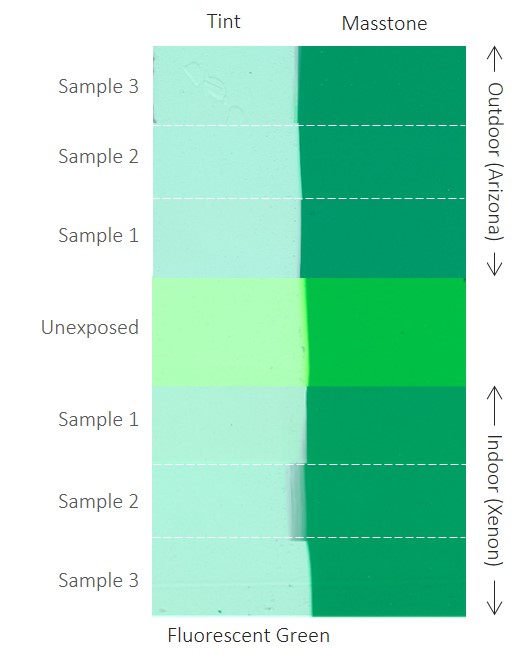
With this next data set we have the Average Delta E measurements of the 40% Reflectance Tint of Heavy Body Fluorescent Colors also unvarnished. Again, Blue overperforms with the remaining Fluorescent Colors rating as Very Poor with Delta E measurements averaging near 40. While the numbers tell us a lot, sometimes visuals do more to show what these changes will actually look like. Keep in mind, due to the nature of Fluorescent colors, getting pictures or scans that show the contrast in luminescence between the control and samples is quite difficult. In general, when exposed, Fluorescent colors tend to become dull and lighten in value or in some cases darken as you will see with Chartreuse and Green.
Lightfast testing for ASTM is done in triplicate for each testing method so for the visuals below we have spliced together all of our test samples on lacquered cards (above) and aluminum panels (below). The hope is to show collectively the affect of UV exposure within a Xenon Arc Chamber and outdoor UV exposure on our Fluorescent Heavy Body colors.
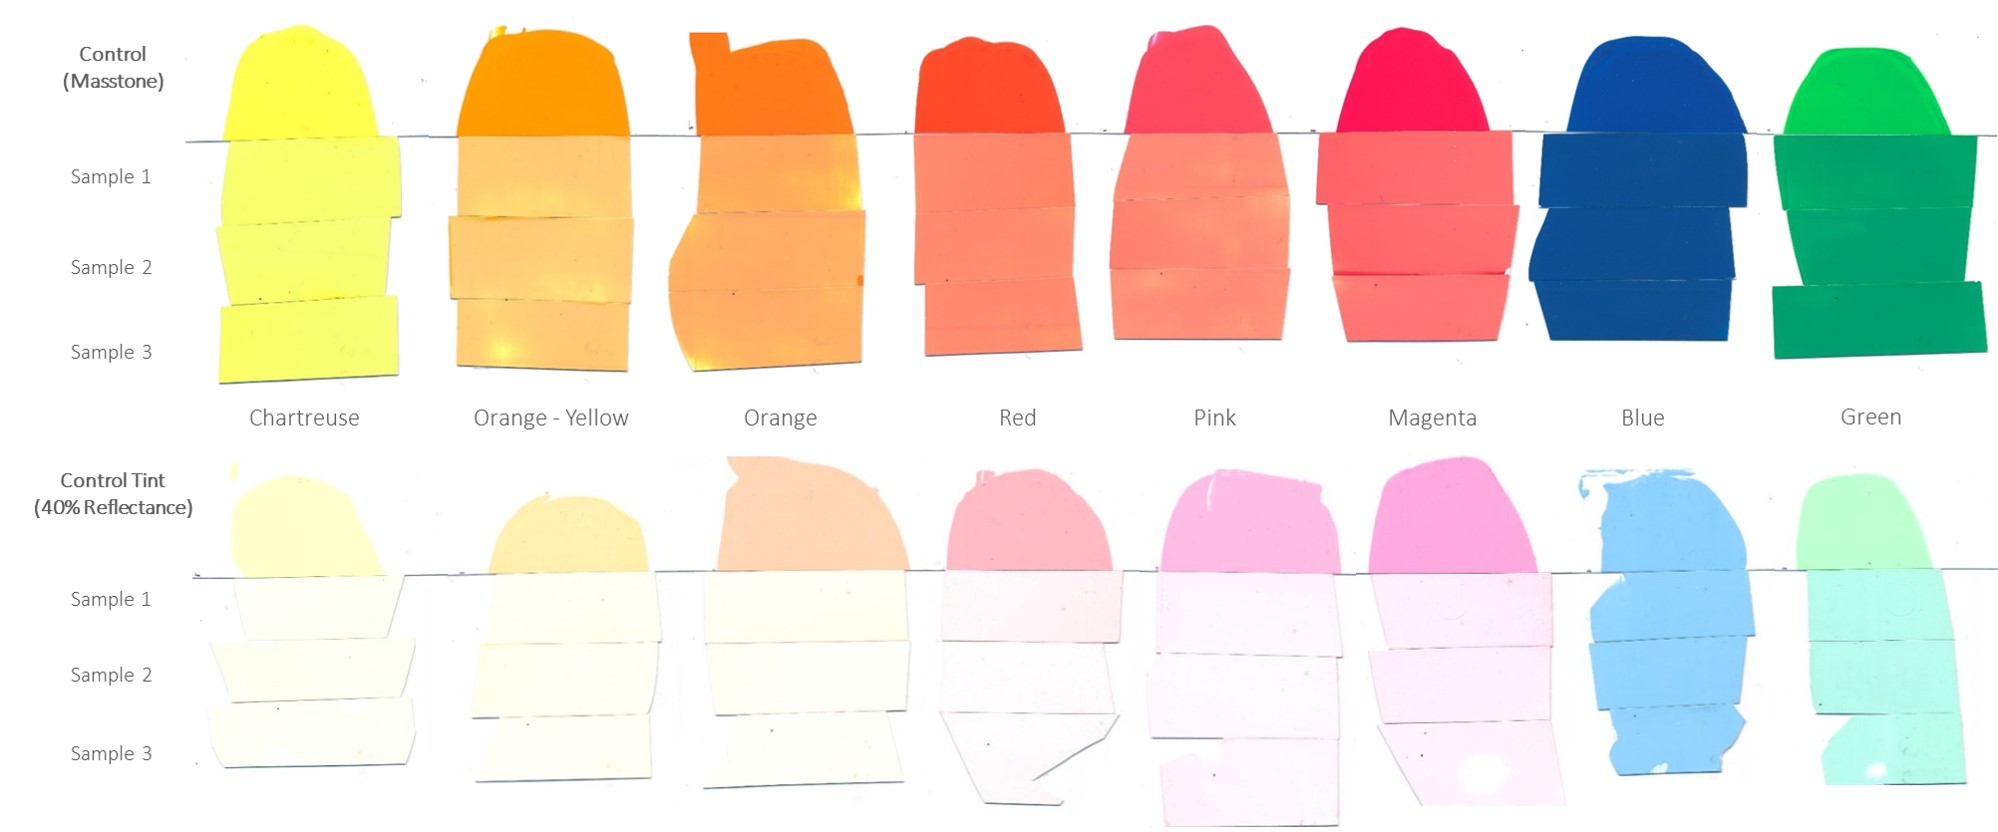
Compiled Xenon (bottom) and Outdoor Testing (top) of Masstone and 40% Reflectance Tint of Heavy Body Fluorescent Colors on aluminum test panels. Graphic was compiled from test samples created by Trevor Ambrose. Within this testing set you can observe the lightening and in some cases darkening of the Heavy Body Fluorescent colors. For larger image, select individual colors.
An Example of Long Term Aging of Fluorescent Colors and the Importance of Varnish
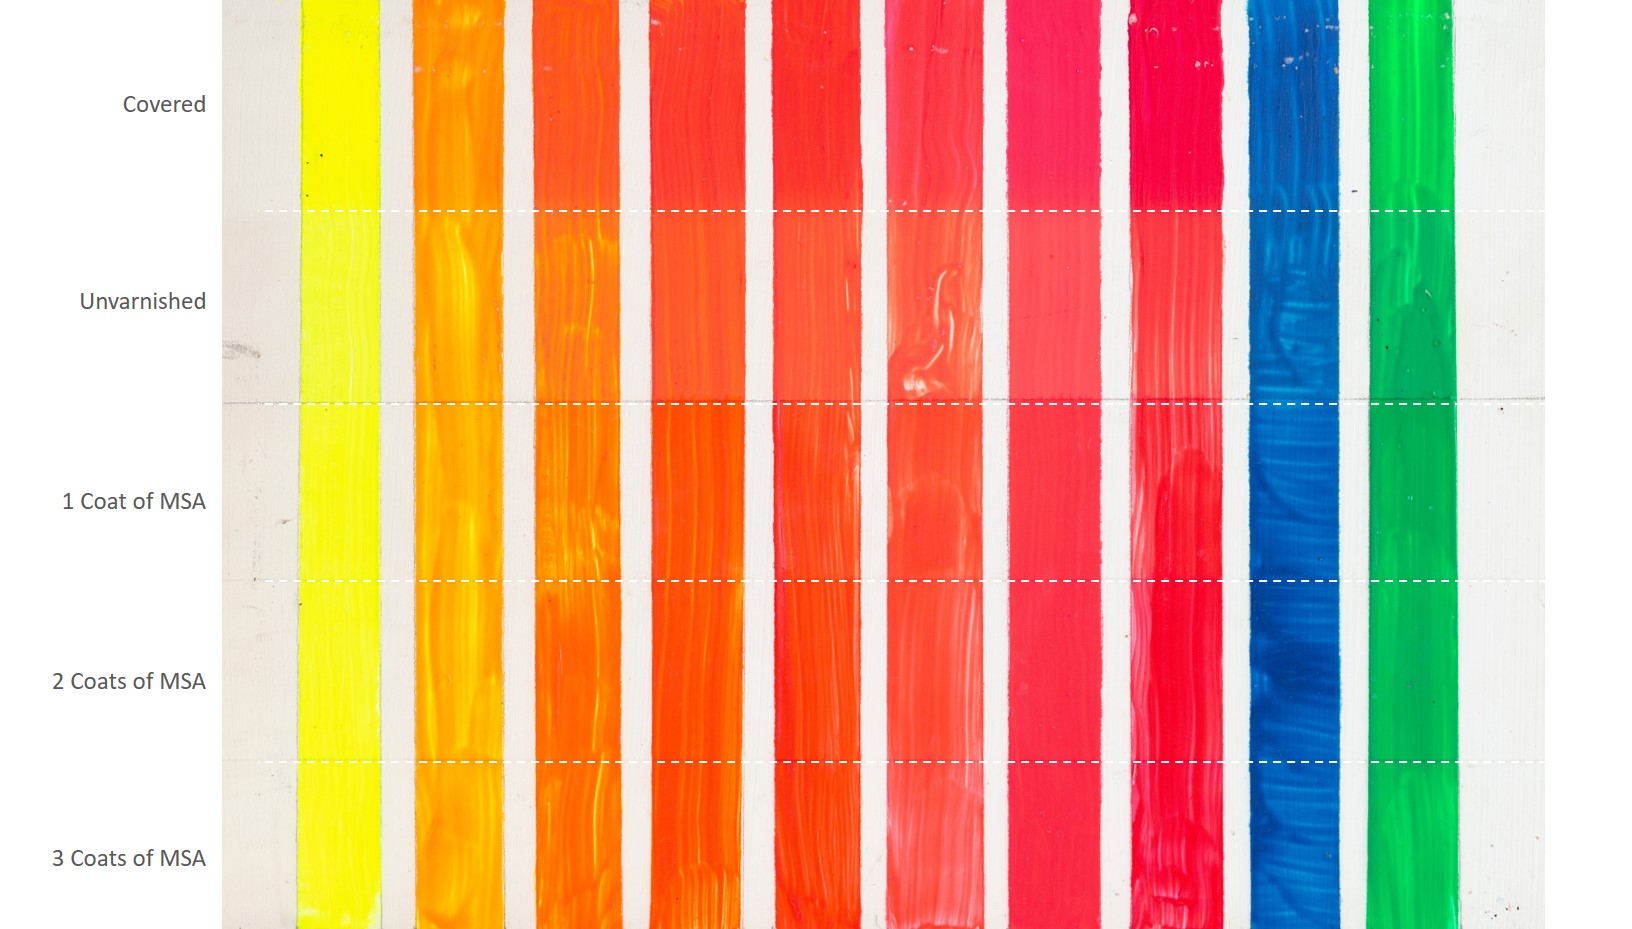
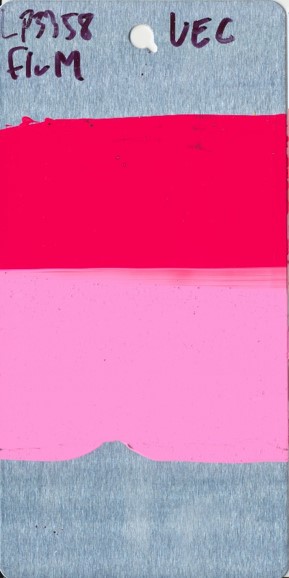
While lightfast testing we do in the lab helps us gain insight into how a color will age over time. It is important to note the role environment has on aging as well as UV protection through the use of varnishes. Both can have a dramatic effect on the lightfastness of Fluorescent colors. We consider the above visual a gift to ourselves in many ways. For the better part of 18 years it has lived in an office environment, exposed to a mix of natural and fluorescent lighting, including at least several years where it sat in a West facing window. The window does have a film on it that helps to reduce infra-red and UV. So while not a controlled test, or nearly as extreme as being near a south facing window in Arizona, it gives some sense of a real world situation where it has aged naturally. You can compare the covered portion as a “control” against the unvarnished section below it and the subsequent layers of MSA Varnish beneath that. While overall there is some change that has occurred, the use of MSA Varnish helped slow down the rate of change by filtering Ultra Violet Light. That being said, this is Central New York so in a different environment this panel may have looked much different.
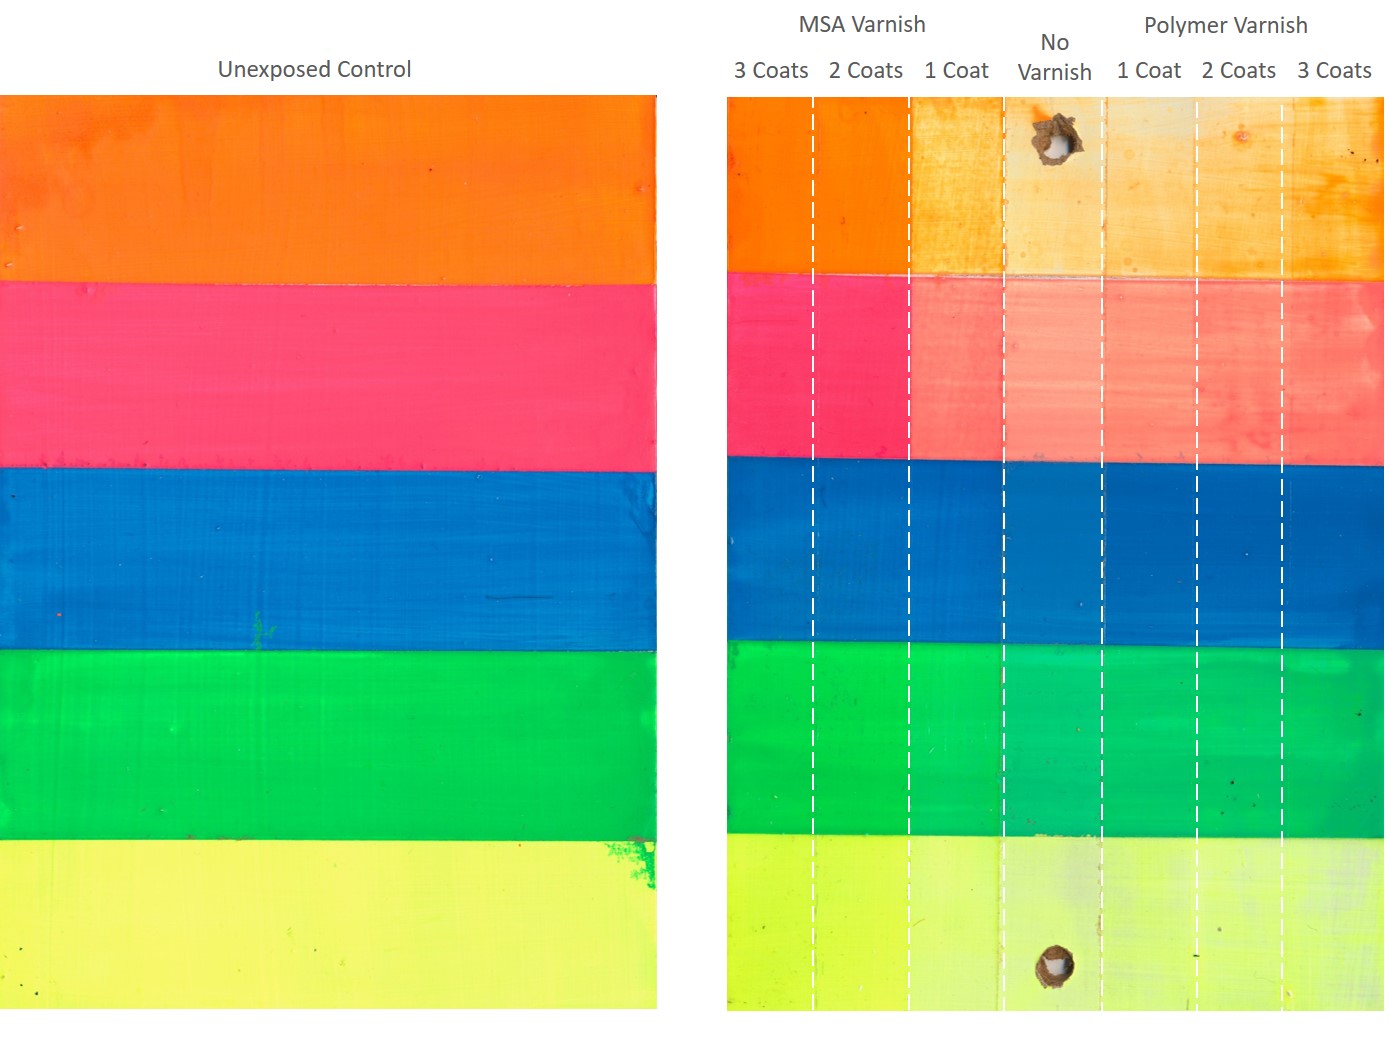
We also wanted to bring back out a visual from our article “Bottling a Shooting Star”. We made reference to this above as a nice companion piece to this article and this visual does a lot to show just how impactful varnishing can be on preserving the look of Fluorescent colors. This test sample was exposed to UV in our QUV Chamber for 1600 hours. For comparison,1200 hours is roughly the equivalent of 410 hours of Xenon testing. The results as you can see are pretty consistent with current testing above. This sample board offers a lot though in showing the impact of our varnishes on lightfastness. MSA Varnish, which offers the greatest UV protection of our varnishes, performed quite well in two and three coats. If you are using Fluorescent colors in your paintings and are hoping to provide the best protection possible to keep them looking nice and bright for as long as possible, we strongly encourage varnishing. It is also important to note here that UV Filtering from a varnish also equates to a loss of Fluorescence in black light. So if you are interested in black light, check out the Bottling a Shooting Star link above for more information. Additionally, here is more information on our MSA Varnish and Archival Spray Varnish, which is an aerosol version of our MSA:
Conclusion
So despite these results, artists will still be attracted to Fluorescent colors as they offer a unique form of contrast that can be employed in painting to dazzling effect. A lot of times when we get questions about Fluorescent colors, artists just want to know “How long will these colors last?”. It is a complex question as many environmental factors can influence the lifespan of these colors. Knowing that they are fugitive colors with very poor lightfastness the use of varnishes like our MSA Varnish, that offers UV filtering, can give them a better shot at lasting longer into the future. It is something we recommend whenever an artist mentions they are using Fluorescent colors in their work.
As always we hope this article has been helpful and do not hesitate to reach out to us at [email protected] if you have more questions or leave us a comment below. We also want to offer a special thanks to Trevor Ambrose for doing this wonderful testing and all that goes into it so that we could share it will all of you. Until next time!
*On QUV Test panel the Varnish used was actually MSA Varnish not Archival. Update to the environmental conditions of the Long Term Aging of Fluorescent section to account for window treatment that had UV Filtering. Article was amended on 6.21.2021
About Scott Fischer
View all posts by Scott Fischer -->Subscribe
Subscribe to the newsletter today!
No related Post


Great article and information.
One thing I didn’t understand was how the substrate affects the samples. What makes the aluminum panel sample different from those on the drawdown cards? Would the substrate material play a large role?
Hello Andrew,
For this testing since these samples were being tested indoors and outdoors the Aluminum was to have a substrate that could withstand weathering outdoors, the drawdown cards would not hold up outdoors. In a previous article on alcohol inks, which are also dye-based, we found interestingly that the dyes migrated to the interface between the substrate and the acrylic (gesso). So Lightfast testing washed them out completely, but when we did these as skins, we saw that the underside looked much more intense for color, so there was physically less color on the surface. With Acrylic fluorescent colors this type of migration is not seen, but it is interesting. Here is a link to that article: Using Alcohol Inks with GOLDEN Acrylics and Varnishes
Let us know if you have questions!
Best,
Scott
Interesting that the tints were nearly as prone to change as the mass tones. Mixing the fluorescents with other paint, then, didn’t protect them much at all, which is not what I might have expected. Just one question: what is a “reflectance tint” and does it differ from just a regular tint (e.g., a mix with Titanium White)?
Hello Lori,
When Fluorescent colors are mixed with white they will still be prone to fading in UV as seen with lightfast testing. In a mixture, the less lightfast color would fade first leaving behind a more lightfast one. You could consider underpainting a color behind the Fluorescent color, for example, to account for this potential of fading.
The Reflectance Tint is when Titanium White is added to a color to reach a 35% – 45% reflectance at the wavelength of maximum absorption (UV). So in other words, they are tinted in order to reach a threshold that has the most UV light absorbing into the paint film. A good scenario for testing, ensuring that the testing sample is really getting pounded by UV. So it is similar to a normal Tint in that both are using Titanium White, it is just to a degree specified by ASTM for the testing protocol.
Let us know if you have questions! [email protected]
Best,
Scott
If fluorescents convert UV to visible light, doesn’t varnishing with UVLS defeat fluorescence?
Hello Steve,
Yes, a Varnish with UVLS would stop the black light Fluorescing. In normal light they will still appear quite luminous still. Here is an article on this very subject. Fluorescent Colors – Bottling a Shooting Star
Let us know if you have questions! [email protected]
Best,
Scott
Can one avoid this fading by keeping fluorescent paintings out of the light ?
Hello Joel,
Keeping the painting out of the light will help to prolong the life of Fluorescent colors. So if you are storing works, keeping them out of the light can be helpful. Varnishing with UV Filtering can be very helpful as well for protecting these colors. The fading of Fluorescent colors is very environmental, so depending upon how much light they receive or the type of light (Tungsten, LED, etc…) it will affect them to a greater or lesser degree. Natural light tends to be much harder on them. We have not tested all lighting conditions or types of light, there would be a lot of variables and everyone’s environment would be different.
We hope this helps and let us know if you have more questions at [email protected]
Scott
This is a very useful article. Is there any indication of timeframe of fading for fluorescent colours? I appreciate that it is dependent on a number of variables but I’m wondering whether we are talking months or years? Also, does the MSA varnish provide the same level of colour protection as a lightfast colour or is it still going to be prone to premature fading?
Hello Shelly,
Thank you, we are glad it is helpful. You put your finger on it, it really is hard to give a definitive date on how long it will take for Fluorescent colors to begin fading. Environmental conditions really set the stage and there is quite a bit of variability in situations. Depending upon the exposure to UV, it could occur in months if sitting in a window or in ambient, less direct sunlight, it could last much longer. MSA will provide UV filtering, but it will not change the nature of the material underneath it. So while it provides filtering, which can prolong the life of Fluorescent colors, they will fade over time. In other words, MSA will not make them archival or non-fugitive. That being said depending upon the conditions you are working with or anticipating MSA will give them a good chance moving forward and it is something we highly recommend if using fluorescent colors. We hope this helps and let us know if you have more questions!
Best,
Scott
Thank you Scott this is really helpful feedback, much appreciated!
Hello- Do you have any advice regarding capturing an image or scan of the fluorescent Golden paints? What works best? A a scanner, a camera, special lighting? Post edit in photoshop? I am working on an illustration and have to deliver the image file digitally Thank you!
Hello Paul, representing fluorescent color on the web is indeed a challenge. The best result we’ve had involved long exposures under black light. With the color over black you get a better sense of it glowing within the context of an image – but you’re still stuck with an RGB gamut that doesn’t really do the color justice.
Hello, thank you for presenting these experiments. Unfortunately, Golden MSA varnish is currently out of stock in all art supply stores in my country due to import restrictions. The only available option is Polymer Varnish with UVLS. While the experiments demonstrated that it is less effective compared to MSA varnish, I was wondering if applying additional layers of Polymer Varnish could still provide adequate protection. Could you please advise?
Hello, Chen.
The UVLS additives seem to create a more effective protection in solvent-based systems than in water-based ones. We maximize the amounts of these UV absorbers and inhibitors in all the varnishes, but the lightfastness testing reveals MSA Varnish to be superior. That said, we do compared same number of coats for each product, plus look at no layers, 1 layer, 2 layer, 3 layers of varnish in these kinds of tests. However, I cannot located test results directly comparing the amount of UV Protection of MSA Varnish to Polymer Varnish. We have compared MSA Varnish to the spray version of itself called “Archival Varnish”. Spray coats are much thinner and thus provide less UV protection, so as guidance we would suggest to apply 6 brush coats for “maximum” UV protection, as shown in this article image: https://justpaint.org/wp-content/uploads/2017/09/Epson-1520-LF-Composite_Edited.jpg .
I hope that helps out. Please contact us at [email protected] directly if you would like to discuss these topics further. – Mike at GOLDEN
Thank you !!
That’s a really good article.
I know that MSA varnish has matte or gloss.
Can I use the glossy version?
Hello Scott, yes you can use either the Matte or the Gloss and have a similar level of UV protection. The main difference there is just the resulting sheen. Fluorescent colors tend to be more matte when they dry generally, but you can always modify the sheen to what you are looking for in the work. Hope it helps!
Scott