
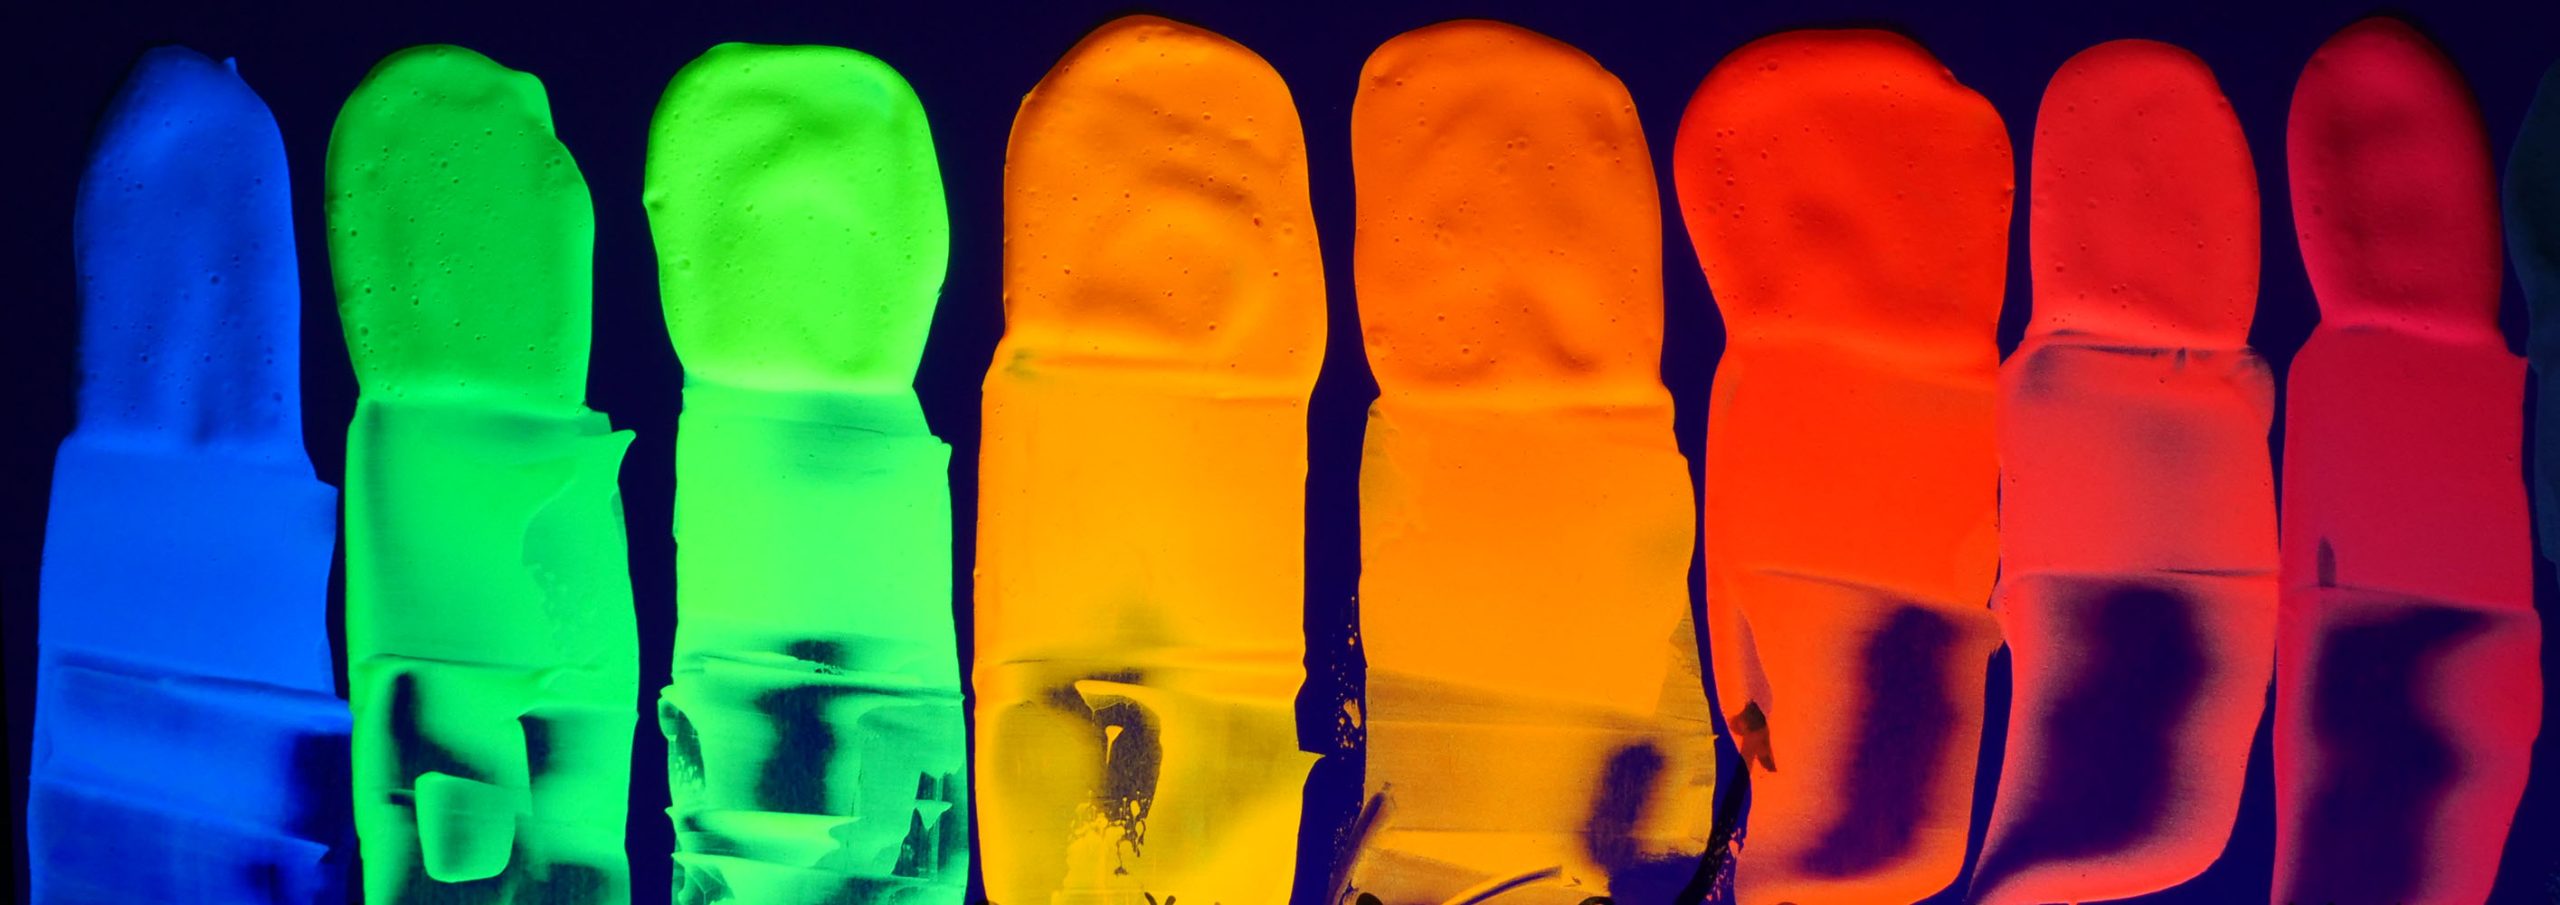
However, a hidden feature is revealed when the light source is removed: an array of glowing colors!
In a previous article The Science and Seduction of Luminescent Colorants, we discussed what makes Fluorescent and Phosphorescent pigments unique. To summarize, electrons can be charged with light energy, causing them to become excited and temporarily jump to a higher orbit. As they release this energy in the form of photons (light), it results in a vibrant phenomenon known as luminescence.
In this article, we’ll share the results of tests to learn what happens when these unique colorants are combined with other products and themselves, the effect of underlying colors, and how to best display luminescent materials for optimal presentation.
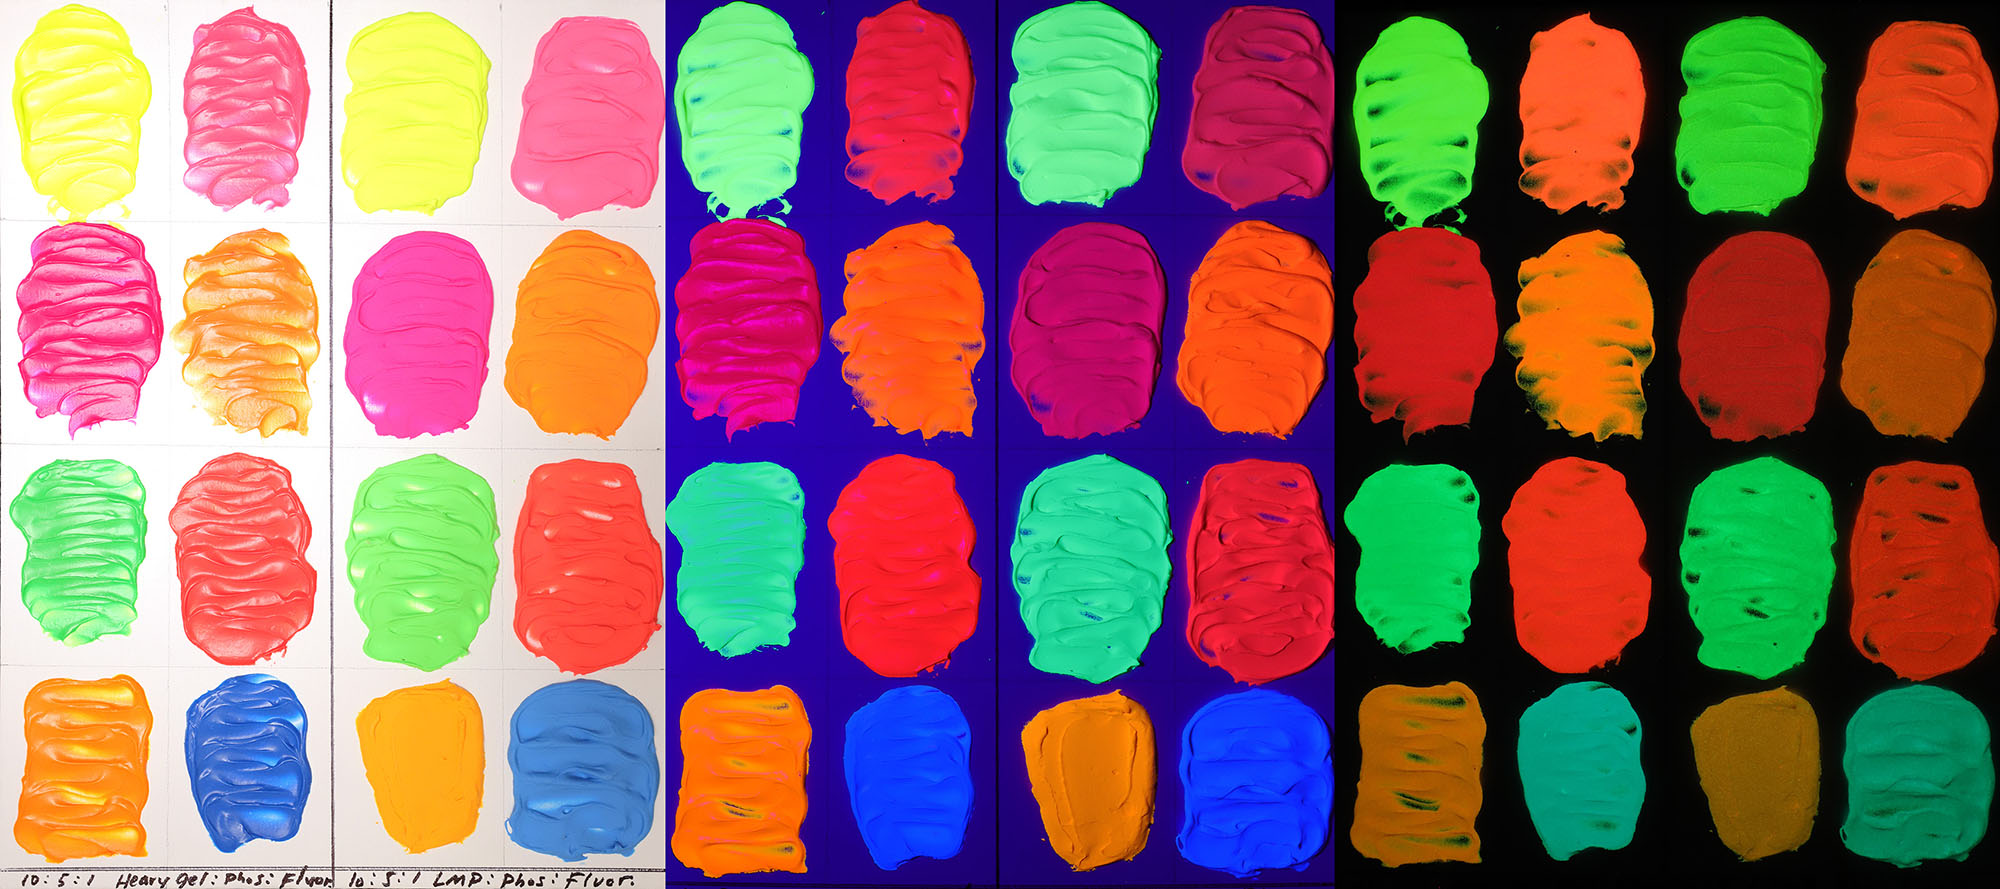
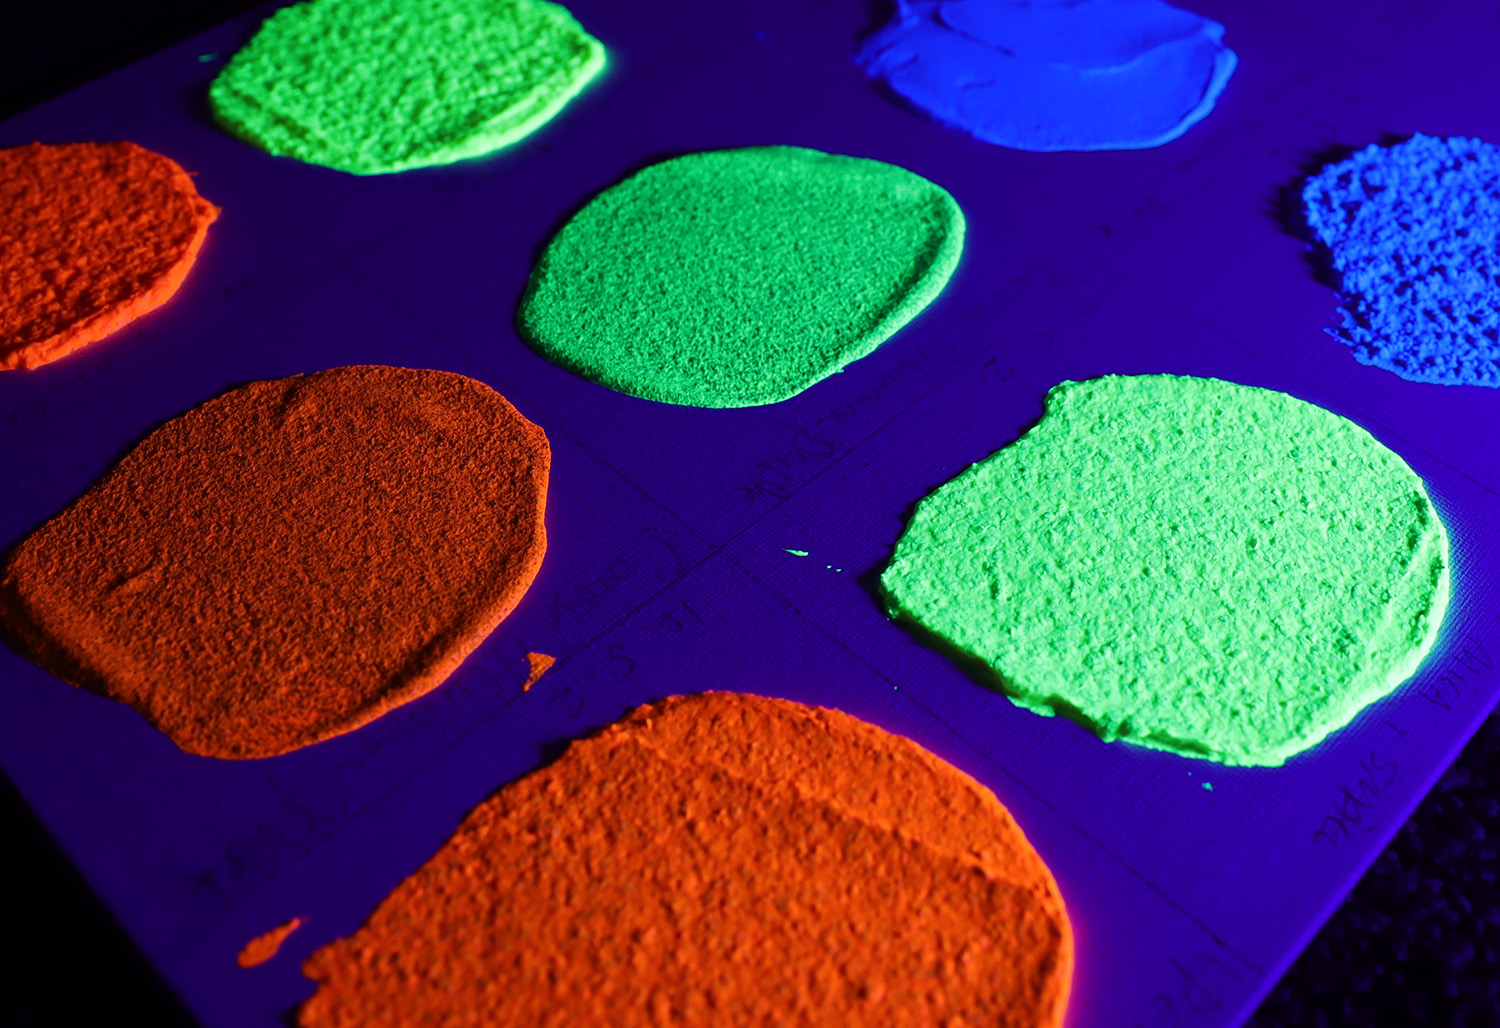
Combining Fluorescent Colors with Phosphorescent Green
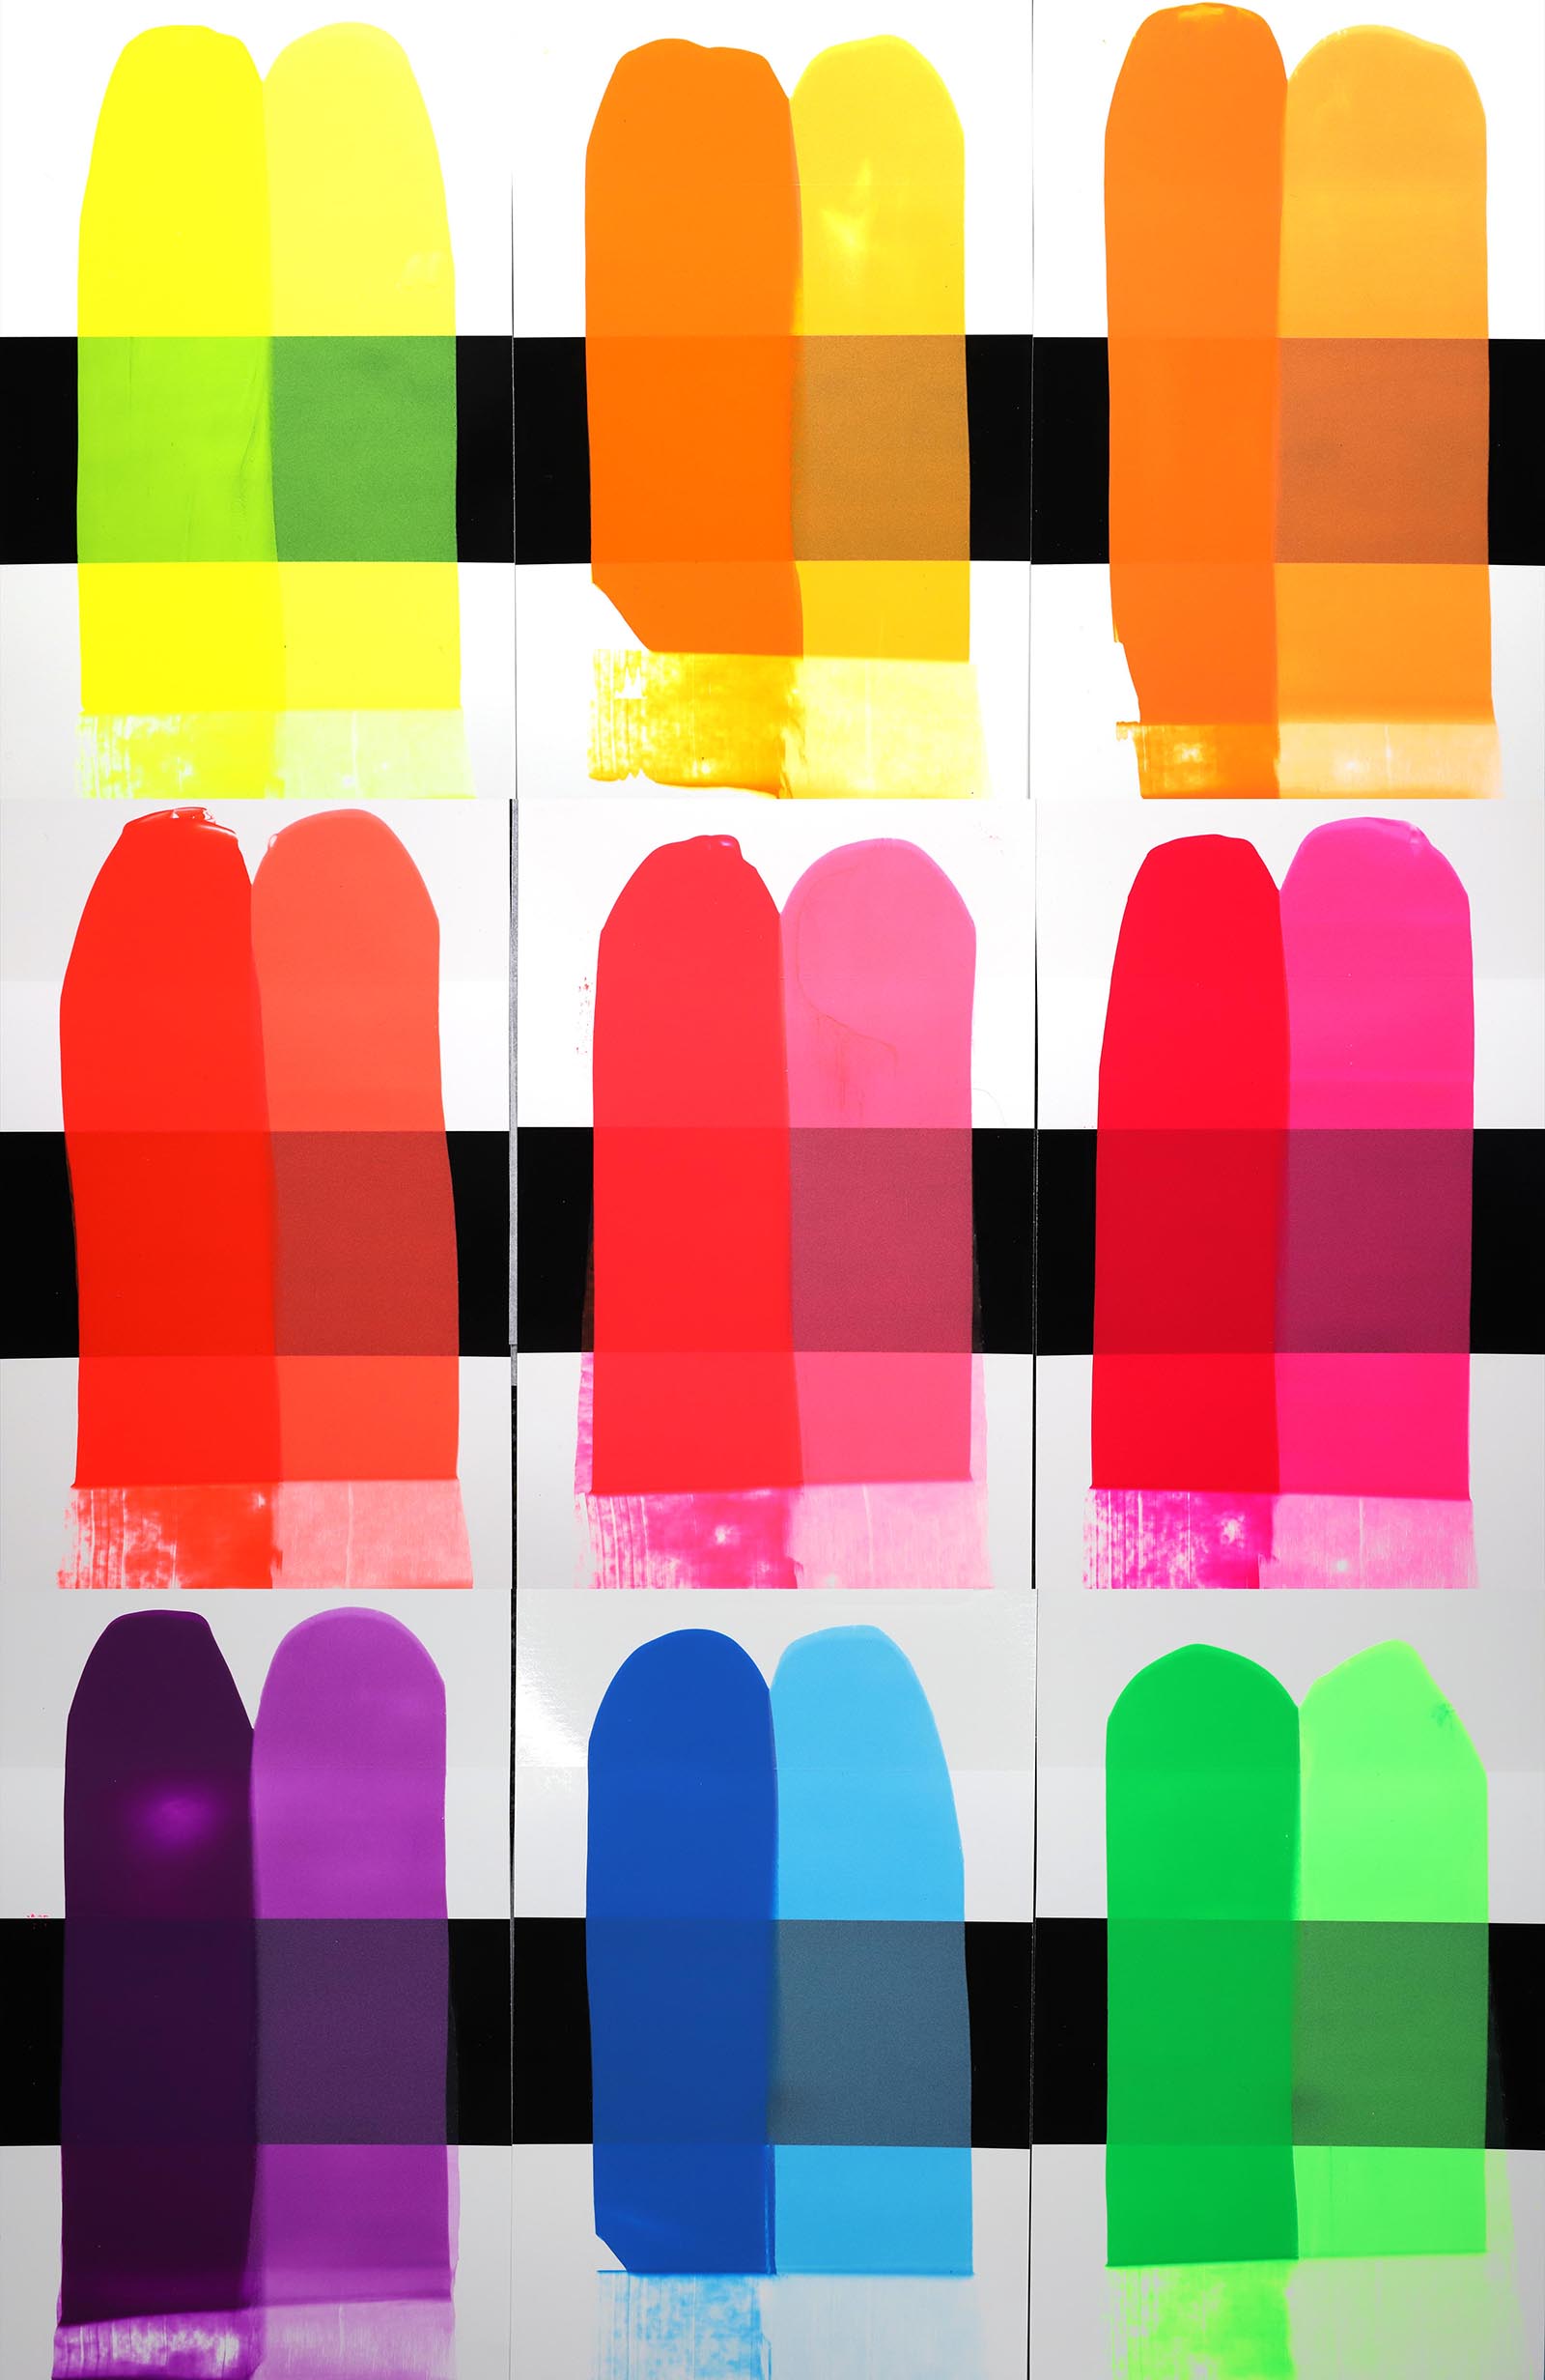
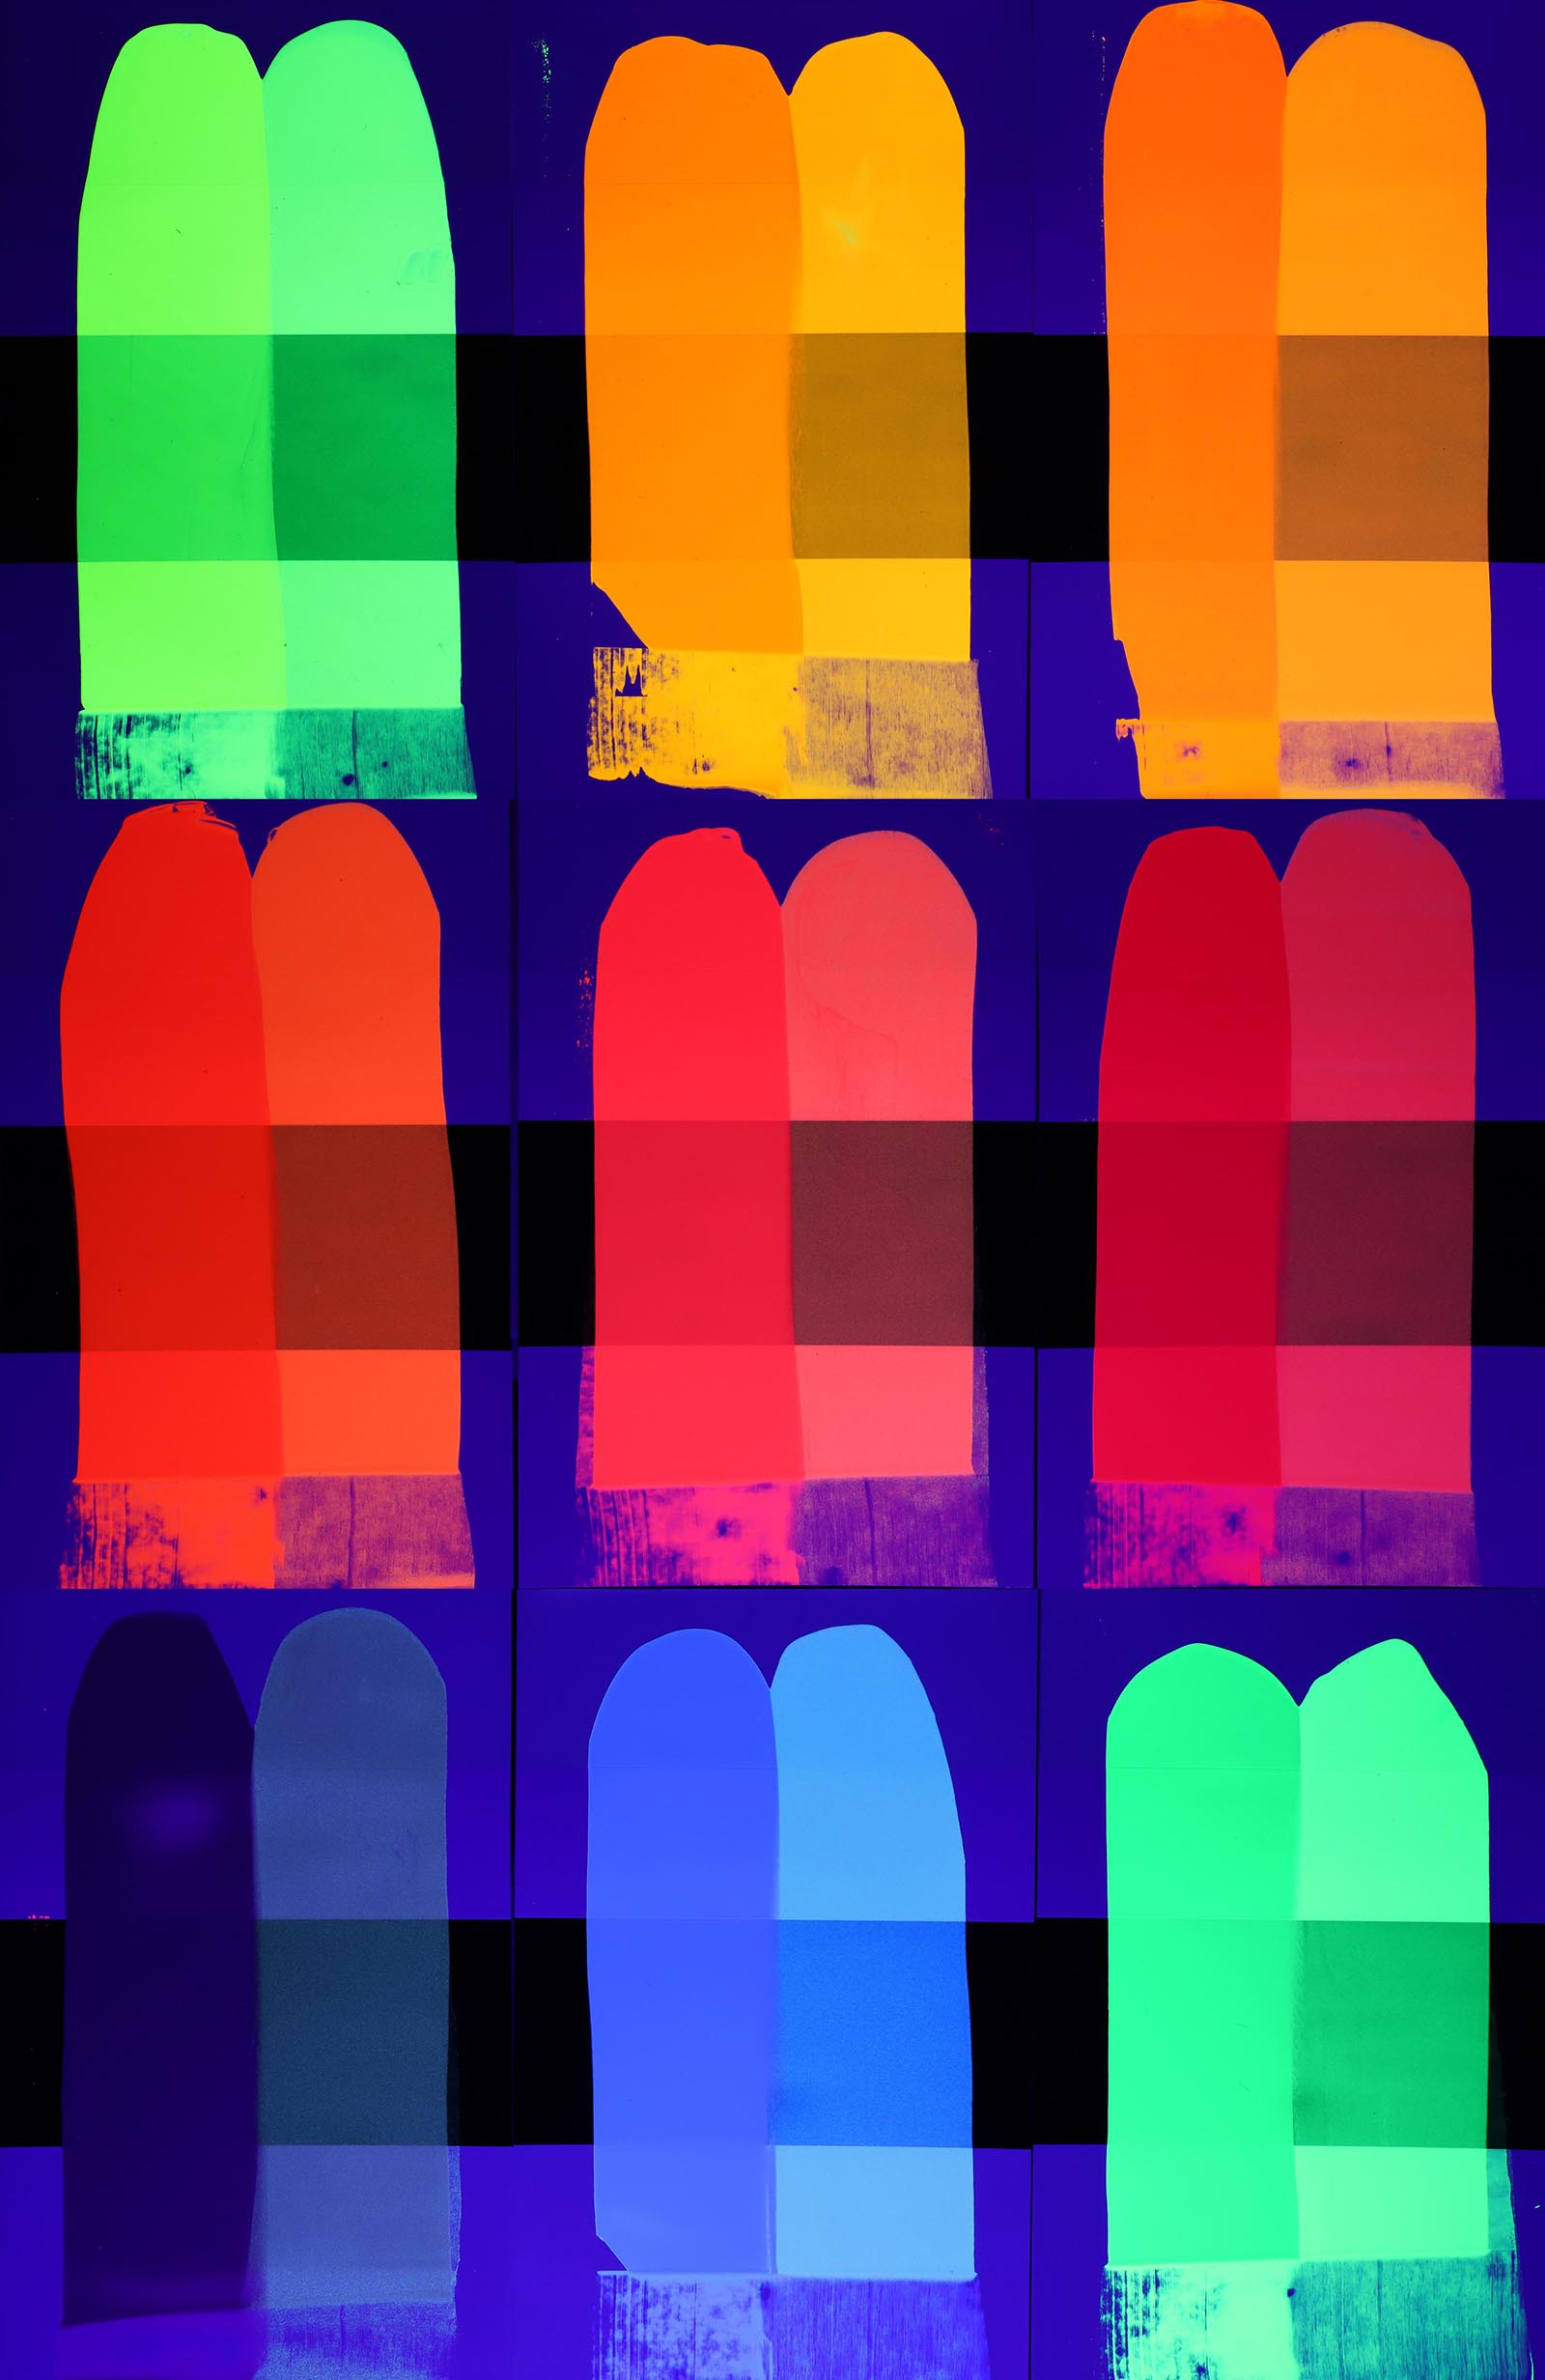
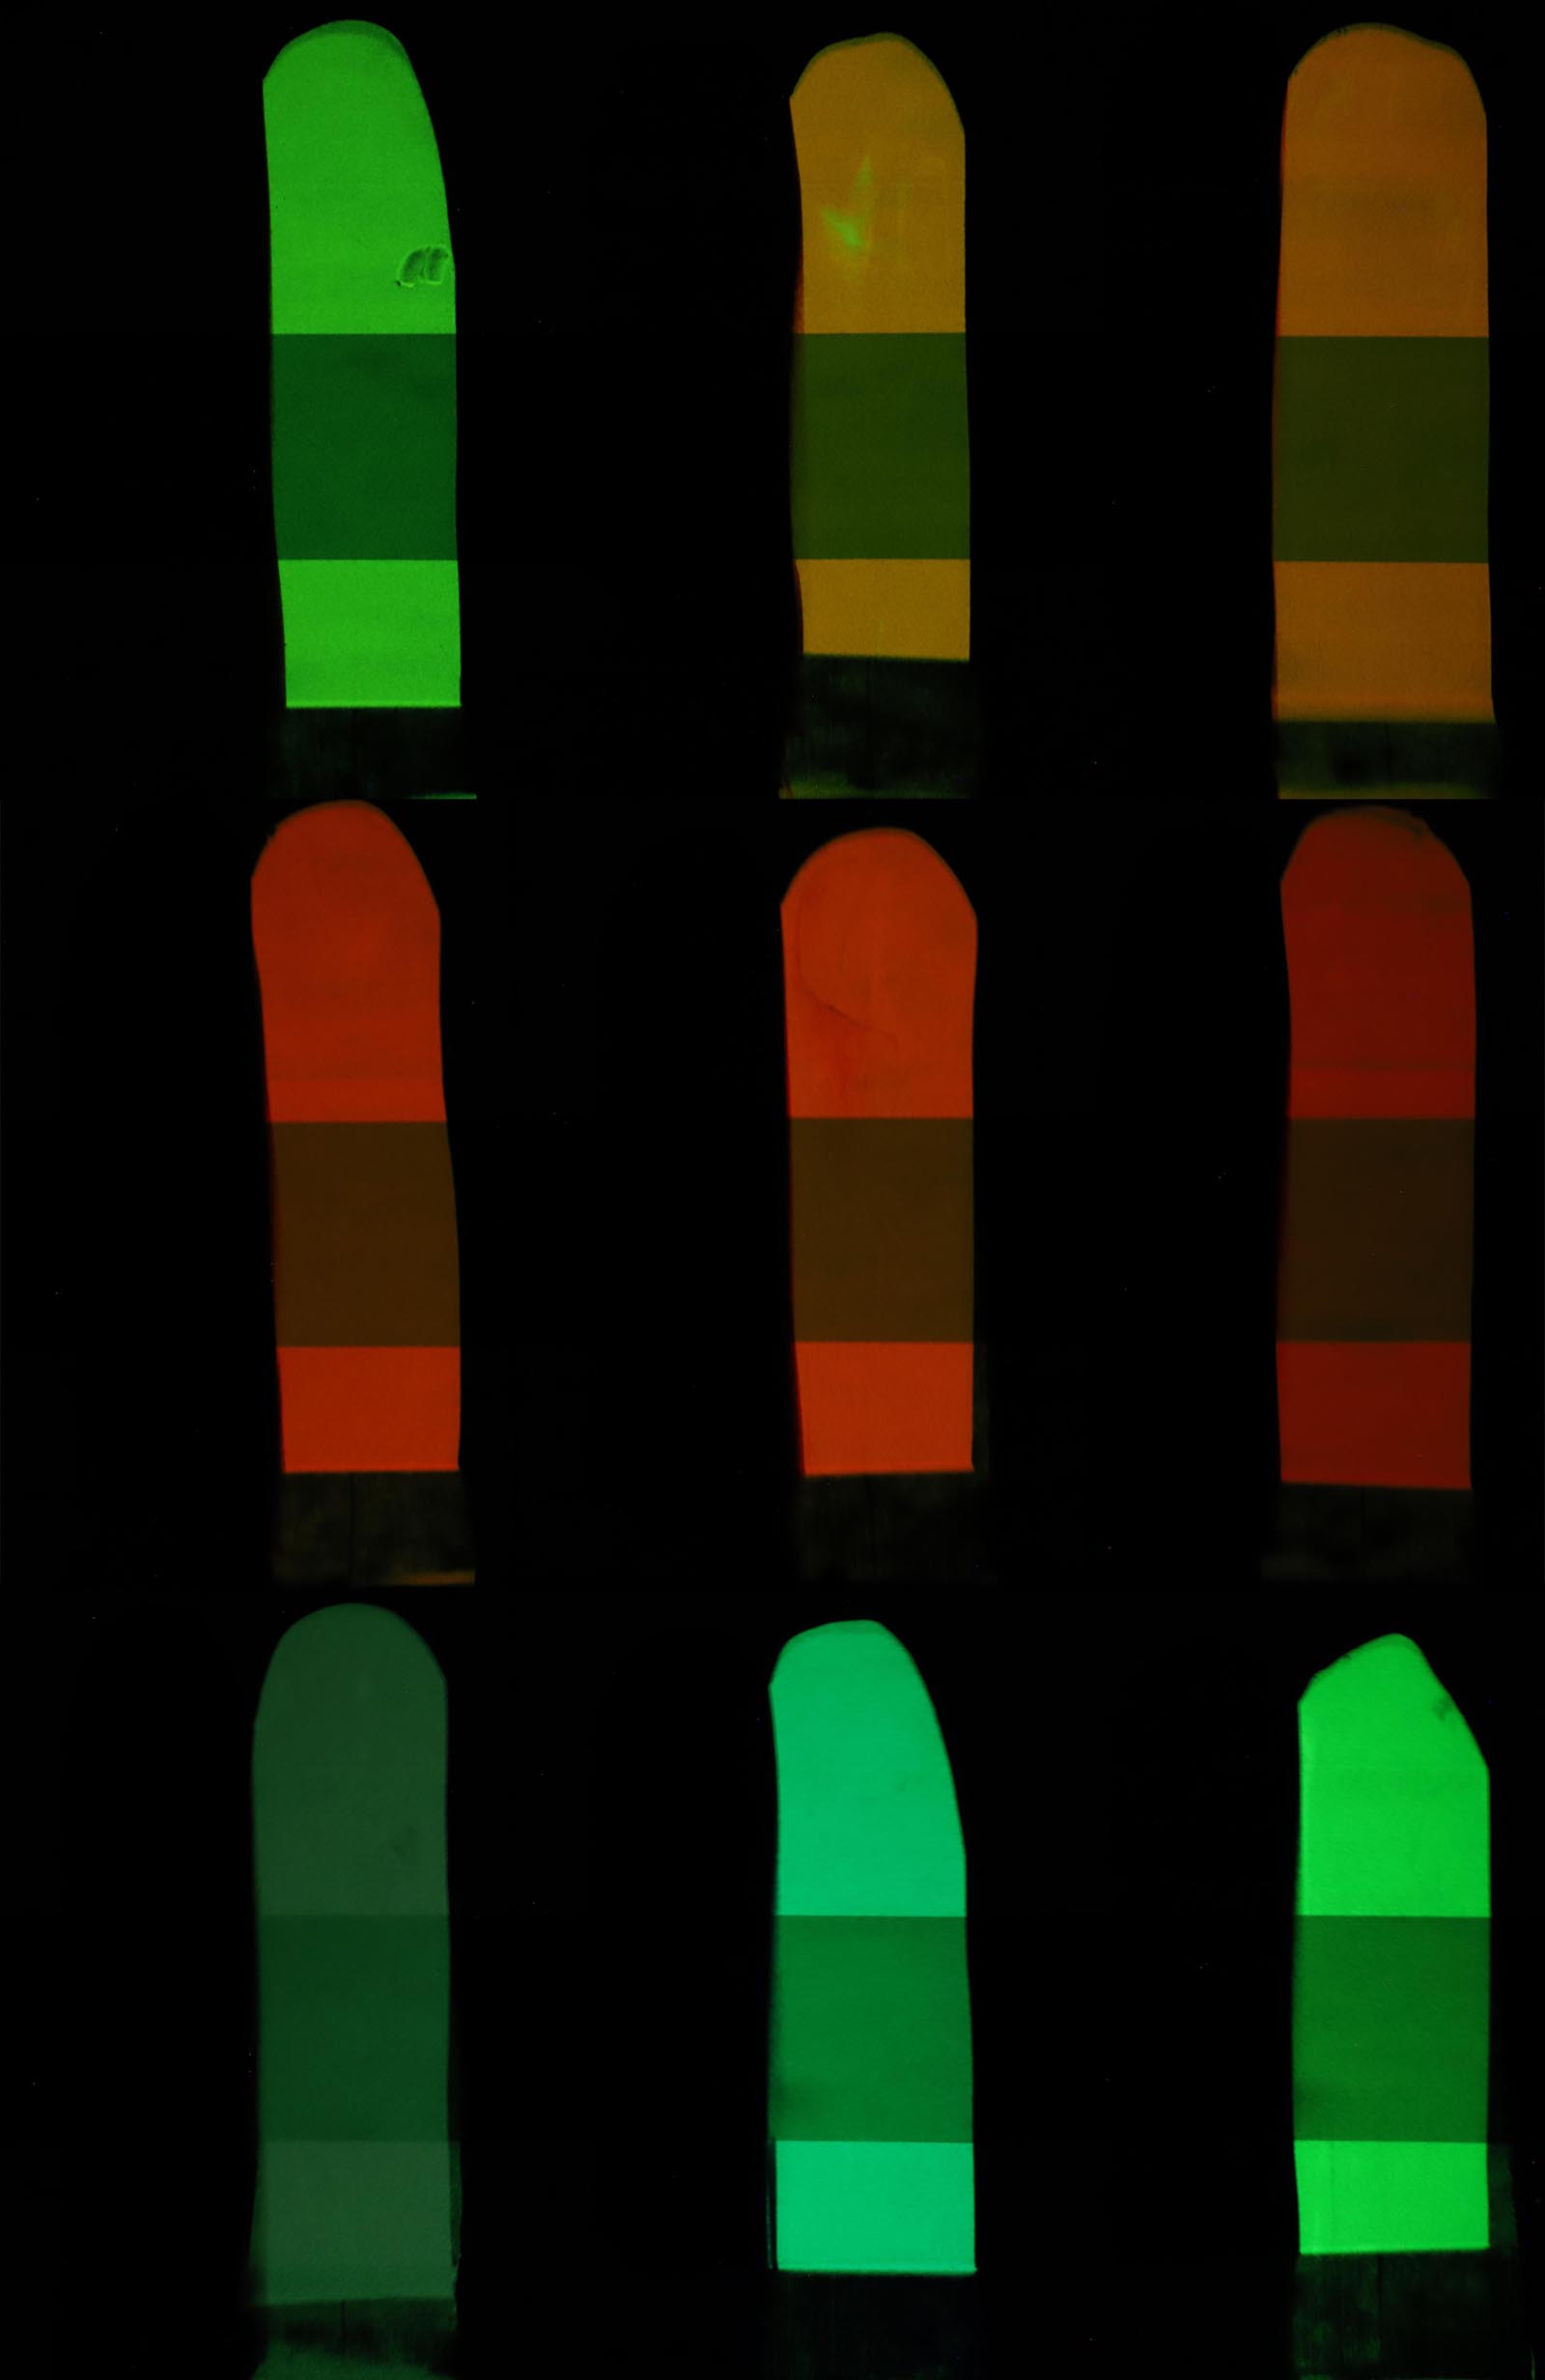
FIGURE 2: Comparing Fluorescent Acrylics (left side of each card) to 1:10 combinations with Phosphorescent Green (right-hand side).
Since Phosphorescent Green emits a green glow, the assumption was that it would continue to glow green, regardless of the products or colors mixed with it. We were wrong! Mixing Fluorescent Colors with Phosphorescent Green creates unique glowing colors both during exposure of Ultraviolet (UV) light and also after that light source is removed. These are 1:10 ratios (Fluorescent to Phosphorescent Green). Other ratios were tested in later tests.
Thickening Phosphorescent Green with Acrylic Gel
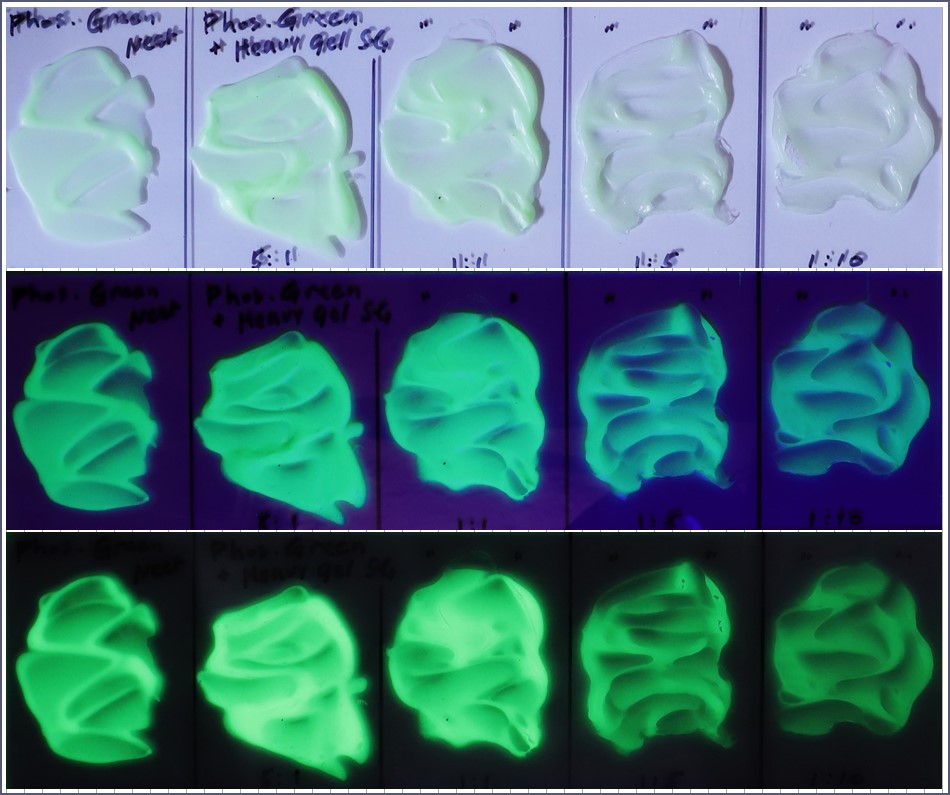
TOP Image: Daylight Viewing MIDDLE: Under UV Light BOTTOM: In the Dark
Phosphorescent Green has a very high pigment load to maximize glow intensity and duration. However, it also has a thin consistency, which limits individual layer thickness. To increase thickness, we can add gel, but does adding a gel diminish the glow brightness and duration?
In Figure 3 we observe adding Heavy Gel allows for thicker applications, which in turn stacks the pigment up, and seems to improve the glow brightness during and after exposure. Mixtures beyond a 1:1 ratio are noticeably weaker in both glow brightness and glow time, which would be useful when softer effects are desired.
Other clear acrylic mediums and gels can be mixed with Phosphorescent Green as their formulas are fairly similar to Heavy Gel, so we wouldn’t expect them to negatively impact the glow. But what about additions of other “non-color” acrylic products that are textural and more opaque?
Adding Various Acrylic Products to Luminescent Mixtures
After selecting a variety of non-color products, we started this round of testing with Light Molding Paste, as it is thick, opaque, and whitish. We also increased the amount of Fluorescent Color to improve its daylight intensity and create a deeper glow color. Compared to the mixtures with Heavy Gel, there are slight color differences under UV light and in the dark, which enforces the need for artists to test any time there are variations in their mixtures. Photographs of luminescent paints do not do them justice compared to viewing them in person.
Note: Fluorescent Colors were also tested by themselves with Light Molding Paste (not shown), which looked great in both daylight and under blacklight. They glowed similar to the neat, pure paint does normally.
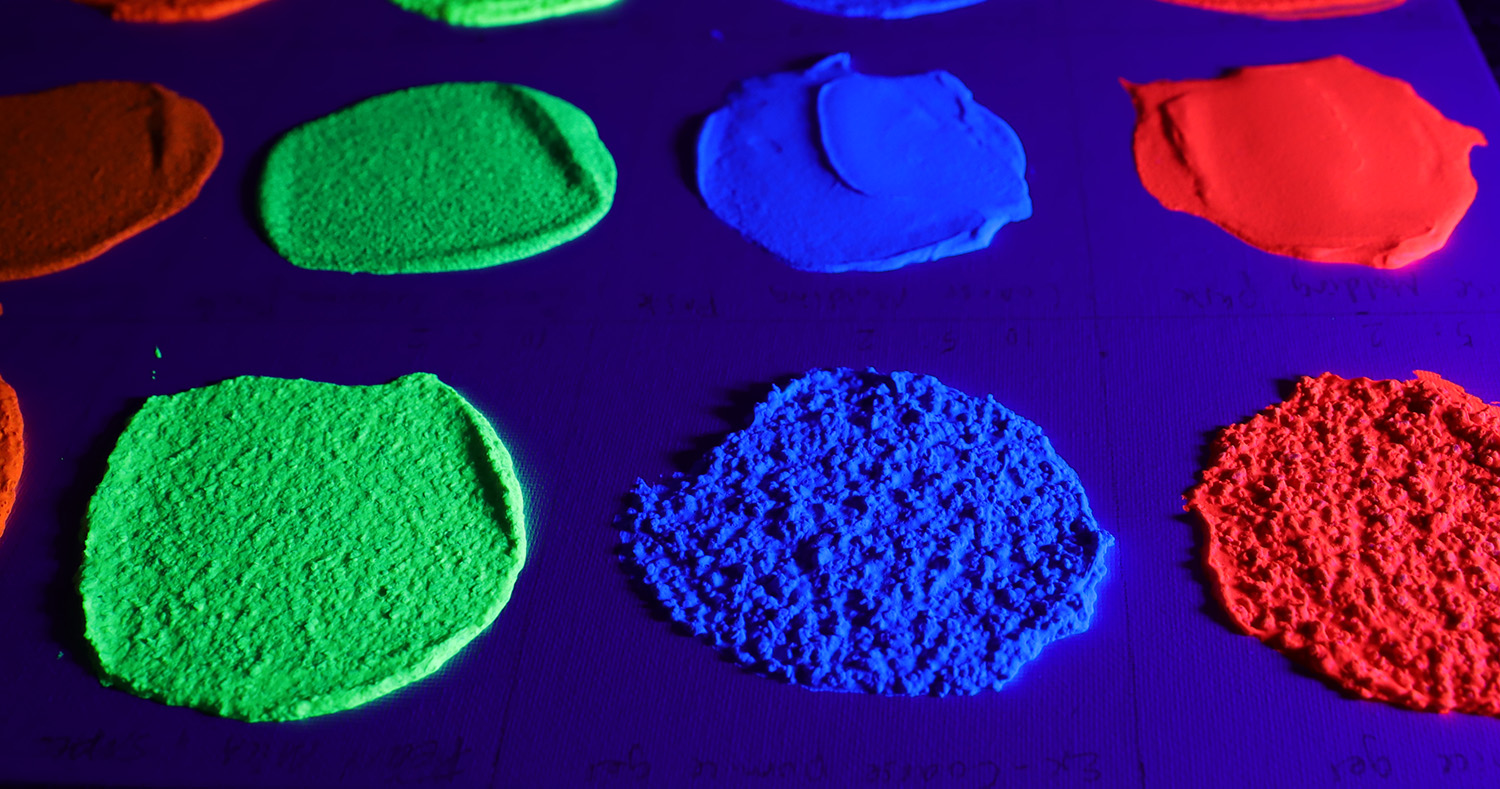
Adding Textural Pastes and Aggregate Gels
The final products to incorporate are textural and rough as well as thick. Natural Mica Flakes and Coarse Alumina created a speckled and natural mineral look, whereas the Molding Pastes, Pumice Gels, Clear Granular, and Glass Bead Gel glowed more evenly, yet up close the textures can be seen even in the dark. Figures 5, 6 and 7 show the variety of effects one can achieve. However, its imperative that each artist does their own mixtures and adjust ratios and products to really see what is possible.
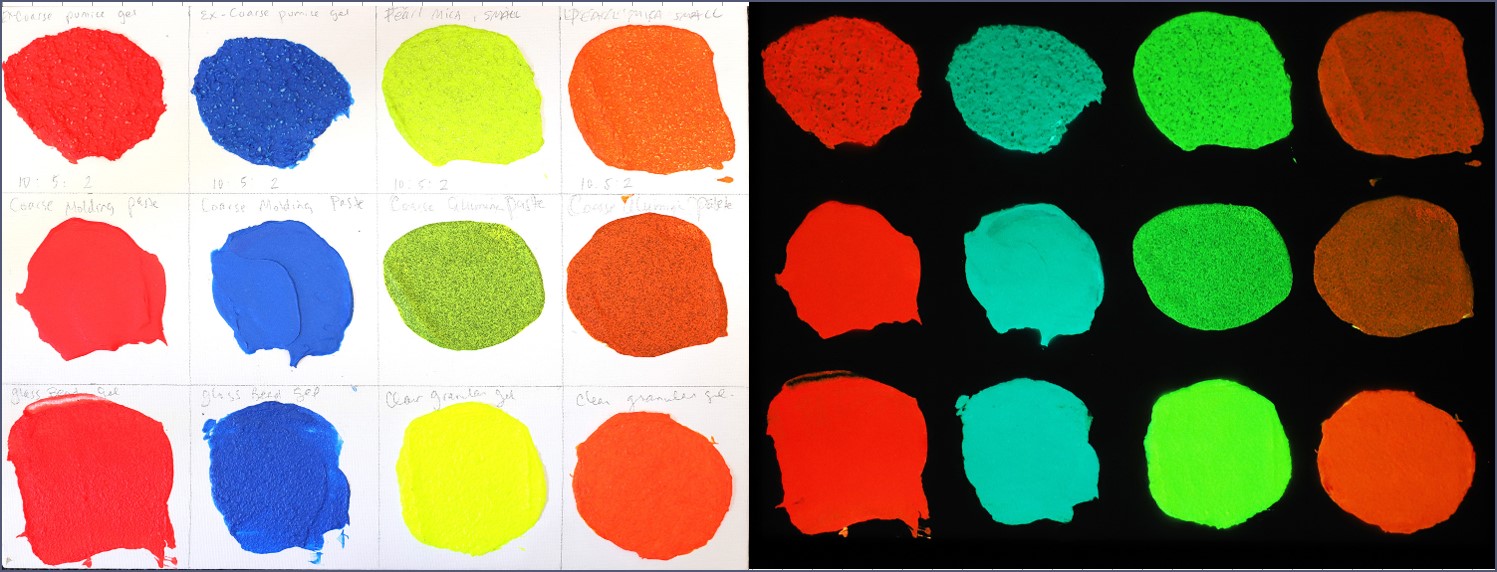
Texture Products Top Row: Extra Coarse Pumice Gel, Pearl Mica Flake.
Middle Row: Coarse Molding Paste, Coarse Alumina Gel.
Bottom Row: Glass Bead Gel, Clear Granular Gel.
The amount of Fluorescent Color Affects the Glow Duration
The addition of Fluorescent Color with Phosphorescent Green influences the emitted glowing color, but it comes at a price. Higher levels of Fluorescents reduce the glow duration time. To find the “best” balance between glow time and daylight fluorescence, we tested Phosphorescent Green and Fluorescent Red mixtures at: 4:1 (80% PG), 3:2 (60% PG), 1:1 (50% PG), 2:3 (40% PG), and 1:4 (20% PG). The (below) sample board was charged with UV light and then viewed in the dark to observe the rate of decay, as seen in the below time-lapse video:
Note the afterglow length changes in the mixtures, with pure Phosphorescent Green glowing for the longest duration (around 20 minutes). From left to right, pure Fluorescent Red; Fluor. Red & Phos. Green at 4:1, 3:2, 1:1, 2:3, 1:4 mixing ratios; pure Phosphorescent Green.
Background Color Importance
When using luminescent paints, the underlying color value affects the appearance and vibrancy. Fluorescent and Phosphorescent pigments are inherently transparent, making it difficult to achieve a solid layer, especially over dark colors. Darker underlayers also absorb light energy, reducing the bounce-back through the paint film. To illustrate this (Figure 8), we applied two brush coats of Phosphorescent Green over several acrylic paint colors, ranging from White and off-whites, middle values, and dark colors.
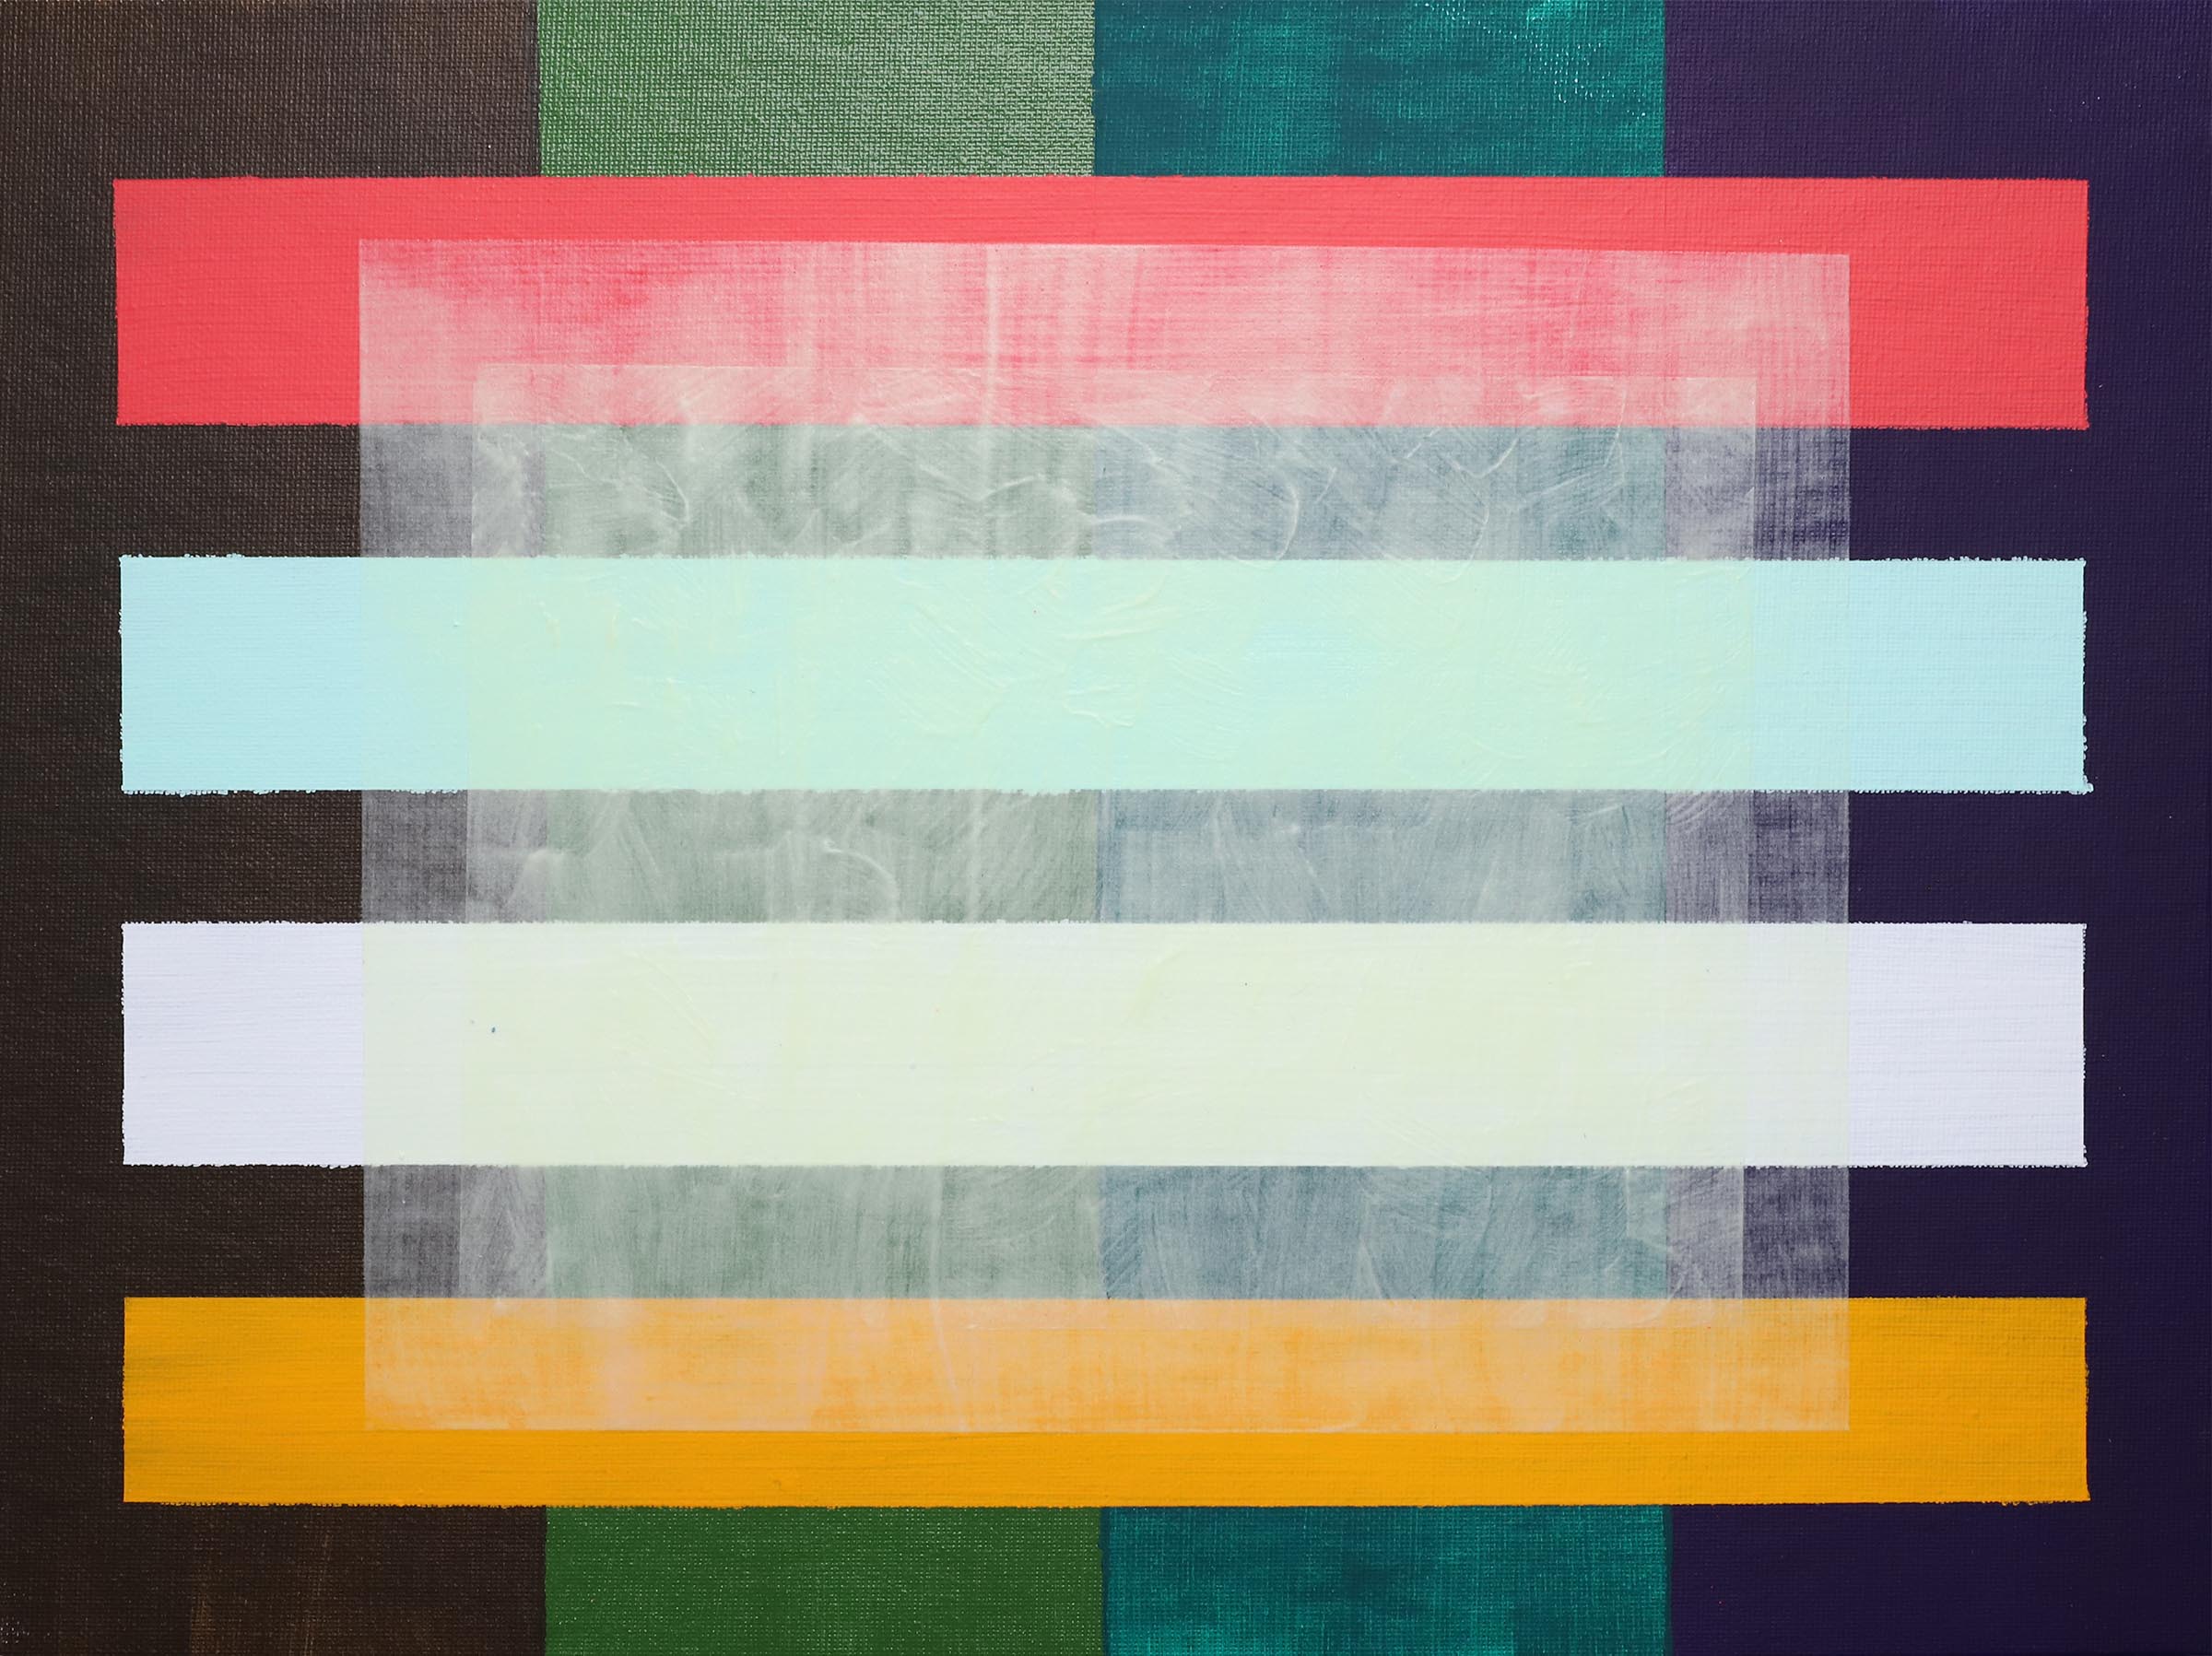
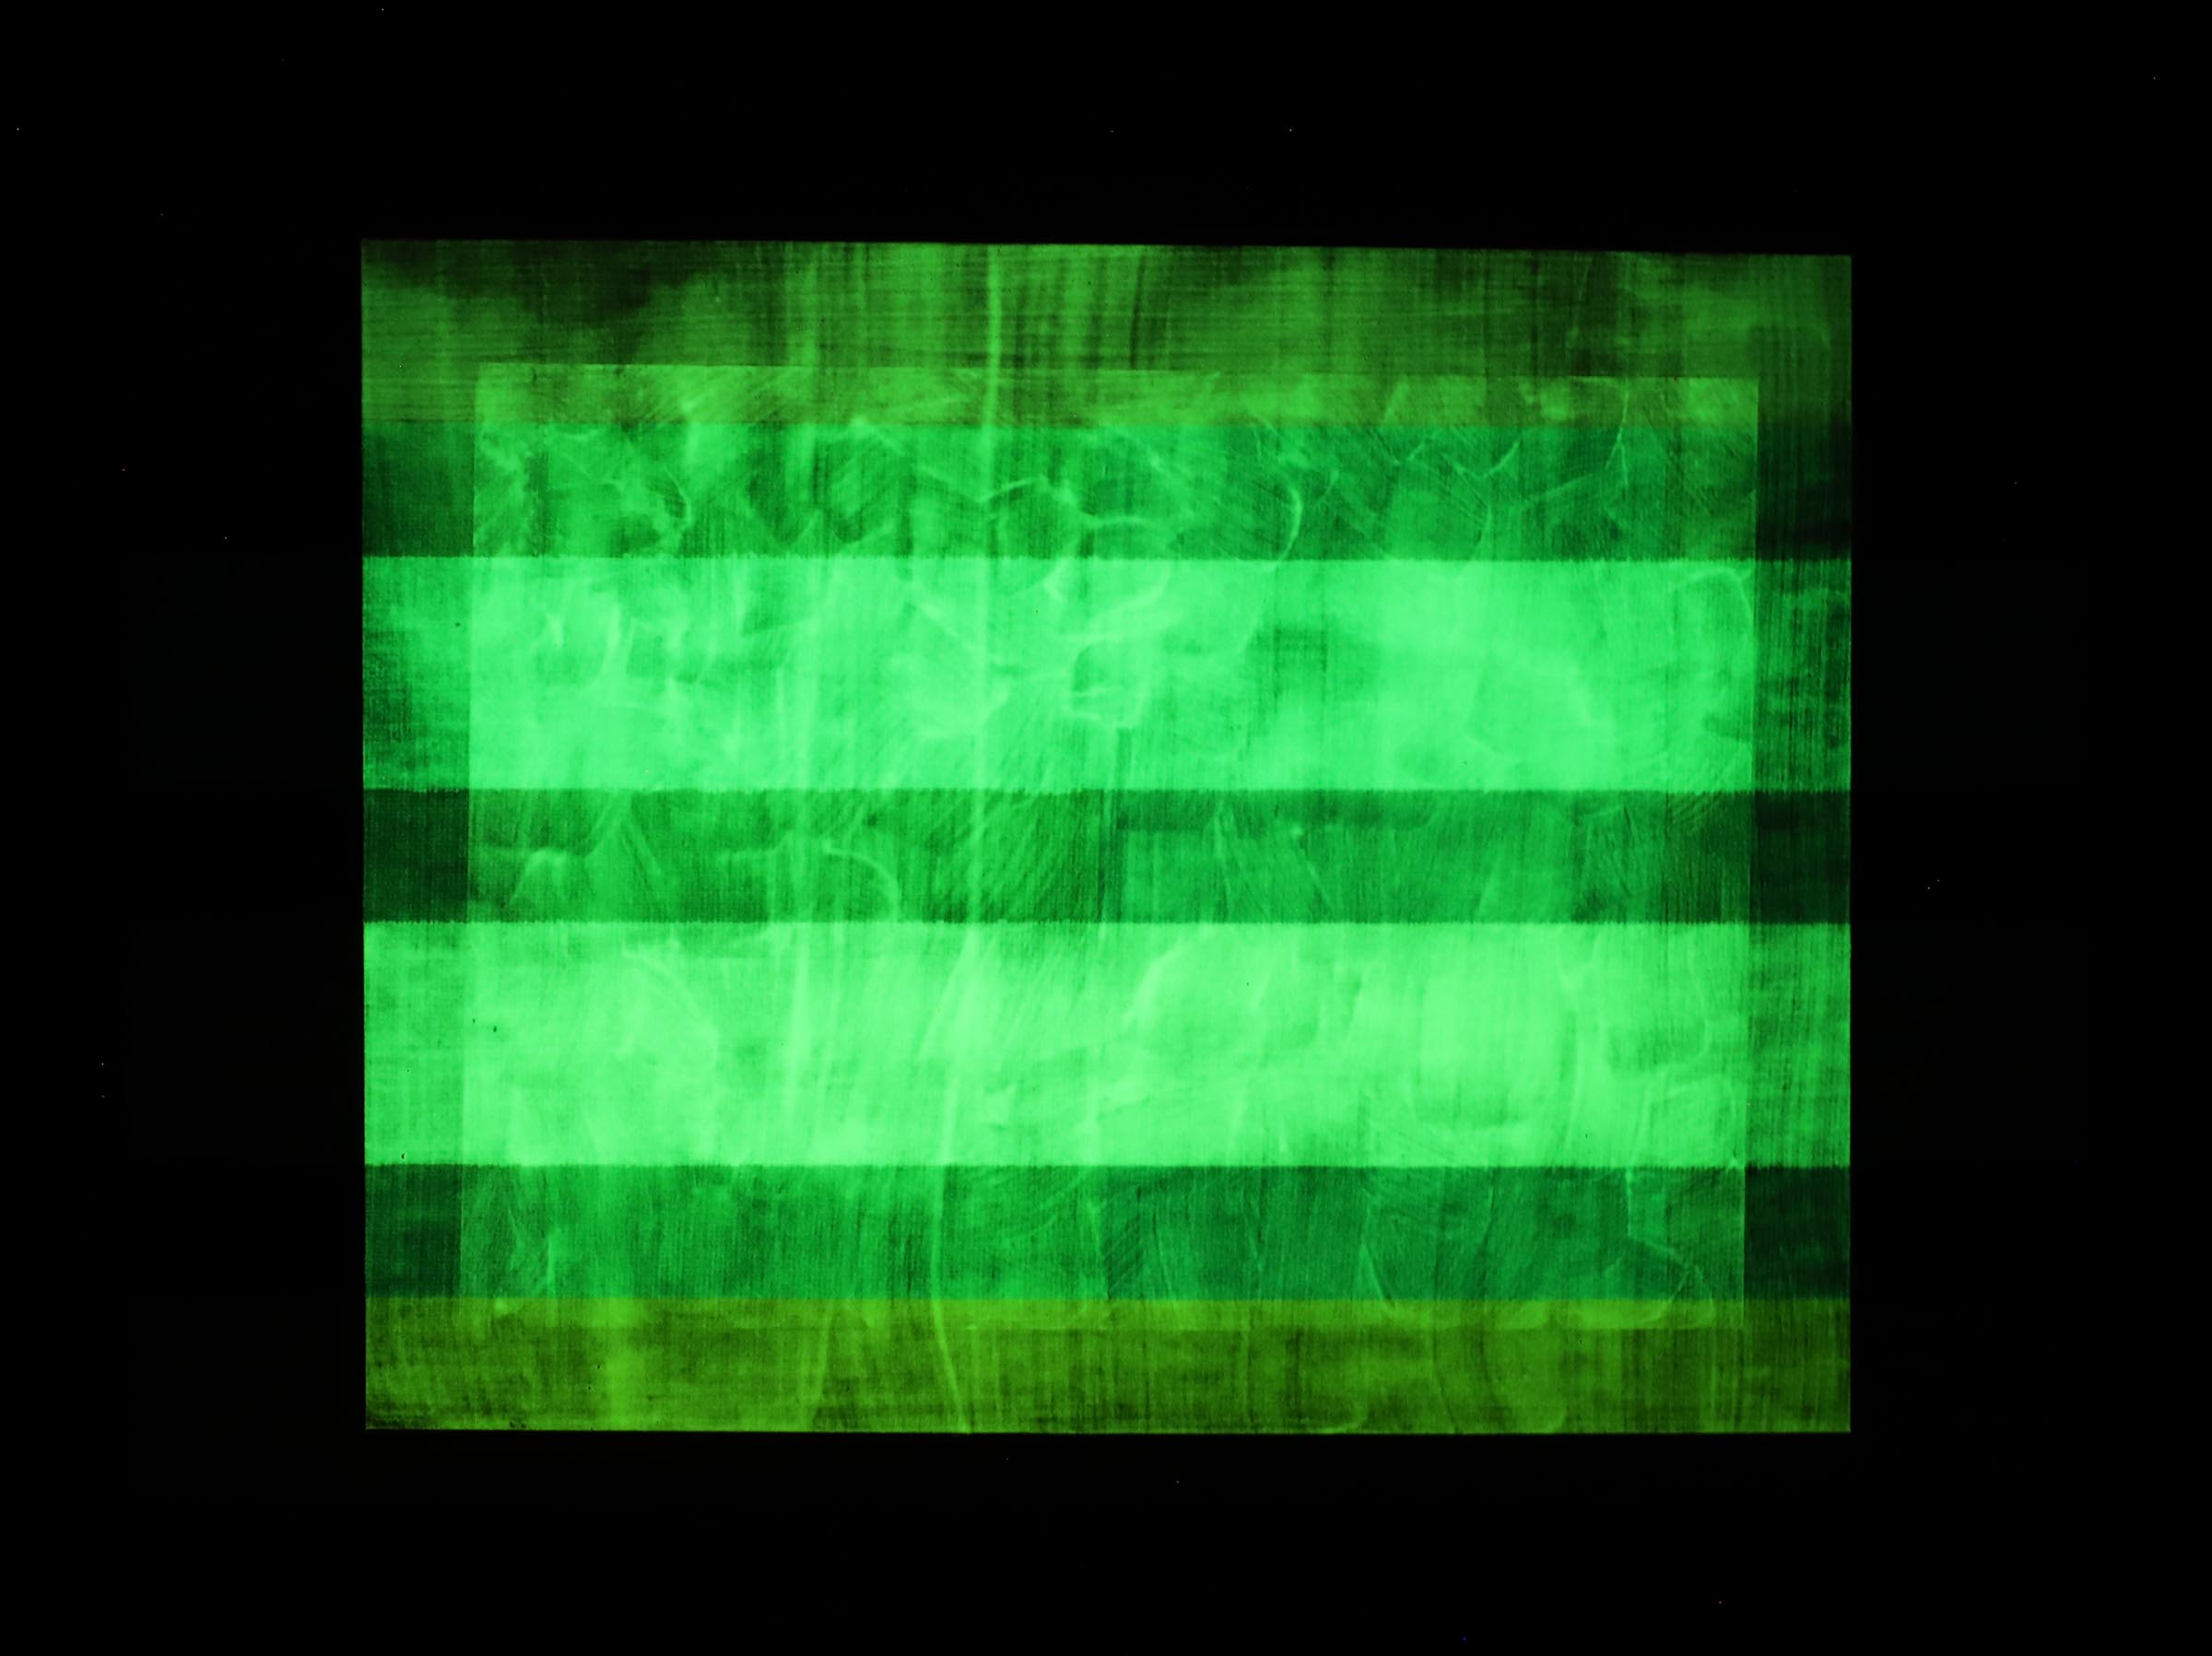
FIGURE 8: Showing the importance of underlying colors. Lighter colors make Phosphorescent Green appear more solid and bright.
Light Source Options
The ideal light source to charge luminescent materials is commonly known as “Black Light” or Ultraviolet Light, but more technically speaking, it is termed “UVA” light. Do not use UVB and UVC light sources with fluorescent and phosphorescent colorants.
UVA– The safest UV source for rapid activation.
UVB– This is commonly used for growing plants and warming reptiles. Direct exposure to skin and eyes should be avoided.
UVC– The strongest and most damaging. UVC is used in disinfection systems.
While regular light bulbs and sunlight provide UVA and UVB light, they require a much longer charging time with a weaker and shorter glow time.
Test the lighting in the viewing space to ensure the artwork will yield the kind of glow you desire. Distance and duration of the light source play vital roles in the brightness and glow time of Phosphorescent Green. If one wants to stage a gallery space to maximize the effectiveness of luminescent materials, it is imperative to provide a continual source of UV energy near the artwork surface. For example, small UV LED lights can be placed in or on the picture frame or hidden within a pedestal near the artwork.
Here are some key display points to consider:
- UVA Light charges both Fluorescent & Phosphorescent colors.
- UVA Light is available in a wide range of wattages and shapes, both in fluorescent bulbs and LED.
- Strong UV Light travels a longer distance than weaker sources.
- Smaller, weaker UV lights (such as LEDs) need to be close to the artwork, even within it.
- Maintain a constant UV source during display.
- Dim the room’s regular lights to enhance the glowing effect.
- Short bursts or strobes of strong UV light are ineffective options and annoying for the viewer.
- Use Fluorescent Colors responsibly! Direct sunlight (and other UV light exposure) accelerates fading, especially in exterior settings. When the work isn’t being displayed, cover artwork or remove the light source whenever possible. You cannot stop the fading, but you can influence the rate of change.
Be sure to comment below if you have any questions or if you’d like to share how you have successfully introduced these paints into your artwork.
Mike Townsend

Subscribe
Subscribe to the newsletter today!
Great information. As usual, Golden goes the extra mile Thank you.
Thank you Martin.
You’re a man among men!
Truly,
Mike Townsend
Brilliant. As usual
Sylvia
Brilliant. As usual.
Fascinating and exciting! I will be looking forward to trying some of your trial applications with my work… can’t wait!
Thanks Mike!
You are most welcome, Jeremiah! I think you’ll enjoy trying these mixtures out!
– Mike
by casualty I discober that one I use a primer based on a wall filler, which I discovered by chance has fluorescence and provides a shine similar to that of paper.
I use a primer based on a wall filler, which I discovered by chance has fluorescence and provides a shine similar to that of paper.
What does the glow look like if Phosphorescent Green is mixed with a fluorescent and/or a textural gel and applied very thickly–not quite 1/4″?
Does varnish affect the glow? I don’t normally varnish my paintings, but I do when I use fluorescent paints.
Hi Diane. In my testing, I created these mixtures and applied around 1/4″ for the article images. You can apply them as thickly as you want to, although very thick layers will take a long time to dry (months).
Varnish can affect the glow of both Phosphorescent and Fluorescent Colors. If you make test pieces, coat 1/2 of each swatch with the varnish, and compare after energizing the mixtures with UV light, then see how they look in the dark and under UV Black Light.
– Mike