EDITOR’S NOTE (4/26/23): Please note that Polymer Varnish has been discontinued and replaced with Gloss Waterborne Varnish. You can read more about it here.
Mirjam Hintz completed her MA and Professional Doctorate studies in Conservation with a focus on painting from the University of Amsterdam. She is the newest member of our Materials and Applications Department, providing technical and product support for Golden Artist Colors in Europe. She lives in Frankfurt Germany.
Varnishing can be a daunting task and much can go wrong during the undertaking. This article describes useful varnishing tips and tricks that I have learned throughout my training in painting conservation. By sharing these I hope to help some artists to avoid mishaps and maybe even encourage artists to try alternative application methods that can produce some subtle sheen differences. Spray application of varnishes is not discussed in this article but will be the subject of a future post.
VARNISHING – YES OR NO?
In short, varnishing is mostly an aesthetic decision. Varnish evens out gloss, saturates colors and determines the final sheen of a painting. It also provides protection to the paint layer from dust, air pollution, abrasion during surface cleaning, and if the varnish contains UV-light stabilizers, protection from light-induced color changes. Some paintings benefit from varnish while others are impacted negatively. Those paintings that lose are the ones that depend on the nuanced differences and interplay of different sheens that a varnish could take away.
Before choosing to varnish one should have clarity about the following questions:
- Is the painting truly finished?
- What would be the ideal finish for the painting?
- Would a unified surface sheen enhance the aesthetic of the painting?
- Will the painting require protection from sunlight in the location where it will be hung?
TIPS FOR MENTAL PREPARATION
- TIMING
Blocking ample time for the undertaking can help calm the nerves. When using solvent-borne varnishes I always like to leave the room after varnishing, even if it has good ventilation. So I make sure I have nothing else to do in the room after varnishing. One should varnish at least two weeks before the painting will be handled or shipped.
- VARNISH CHOICES
GOLDEN offers two different types of varnish in three different sheens: Gloss, Satin, and Matte. The first type is the solvent- based GOLDEN MSA Varnish, along with its aerosol version, Archival Varnish, and the other is our water-based Polymer Varnish. All the varnishes contain UVLS (Ultra Violet Light Stabilizers), which help protect against fading due to UV exposure. As a general rule, oil paintings and watercolors should be varnished with MSA or Archival Varnish, while acrylics are usually compatible with any of the three. Texture also plays a role. Paintings with a lot of impasto or rough textures such as Pumice Gel, should be spray varnished, either with the aerosol Archival Varnish or with the MSA or Polymer Varnish diluted and applied with a spray gun. All GOLDEN Varnishes are removable for conservation purposes. For acrylic paintings, an isolation coat is recommended. This is a clear acrylic film that acts as a permanent barrier between the paint layer and the varnish, protecting the paints or pigments during the varnish removal process. Isolation coats can also even out differences in the absorbency of the ground and paint layers. This way an isolation coat creates a more even sheen in the subsequent varnish layer, regardless of whether the varnish has a gloss, satin or matte finish. See the Isolation Coat Tech Sheet for detailed information: https://www.goldenpaints.com/technicalinfo/technicalinfo_isolationcoat.
TIPS FOR PRACTICAL PREPARATION
- SOLVENT SENSITIVITY TEST
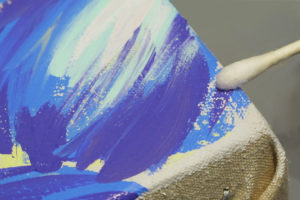
It is important to establish whether the painting is sensitive to the solvent the varnish is dissolved in. For Polymer Varnish that would be water, while for MSA that would be our MSA Solvent, which is a form of full strength mineral spirits. To do the testing, moisten the tip of a cotton swab (Q-tip®), or a strip of folded-up tissue paper, with either distilled or clean tap water, or MSA Solvent, depending on which varnish you plan to use. Then roll/swipe it gently over the various colors in the painting, first testing along the edge (Image 1). Check the cotton swab or tissue for pigment lift. If no pigment is removed, then the paints are not sensitive and varnishing can be carried out. If paint was removed only after prolonged solvent contact both brush and spray application should be possible. Otherwise, spraying might be the only option. Should the paint prove to be very sensitive there could be some pigment lift, or in extreme cases, even smearing of the paint while brushing on the varnish.
- COLOR SHIFT
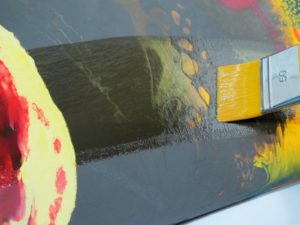
Varnish will change a painting’s appearance. Gloss varnish will saturate the colors, causing a slight shift in values. A good way to mentally prepare for that is by saturating the whole or part of the painting with a clean soft brush and some odorless mineral spirits or water, assuming that the solvent sensitivity test showed no color lift. The solvent will evaporate within a few minutes, but while the painting is wet it shows quite closely what the painting will look like with a glossy varnish (Image 2). The matting solids in a matte varnish, on the other hand, will cause a different color shift, with dark colors looking lighter and the overall colors possibly appearing ever so slightly milky. Saturating a small painting with solvent or water might be an option for artists who need to take a photograph of their work but do not have time to varnish beforehand. Or maybe they want to continue painting and just need a quick sense of how the colors appear when either wet or glossy.
- DRY CLEANING
Dry cleaning with a clean soft brush or a soft lint-free cloth might seem to be a pretty obvious thing to do before varnishing, but in the excitement to get the job done it might be forgotten. This way no unwanted dirt, hairs etc. get trapped in the varnish or isolation coat.
- BACKING BOARD
When applying varnish to a stretched canvas that is laying flat, for instance on a table, it should be backed with some sort of rigid support, e.g. foam board or cardboard. This is especially important for paintings that have a crossbar in their stretcher system. The backing board should carefully be slid in-between the crossbar and the canvas. This helps avoid the pooling of varnish towards the center.
- DRY RUN & TEST PIECE
This might feel awkward, but really helps reduce nervousness and mishaps. After having gathered all the obvious tools, and it seems all is ready for action, try making a dry run. Act as if you dip your brush into your bowl of varnish, maybe blot it on some lint-free tissue paper or cloth, and pretend as if you are now applying the varnish on the painting. This helps to build a little muscle memory and prepares you mentally. Maybe now you notice that you need better light, or tweezers, or a stool because you cannot reach the top of your very tall painting comfortably and in a controlled manner.
TIPS FOR VARNISH APPLICATION
- BRUSH APPLICATION
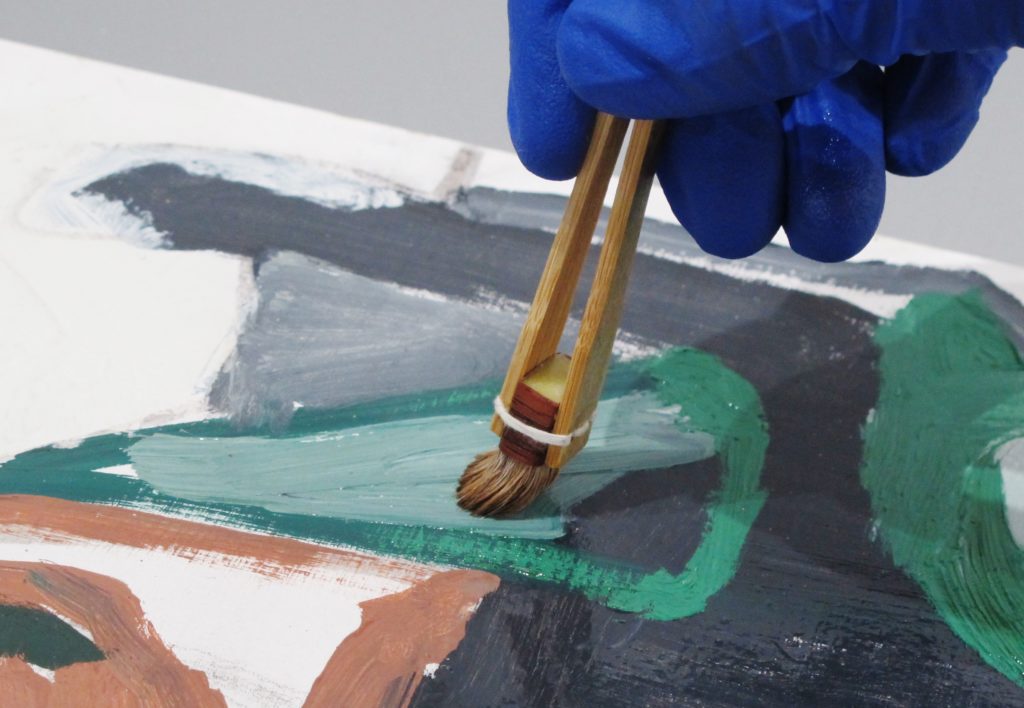
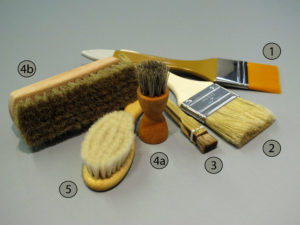
1: synthetic hair mottler
2: hog-bristle mottler
3: Japanese bamboo stippler
4: two different horse hair shoe brushes
5: goat hair baby brush
One of the most common varnishing brushes is a wide flat mottler brush. If one aims for a continuous and relatively thick layer of varnish, then that is the best choice. Water-borne varnishes such as the Polymer Varnish with UVLS can best be brushed out with soft synthetic hair mottlers (#1 in Image 3). This would also be the best brush for applying the Soft Gel Gloss isolation coat. The solvent-borne MSA Varnish is more forgiving in terms of leveling and can be applied with hog-bristle mottlers (#2).
But there are many more tools available to the varnishing artist, which can help to create subtle and individualized finishes.
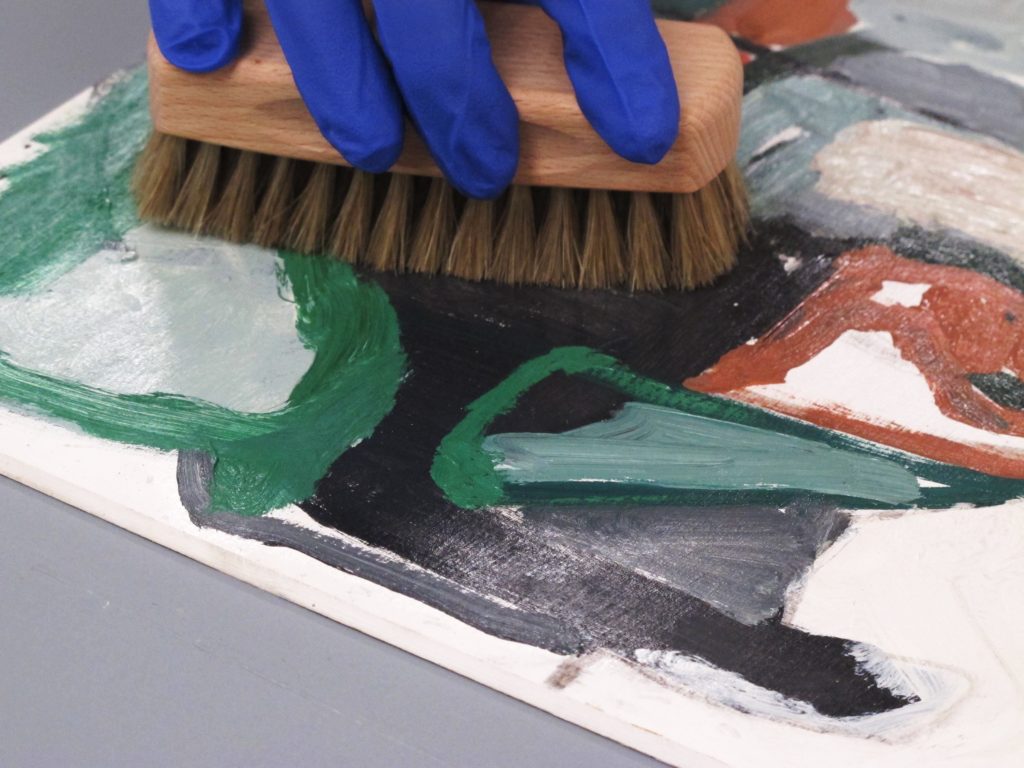
A thin varnish application can be achieved by scumbling varnish on with a short-haired soft brush, such as the Japanese bamboo stippler (#3), watercolor mop brush, or deerfoot stippler. This application technique is suitable for paintings that have some impasto. The thin varnish layer will hardly reduce the texture of brushstrokes or textures, but the colors will saturate. One can make small circular movements with the varnishing brush, or go along the direction of brushstrokes (Image 4). It makes sense to follow the forms of the composition in the painting, so that any unevenness in gloss will not be noticeable. The brush should only be loaded with very little varnish to keep the layer thin. When using a gloss varnish this thinly, the sheen will be ‘discreet’, almost semi-gloss. Since the MSA Varnish has excellent UV protection, even a thin layer of this varnish will still give considerable protection from UV-light.
Since the MSA Varnish with UVLS has such a long open time, the still-wet varnish can be buffed up or reduced with a horsehair shoe brush (#4a /4b), a goat hair baby brush (#5), a badger blender or a lint-free cloth (Image 5). This reduces the thickness and sheen of a gloss varnish.
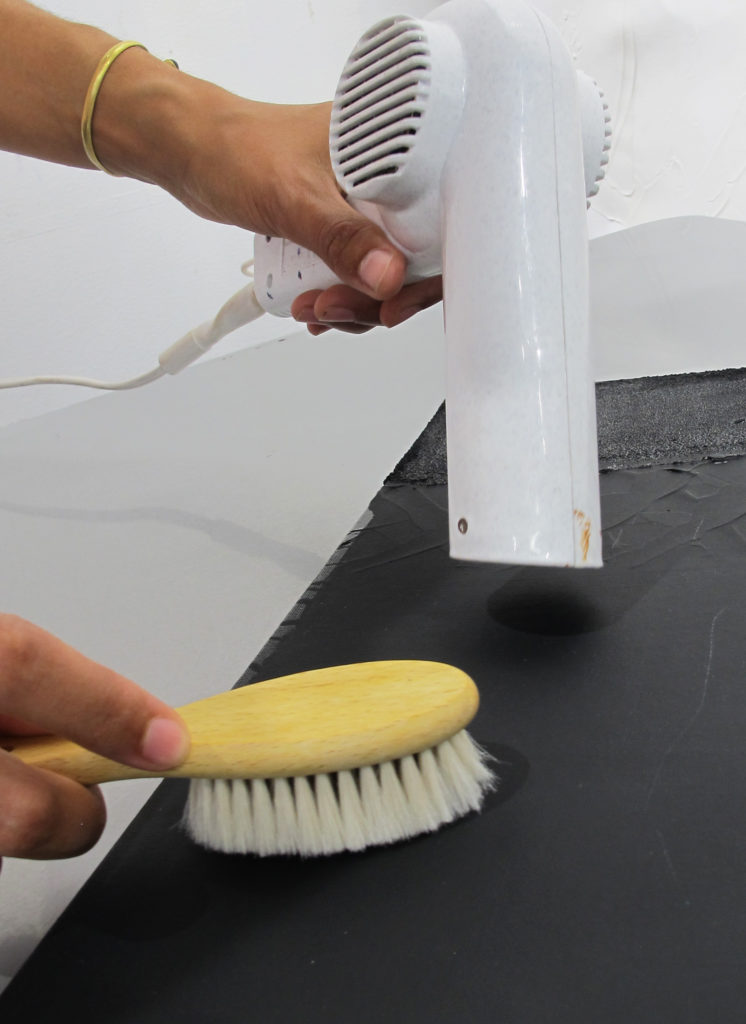
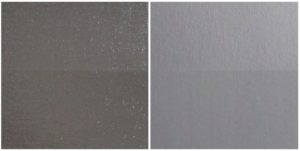
It is also possible to buff up only certain areas to achieve a slightly varied sheen. By warming the MSA Varnish with a hairdryer, and then buffing, even a dried varnish can be adjusted in sheen (Image 6). Gloss MSA can be made slightly more matte and matte or satin MSA can be polished to a slightly glossier finish (Image 7). When using shoe brushes it is advisable to get horsehair with split ends, otherwise the bristle might be too stiff and scratch the varnish too much.
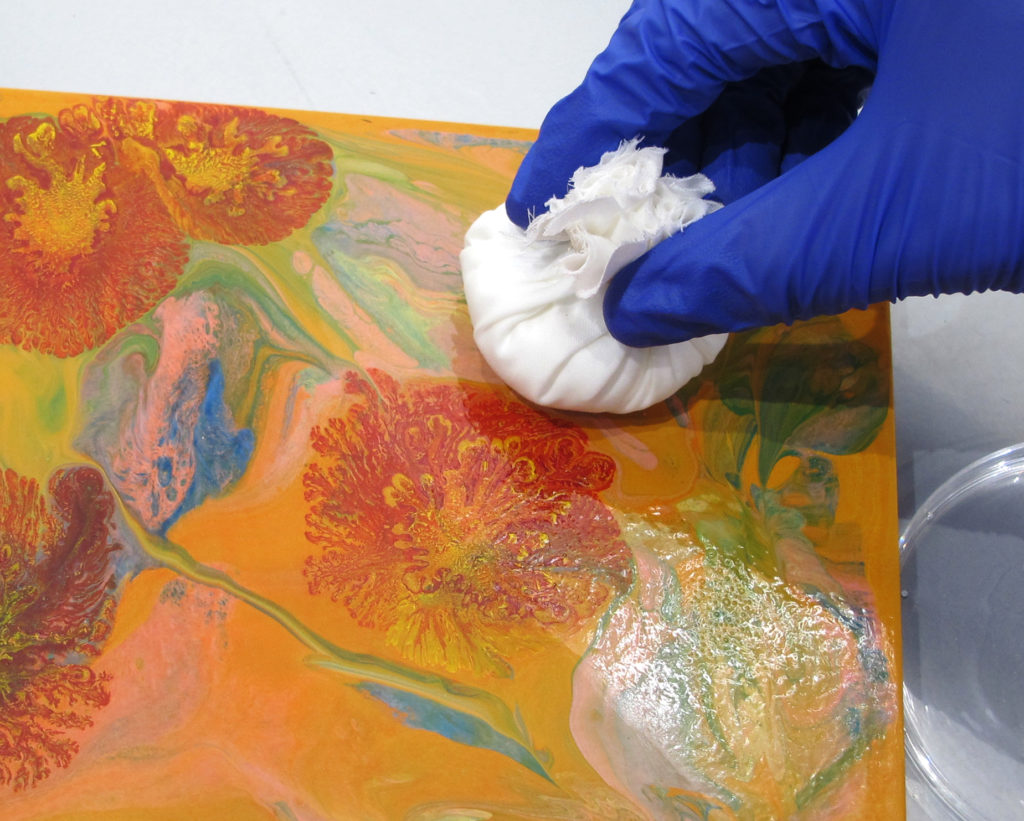
Sometimes paintings with sensitive surfaces can be varnished using a silk covered cotton ball (Image 8). Silk fibers are resistant to solvents and the fabric is very soft. The ball is dipped into varnish and then gently glided over the surface. When using white silk one can notice immediately when pigment is lifted due to the solvent in the varnish.
Large paintings can be challenging to brush varnish successfully. When the center of a piece cannot be reached comfortably, then it can only be varnished in a vertical position. It might be a good option to follow compositional forms with the brush. If that is not an option then varnishing from one end to the other while keeping a wet edge is the way to go. It can be very helpful to have a second person helping.
TIPS FOR DRYING
Drying times of varnishes vary, depending on the absorbency of paint, ground and substrate layers. Paintings on panel supports, for instance, might absorb less varnish and therefore dry more slowly. At any rate, key is to avoid any dust settling into the fresh varnish layer. Reducing airflow can help a lot.
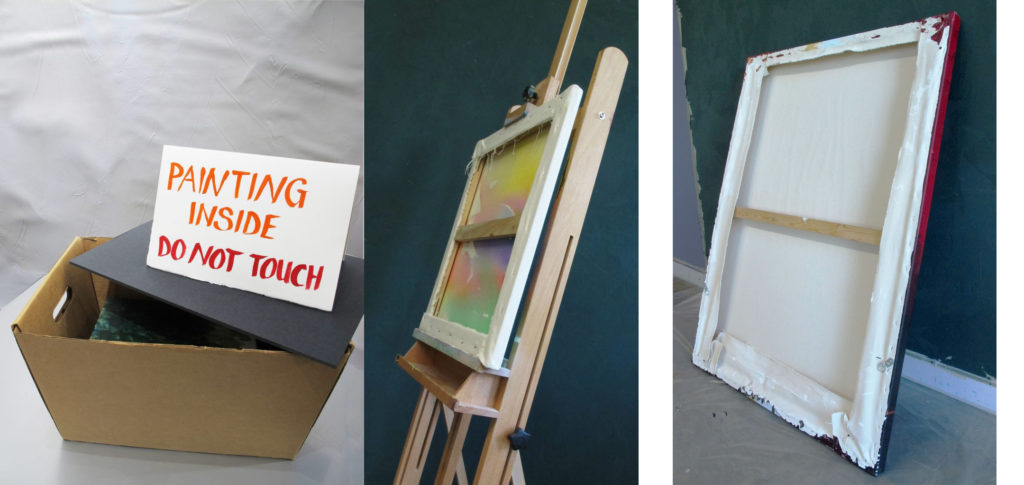
Small paintings may be placed in perforated cardboard boxes for drying (Image 9). The box should be covered with a lid to protect the painting from dust. Large paintings can be leaned against a wall as soon as a varnish has set (Image 11). The varnished side should be facing the wall, to reduce dust accumulation. Placing the painting on an oblique easel with the painting facing the easel can also be an option (Image 10).
CONCLUSION
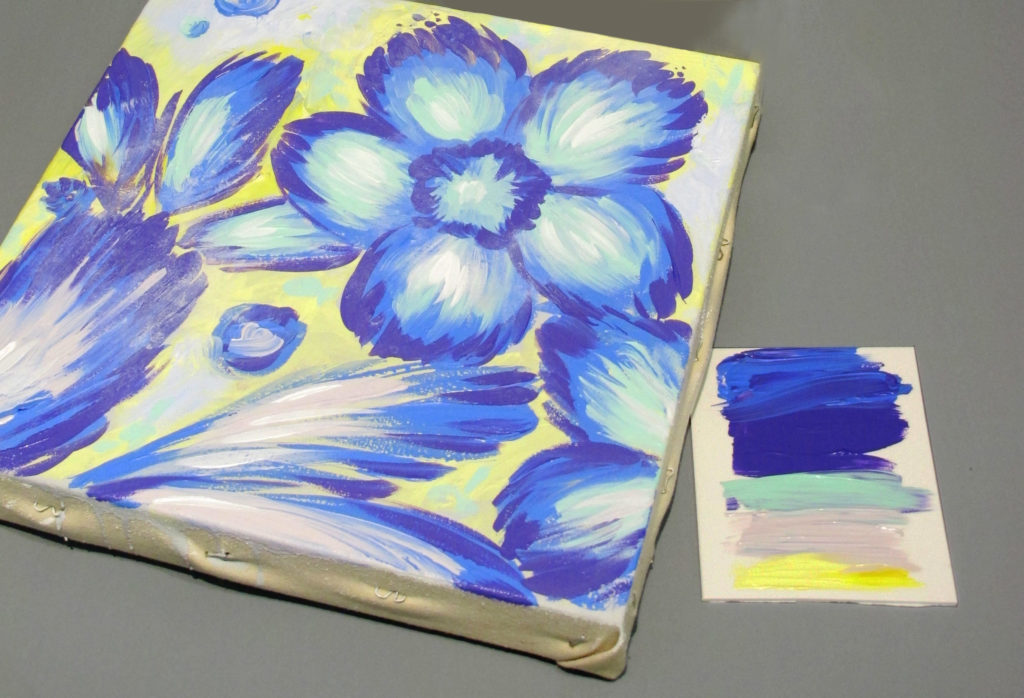
There are many ways to apply a varnish and create nuanced sheen differences. The most important thing probably is to allow enough time and to practice on a sacrificial piece. It can be very useful to create a simplified miniature, sort of a scrap piece, while painting. Such a piece can be used for solvent sensitivity testing and for varnishing tests (Image 12).
If you would like additional advice, please contact the Materials Specialists with your questions ([email protected]).
About Mirjam Auf der Mauer
View all posts by Mirjam Auf der Mauer -->Subscribe
Subscribe to the newsletter today!

You for a very thorough instruction on varnishing. I learned some new things. Very helpful
Hello Nancy, thank you for your feed-back and good luck for your future projects!
Dear Mirjam, I greatly appreciate your sharing these varnishing techniques! I have read many articles about varnishing methods but this is the first one to share methods to tamp down the sheen of glossy varnish or shine up a matte varnish. I will definitely try these methods as well as the idea to apply varnish with the direction of the underlying painting. These methods suggest to me that gloss and matte and satin varnishes could be applied to selective areas of a painting to preserve the shine of metallic paints or the matte of pumice inclusions, etc. Have you tried such an approach?
Hello Judith,
Thank you for your comments. Selective varnishing can be a good option sometimes. It probably requires a little more practice and skill, but it is a great way to protect the sheen of areas that have been gilded or painted with metallic or iridescent paints, for instance, while keeping the rest of the surface more matte. The possibilities are many! Always test first when trying out new varnishing approaches.
Good luck with your projects.
Best,
Mirjam
Thanks. The freshly varnished top edge is touching the wall & easel? How can a painting be lent forward without the front touching anything? How to avoid dust on an oil painting left to dry for months before varnishing?
Doesn’t UV protection have a very short lifespan when premixed into varnish?
Hello Doug,
Thank you very much for your questions. I should have been more clear on this. When placing the freshly varnished painting on an oblique easel, it should be facing the easel but not lean against the center piece or anything. The top retainer of the easel should be used to keep the painting from falling forward/backward. When placing a small piece of foam in-between the retainer and the painting, then the painting is held in place more securely. It is helpful to practice this set up with the painting before varnishing, so that everything goes smoothly when it matters.
When we carried out tests to investigate the stability of UV-light stabilizers in our varnishes, we found that the UVLS do not become less effective, even when the varnishes are stored for longer periods of time.
Always feel free to contact us with comments or questions!
Kind regards,
Mirjam
Thank! you this is a fantastic, informative article, one of the best, if not the best that I have read on varnishing. Although I’m pretty good at getting a decent result when varnishing, it is still a useful article to read, my biggest enemy when painting and varnishing is DUST. God damn it, it’s impossible to avoid it, I’ll be trying the archival varnish at some future point, keep up the good work, it’s much appreciated as an auto-didact.
Hello Purcell,
Thank you very much for your kind feed-back. Yes, dust can be a tricky problem, especially in big cities. Avoiding any air draft and misting or spritzing the air with water should make the dust settle somewhat. Another option might be to improvise some sort of transparent tent in which the painting could be placed while drying. That way the oil can dry in the light, but the painting is protected from dust. One of these mini greenhouses or portable covered clothes closets could maybe be adapted for the purpose:
https://goo.gl/f6T1yt
https://goo.gl/XEyNPw
Good luck!
Warm regards,
Mirjam
i made a mistake and used the gloss varnish for acrylic on an oil painting is this going to be ok
Hello James,
It is correct that the Polymer Varnish is not recommended for oil paintings. There are concerns around both adhesion as well as the alkalinity of the varnish in its wet state. At this point, however, if the oil painting looks okay we believe the best thing is to simply let it be. Removal of the Polymer Varnish would require extensive use of ammonia, which would pose far more danger to the painting then leaving things alone. Besides, at this point the varnish is largely inert and has a neutral pH. Lastly, we would recommend making a note of the varnish type and including that with the painting – perhaps listed on some paper adhered to the back stretcher- not on the reverse of the canvas. That way any future conservator or framer needing to repair or clean the painting would be aware of what materials were used.
Best wishes,
Mirjam
Hi Could I possibly put a coat of liquitex gloss varnish over Golden MSA varnish. The MSA was matt and I want to go glossy and I have the liquitex materials for it. So I was wondering if it’s possible?
Hello Christopher,
We are not sure how the Liquitex Gloss Varnish would behave in the long run on top of the MSA Varnish, since we have not tested it. The safest option would be to stay within the same system and use the MSA or Archival Varnish Gloss on top of the Matte MSA Varnish. You could also consider removing the Matte MSA Varnish and then apply the Liquitex Gloss Varnish afterwards, provided that this could be achieved without damaging the underlying paint layers. However, the Liquitex Gloss Varnish, which is actually named “Gloss Medium & Varnish”, is a permanent and non-removable layer. While certainly this is an option an artist can take, we just want to share that we do not recommend using non-removable mediums as a topcoat on a painting since we believe varnishes should be removable to allow for repair should the surface is ever damaged. We just want you to be aware of that, so you can make your own informed decisions.
We hope we could help.
Best, Mirjam
I have finished a painting as a mixed media work.
I used Golden acrylic paints and black Noolers Ink.
What Golden Media can I use for the finial coat to seal
it so I do not have to put a glass over it?
Can you help me?
Hello Daunine,
Mixed media pieces can sometimes be tricky to varnish if the materials have different sensitivities. According to the Noodler’s ink website, some of their inks are water resistant and other aren’t. To avoid solubilizing or blurring any water sensitive inks, it would be necessary to use a solvent based varnish. It might also be better to spray apply the varnish, rather than brush apply. The Archival Varnish would allow you to build up the varnish layers carefully with minimal surface contact. We recommend doing a small test on a scrap piece that contains the same materials as your mixed media painting, to check if there are any unforeseen issues. We generally recommend starting with MSA Varnish Gloss to build up layers until an even, glossy surface is achieved. After that, Archival Varnish Satin or Matte could be applied, if a matter sheen is desired.
Best,
Mirjam
Hi Mirjam,
I am looking for a varnish which can do oil and acrylic that protects against UV.
I have just finished art school and was never shown varnishes. I have the Archival Varnish in Aerosol w/UVLS (satin). Can I use a glass varnish and then apply a coat of the spray for UV?
Is varnish possible over AS Medium 1?
Regards
Christie
Hello Christie,
if your paintings contain both acrylics and oils, then it would be best to wait 6-12 months with varnishing, to make sure the oil paints are sufficiently cured. To seal the different absorbencies of the paint layers, we recommend starting with light layers of Archival Varnish Gloss w/UVLS, until an even glossy sheen is achieved. After that build layers of desired sheen as needed with Archival Varnish w/UVLS (e.g. Satin or Matte). This technique allows you to built up sufficient layers of UV-protective varnish, that should protect your paintings significantly from UV-induced discoloration or fading. We have found that approx. 6 spray coats of Archival Varnish w/UVLS is a good amount of layers and equivalent to 2 brush applied coats of MSA Varnish w/UVLS.
It should be fine to spray the Archival Varnish w/UVLS over Art Spectrum No. 1 Medium, once the Medium has cured sufficiently.
It is always best to test and practice varnishing first on a similar surface as your artwork.
Feel free to reach out whenever you have more questions. Here is where you can reach us:
Warm regards,
Mirjam
Pinto hace como 40 años…..y en un pais en donde no existen casi los materiales buenos e importados….uno hace lo que puede.El barniz brillante sobre acrilicos….a veces produce tantos reflejos que hace dificil la fotografia….y segun de donde se vea el cuadro…es molesto.
Por supuesto que ayuda a resaltar los colores…sobre todo los oscuros.La solucion que encontre …es hacer una mezcla de barniz acrilico brillante…..y una parte de barniz mate…..digamos un 70 y un 30 %…..de esta manera no queda tan reflexiva la superficie.Hay que dejar secar bien ….lo dejo una media hora al sol….y listo.No conviene barnizar en dias muy frios….el acrilico no va bien con el frio….a veces acelero un poco con un secador de cabello.
Hola Luis
Gracias por tu comentario. Es genial que hayas encontrado una forma de barnizar y fotografiar tus cuadros que te funcione. Si el resplandor de un barniz brillante es problemático al fotografiar la obra de arte, también se puede esperar simplemente con el barniz después de que se hayan fotografiado las pinturas.
No recomendamos forzar el secado de un barniz con un secador de pelo ni a la luz solar directa, para evitar que se sequen las grietas u otros defectos de la superficie. Además, uno querría evitar soplar el polvo en la superficie.
El consejo más importante es probar nuevos materiales o técnicas de barnizado, antes de barnizar las obras de arte reales, para asegurarse de que los resultados sean satisfactorios.
Disfruta pintando y mucha suerte!
Hello Luis,
Thank you for your comment. It is great that you have found a way to varnish and photograph your paintings that works for you. If the glare from a gloss varnish is problematic while photographing the art work, one could also simply wait with the varnishing after the paintings have been photographed.
We would not recommend force drying a varnish with a hair dryer or in direct sunlight, to avoid drying cracks or other surface defects. Also, one would want to avoid blowing dust onto the surface.
The most important advice is to test new varnishing materials or techniques, prior to varnishing actual artworks, to make sure the results are satisfactory.
Enjoy painting and best of luck!
Mirjam
thanks for the information
good one keep it up
Hello, I have nearly completed an acrylic painting on stretched canvas. Before painting I applied a couple of layers of Gesso. Now that it’s nearly complete, I see rather noticeable lines in the gesso texture. I wouldn’t normally worry about it but they are more prominent than I thought they’d be. Would varnish or perhaps a layer of clear acrylic gel help to conceal these lines? Many Thanks, Dave Owen.
Hello Dave,
Thank you for commenting. A regular varnish or acrylic medium would not help much to conceal irregularities in the ground or paint layers, because they dry to relatively thin layers and conform to the underlying layers. One would have to build up many layers to counteract the surface irregularities. Pouring thick layers of waterborne acrylics can cause crazing (especially when damming the pour), but the Gloss MSA Varnish w/UVLS could be used quite thickly (right out of the can) without that risk. It would be best to test this application on a small trial piece. Alternatively, you could consider using a fine art grade two-component resin, which could be poured thickly in one application. It might be laborious to remove an extremely thick layer of MSA Varnish, but at least it would be possible if needed. Casting resins and waterborne acrylics, on the other hand, are permanent.
I want to varnish a painting but am unable to determine if it is acrylic or oil. In the past, I have varnished a painting I was able to determine was acrylic by wiping a bit of rubbing alcohol in the corner and seeing paint rub off. I tried the same test this time and nothing rubbed off. I was convinced it was acrylic but now I am thinking it is oil but cannot confirm. Seeing as the supplies I bought last time were for an acrylic painting (Golden Soft Gel Gloss for isolation coat + Polymer Varnish w/ UVLS) should I proceed anyway with the same materials or instead purchase the Golden MSA varnish + MSA solvent since, based on my research, can work for either acrylic or oil? What should I do? Also, if I go the MSA varnish route, being that it is unknown if the painting is acrylic or oil, would it be safest to still apply an isolation coat even though it could possibly be an oil painting?
TLDR: What gloss varnish is recommended if the painting cannot be confirmed as either acrylic or oil based? And is an isolation coat a good idea since it could possibly be acrylic painting?
Thank you for any help.
Hello Peter,
thank you for commenting. Your concern is absolutely valid. Oil paintings should not be coated with water-based acrylics, so neither isolation coat not Polymer Varnish. To err on the safe side you could simply use MSA Varnish or Archival Varnish w/UVLS. If the first coat sinks in and creates an uneven finish you could simply apply additional layers until the surface is even.
In case you expect that the varnish will have to be removal in the future, you could test if the paint layers are sensitive to the MSA solvent or another full strength/high aromatic mineral spirit. If you do not get pigment lift, or only very little, if is fair to expect that varnish removal would not be a problem. If varnish removability is important to you and you do get pigment lift, then you should consider not varnishing the painting at all.
As a side note- oil paint layers can also be sensitive to rubbing alcohol, depending on the color and especially young paint layers. Thus, one could also get pigment lift with alcohol (and even water), on an oil painting, too.
Good luck and best regards,
Mirjam
Hi. I have done acrylic painting on black paper and then applied gloss varnish on top but there are many brush strokes marks on the empty part of paper. How to fix this?
Hello Parul,
thank you for your question. It is possible that the paper was a little too absorbent and some of the varnish sunk in and thus created brush strokes. Try applying a second and maybe a third coat of the same varnish. You might want to dilute the varnish a little more to increase the levelling quality. Try applying und brushing out the varnish swiftly and then leave it alone to give it time to level before it sets up.
Hello,
Thanks for your article. I would like to know if it’s possible to mix a bit of the glazing medium with the polymer varnish so the retarder in the glazing medium helps me getting more time to work on the varnish application before it dries.
Thanks.
Hello Ana,
Thank you for your comment. It would be better to dilute the Polymer Varnish with more water to get more working time and levelling. Try 3 or 2 parts varnish to 1 part water, rather than the 4 : 1 varnish-water mixture. A more diluted varnish might require more layers to provide equal UV protection. Water also mixes much more readily with the Polymer Varnish than the Glazing Liquid would. The main disadvantage might be that the Glazing Liquid could potentially make the varnish layer not, or less easily, removable. If you are varnishing a big piece you could consider using a High Volume Low Pressure spray gun and make a 2:1 Polymer Varnish-water dilution.
Thank you for your article. I haven’t varnished my work in the past because I feel it would compromise the aesthetic…. but I worry about the future conservation of my work. My acrylic paintings are made up of matte and glossy layers. This contrast is important. Do you think I could use matte varnish half way though a paintings production, then add glossy acrylics on top? Or would you suggest I forego the varnishing process altogether?
Hello Amy,
Thank you for your comment. It might be best to not varnish in your case and simply dust the paintings once or twice a year, so that dirt does not get embedded in the paint layers, which could reduce the differences in sheen.
Varnishing in a matte sheen and applying glossy paint layers on top is theoretically possible, however there are two things to keep in mind. GOLDEN varnishes are removable and during a possible future varnish removal these paint layers would be at risk of being damaged. You could, however, place a label on the reverse of the stretcher bars, stating that the varnish should not be removed and indicate the layering. Also, in order to achieve an even matte varnish it is important to first apply an isolation coat, particularly if the painting’s surface is absorbent, which the matte paint layers probably are.
Hope this helps. Best,
Mirjam
I wish varnish a work utilizing a gloss/matte-combo.
Query, though: Doesn’t matte (which utilizes wax as the matting-agent)
require heating-up beforehand to liquify that wax?!!
And if so, How does one address that “heating-up” properly?!!
If I gotta do this, I mean I really do wanna do it properly. . .
Hello Albert,
it is true that varnishes, which contain wax as matting agent, require warming up before application. This is usually done with open lids in bain marie or baby-bottle warmers. But GOLDEN varnishes contain silica particles for matting agents and not wax- therefore they do not require any heating. It is important to stir matte or satin varnishes before use, in order to disperse the matting solids evenly.
Best,
Mirjam
Hi! I added too thick a layer of varnish on my impasto painting and now it looks very milky. What can I do to take it off?
Hello Aakanksha,
Our recommendations for removing varnishes depends on a couple of factors: the painting being an oil or acrylic painting, whether an isolation coat was applied in case it is an acrylic painting, and which varnish was used? You will find specific removal recommendations in the tech sheets Polymer Varnish (UVLS) and MSA Varnish (UVLS). The video MSA Varnish Removal from a Smooth Surface also demonstrates the process. If the varnish pooled in the ‘valleys’ of the paint layer in your case, than the technique demonstrated in the video might leave you with a lot of residues in these deep pints of the impasto. You might need to go back with Q-tips or a cotton rag and focus on these areas. Feel free to reach out if you have more questions.
Best,
Mirjam
Hi Miriam,
I have spray varnished a large acrylic with Schmincke Universal Satin-Matt. Is it alright to add a layer of Polyurethane Water Based Gloss Varnish over the top of that as I think I’d like a glossier finish.
Sally
Hello Sally,
The Schmincke Universal Varnish is an acrylic varnish and in theory it should be fine to apply a polyurethane product on top of a dried acrylic layer. In practice however, we would not recommend using a polyurethane product as a picture varnish. Most polyurethanes become brittle over time and could crack on a flexible support. They also tend to yellow over time and are not easily removable. The best solution would be to use Schmincke Universal Varnish Gloss on top of your current varnish layer or at least another acrylic varnish, for best compatibility.
Warm regards,
Mirjam
Hi Mirjam
I’ve used Michael Hardings V2 Matte varnish over an oil painting. It’s great but I’m trying to ascertain if I can do a second coat. The label reads apply one thing coat only, but there are areas where I didn’t apply it so well.
It’s a beeswax and double rectified turpentine mix.
Thanks.
Harry
Hello Harry,
We are not familiar with the product, but in general it is safest to follow the manufacturer’s instructions on product use and if the label advises to apply only a single coat, then there is certainly a reason for that. You could create a testing surface that is similar to your painting and see how a second coat of varnish turns out.
thank you, its just over oils which took a year to dry so not that simple to recreate!
Ok, that makes recreating the surface difficult. But you could apply the varnish over an old oil study or discarded painting, just to have a surface to practice on. Maybe you’ll find that just by buffing the varnish with a dry cloth will even out the sheen sufficiently.
Hi Mirjam,
I sometimes get air bubbles when varnishing. Mist of them ”pop” before drying. But a few always seem to stay. I’ve been trying different brushes, both synthetic and bristle moddlers. I also tried different amounts of preasure when applying. But the bubbles persist:/
I’m using a 50/50 mix gloss/satin polymer varnish. Satin was to matt and gloss too glossy for my liking. When I tried pure gloss there were even more bubbles.
How to avoid them all together is my question.
Kind regards
Gunnar
Hello Gunnar,
Whenever there is texture on a painting’s surface, brush application of an isolation coat or a varnish layer can easily create bubbles. Spraying is often best for textured surfaces. However, sometimes bubbles happen on smooth surfaces too. It is important to let the diluted and mixed varnish sit long enough for any bubbles to disperse. During application many things might cause bubbles. Among these are the type of brush, how the brush is held, the pressure and angle with which the brush touches the surface, over working the surface, brushing back into areas that have begun to set up, and the humidity in the room (low humidity might cause the acrylic to dry before bubbles disperse). We encourage you to call the Materials Team at Golden, we will be happy to talk with you about varnishing. Golden’s number is 607-847-6154, ask for the Materials Team when you call. It is fine to mix sheens of our varnishes. Unfortunately all sheens of Golden’s Polymer Varnish were discontinued several years ago when we lost a vital ingredient.