
If you’ve ever sanded Gesso or other acrylic products and ended up with rubbery bits and had to throw out sheets and sheets of sandpaper and less than excellent results, then you should try WET SANDING!
Wet sanding is the most effective way to sand acrylics. Adding water to the process lubricates the surface to reduce the build up of heat, and softens the acrylic making it easier to abrade away unwanted material. Acrylics are thermoplastic, which means they soften when they get warm. The friction of dry sanding warms the acrylic, making it rubbery, which will quickly gum up your sandpaper. Wet sanding helps to mitigate this issue and also reduces the amount of airborne dust that can be created from typical dry sanding techniques.
Wet Sanding How To
Wet sanding is a simple process. With a spray bottle filled with filtered water, mist the surface of the work. (No need to over flood). Then simply wet your wet/dry sanding sponge or wet/dry sandpaper, and the surface you want to smooth, and start working back and forth or in a circular motion from section to section. If your surface dries out during the process or starts to get grabby, then just add more water. You can continue adding water and working the surface until you see the desired results. When you are finished, use a damp cloth or sponge to wipe off all the frothy sanding residue. You may need to rinse your cloth a couple times to remove all the pigment, acrylic solids and foamy mess from the surface. Allow to dry and you are ready for your next layer. Sanding sponges and papers can also be rinsed and cleaned for another use.
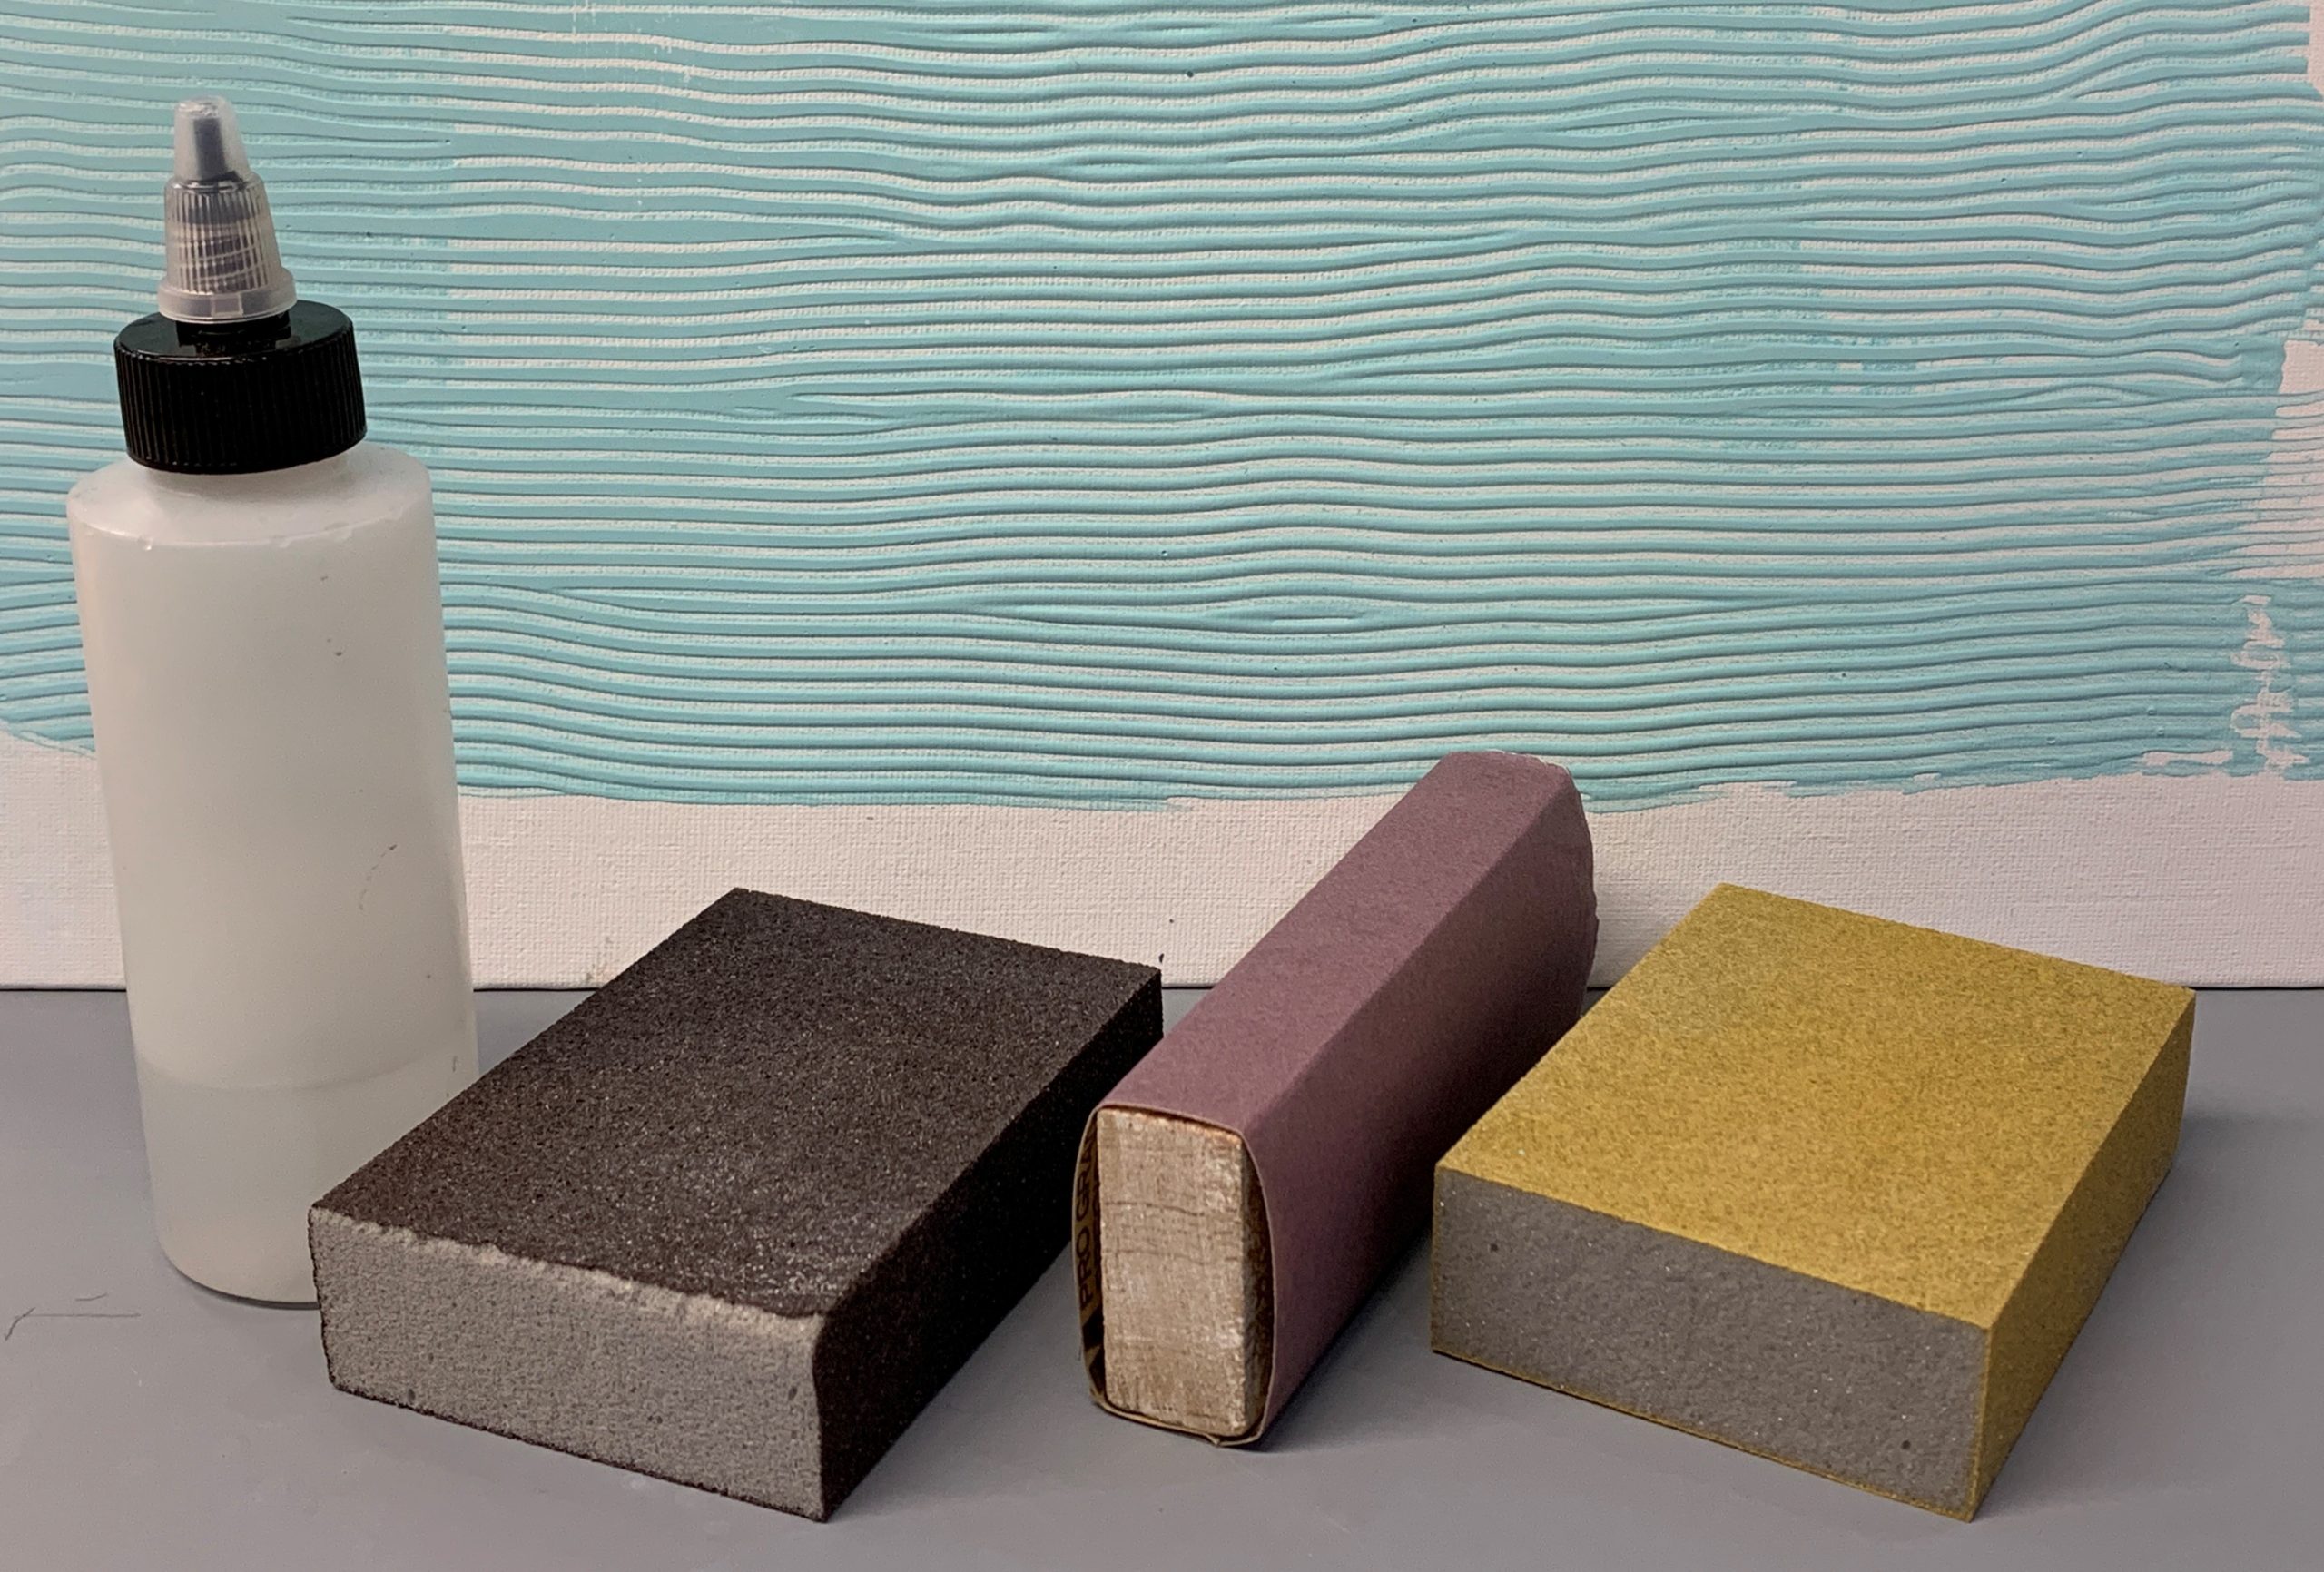
Wet Sanding Sandpaper Selection
There are many different types of wet/dry sandpaper and sanding sponges. If you haven’t wet sanded before, then simply pick up a medium and fine grit sanding sponge from the hardware or paint store. These make the process painless and the two grits should give you a couple options for obtaining a relatively smooth surface on most acrylic products. Some regular sandpapers can degrade when they get wet, so a dedicated wet sanding paper or wet/dry option is preferable for wet sanding.
Sanding can be done with a “Schedule” of grits. Start with coarser papers such as 150 grit, and then move to medium, then fine. The higher the number, the finer the grit. Be sure to not “over sand” or make the acrylic too smooth. Very smooth, almost polished, surfaces can impact adhesion.
Sanding Different Types of Acrylic
Keep in mind that not all acrylic surfaces are the same. Generally, the more solids (pigments, fillers or matting agents) in a product, the easier they will be to sand. Clear gels and mediums will tend to be more rubbery than pastes and Gesso. They will flex when sanded, especially if applied in peaks or strong textures. While it is possible to sand them smooth, it may be more time consuming. Sanding clear products can also change the clarity of the surface dramatically, so what was clear and glossy, can become hazy and matte once sanded. Applying another layer of gloss can help to bring back the glossy sheen, but it may not be possible to get back to their original clarity.
Gessoes, pastes and other grounds tend to be a little easier to sand. Some products with large aggregate, such as Coarse Pumice Gel or mica flake can tear up the paper and sanding can alter the way they look. Fortunately, they are cherished for their texture and those who want smooth surfaces, don’t tend to use them. But other materials like Light Molding Paste, which has beautiful fluffy texture and a highly absorbent surface, can be sanded.
The Effects of Water
Adding a bunch of water to the surface of an artwork might not be a problem in some cases, but it is worth considering when working on porous substrates such as wood or paper. For example, a thin wooden panel or flimsy support that is vulnerable to warping, might get distorted if too much water is absorbed into the surface. Or a collage with paper elements, might tear or sand in irregular patterns if sanding breaks through the acrylic layers and saturates the papers. Hopefully any potential issues will not deter you from trying wet sanding, but it is good to keep this in mind as you work on different types of projects. .
Wet Sanding Tips
A misting sprayer can be very effective at adding just the right amount of water to your surface. You can also try using a water bottle with a nozzle so you can direct the water to the exact location where it is needed.
Ideally, if you want a smooth surface, you start with the right application tool and try to keep the product as smooth as possible from the start. Scraping on grounds with soft scrapers or trowels as opposed to brushing can be very effective at reducing the amount of sanding needed. But if tool marks persist, then sanding is the next best option.
Turn regular sheets of wet/dry sandpaper into a sanding block by wrapping a partial sheet onto a block of wood for a nice flat sanding surface. This becomes a rigid sanding block with a flat edge and the paper can be changed out easily after all the sides have been used.
Precautions
- Wet sanding is for acrylics only and not recommended on oil paintings.
- Sanding can change the performance of the product.
- Make sure you use a damp cloth to clear the wet sanded material off the work.
- Fresh layers may rehydrate from wet sanding more easily and become vulnerable, peeling from the surface.
- Sanding thin applications can abrade surrounding areas, removing details in the work. It can also remove colors and the ground all the way to the canvas or panel support. Work slowly and wipe away slurry regularly as you go.
- Wet sanding clear coats, varnishes or Isolation Coat can leave a hazy surface and should be avoided if a pristine finish is desired.
- Dry sanding or wet sanding acrylic products can create dust that is better kept out of the body. Wearing a proper dust mask is recommended when sanding.
- Cadmiums and Cobalts are heavy metal based colors and should not be sanded! Sanding these products can create hazardous dust that can be breathed and enter the body.
- Most importantly, wet sanding will remove a lot of material quickly, so be careful not to overdo it or you’ll be back to your original surface!!
Conclusion
If you have struggled with sanding, save yourself time and frustration and give wet sanding a try. It should help you reach your smooth texture goals faster with better results. Keep in mind that changes in performance and appearance can occur when acrylics are sanded. But in most cases, the change is so minimal that having a texture free surface might be worth the trade off. We recommend practicing on sacrificial surfaces before trying a new technique on your final artworks. Let us know how it goes by calling 800-959-6543 or emailing [email protected].

Subscribe
Subscribe to the newsletter today!
Thank you for the information very helpful!
You are welcome Carol! Thanks for letting us know.
Greg
Can Golden varnish be removed by sanding instead of using mineral spirits? If not, can acrylic paint be used directly over Golden varnish?
Hello Regina,
Thanks for your comment. It would be very difficult to remove varnish by sanding it off the surface. The best way forward is to remove the varnish with MSA Solvent and repaint. If that is not possible, then you can paint over the MSA with additional acrylic layers. There are some caveats though, so best if you got in touch with our tech team by calling 800-959-6543 or email us at [email protected] so we can go over the potentials with this type of layering.
Take care,
Greg
Can I use the wet sanding technique on Silverpoint/Drawing Ground? I typically brush the ground on a claybord panel, then sand, apply another coat of the ground, and lightly sand.
Hi Peter,
Wet sanding should provide a similar outcome to the dry sanding technique you are already performing, but with less scuffing and perhaps faster results. If you like what you’re getting with these steps, then try wet sanding. Just be sure to wipe away all the slurry that results and don’t be shy with the water additions, especially if the sandpaper starts to get grabby.
Best wishes!
Greg
Yes, this is very possible. Many artists sand their Gesso layers to provide a smoother start for their paintings. give it a try!
Greg
Thanks for this article. I’ve been wetsanding my gesso’ed surface (gesso on linen over panel) for years. I wetsand the final gesso layer, then apply Gamblin oil ground over top.
I have always wondered if the wetsanding could be interfering with the gesso’s permanence in some way, by breaking up the acrylic surface after curing. So I’m curious to hear more about the precaution “Sanding can change the performance of the product” – in what ways?
Hello Samantha,
Thanks for your comment. Sanding the Gesso should not interfere with its long term stability. If anything, it could change the sheen of the products applied over top, due to increased surface area on the sanded product – increased absorbency because the sanded surface may wick in water or oil differently or more aggressively. We have also seen reduced adhesion when surfaces are sanded to a super smooth polish. But, normal sanded surfaces, smooth but not polished, seem to not have any problems with adhesion. Just make sure you wipe down any residual dusty material before painting over the surface and you should be good.
Take care,
Greg
I’ve been dry sanding Golden’s black Gesso on paper for a long time with all the difficulties you mention. So I gave wet sanding with 220 and 400 grit wet/dry paper and voila– so much faster and so much better even if a bit messy. I use Strathmore 4 ply bristol board so that the paper doesn’t warp if don’t flood the surface. I tried wet sanding some time ago but your article helped me try again. Thanks!
Excellent David! Thanks for the comment. We are glad it went well this time around. Keep in touch and best wishes.
Greg
What grit would you recommend for removing brush strokes on gesso and acrylic paint? I’ve read elsewhere to start with 600 or lower and I’ve read to start with 1000 or higher so I’m confused. Thank you!
Sanding acrylics with coarse grit sandpapers creates deep scratches that telegraph through clear layers of mediums or paints applied on top. 400 grit can be used for products like gesso and molding pastes due to their high solids content. Some paints (for example, earth colors) can also be sanded with 400 grit but many are going to have very small pigment particles with a more rubbery nature. Starting with 600 grit is a good idea, but think of it as a test to see how effectively it knocks down the brush strokes, and also how deep the scratches are. Then increase or decrease the grit size of the sandpaper by one step and observe how the paint surface responds. Ideally, while you paint, you can make some test panels to try various grits and sandpaper types. I hope that helps with the process. It can be slow going but once you dial in the factors, you should be able to reduce brush strokes with more confidence on an actual project. – Mike
I’ve been searching for advice on how to wet sand acrylic paint on my used surfboard without removing the new paint layers. I recently added some new colors, but there are small bumps from the paint sprayer that I want to smooth out once the paint has fully adhered in 3 to 4 days, before sealing it with a clear coat. What grit sandpaper do you recommend for this?
Hello Jasmine.
Thank you for your question. This might be a little more in-depth than you were looking for, but finding the right grit and type of abrasive can be a game-changer. The below links are for reference only.
A good starting range for sandpaper grit would be 220-320, but the right grit will depend on paint thickness, paint hardness, and your desired surface appearance. You may need to start with a coarse/low grit to remove tall bumps, then move to a fine/high grit to unify the surface sheen.
You may find that the soft acrylic film gums up traditional sandpaper, in which case we would suggest a more modern “mesh” sanding sheet. These usually have a hook-and-loop attachment style, which readily connect to most sanding machine pads or a block of wood with some Velcro attached. High-end and low-end assortment pack options are:
High-end:
https://www.amazon.com/Mirka-9A-150-APRP-4-Inch-Abranet-Assortment/dp/B001BKVZWA/ref=asc_df_B001BKVZWA/?tag=hyprod-20&linkCode=df0&hvadid=692875362841&hvpos=&hvnetw=g&hvrand=13585813280347005341&hvpone=&hvptwo=&hvqmt=&hvdev=c&hvdvcmdl=&hvlocint=&hvlocphy=9058739&hvtargid=pla-2281435179578&mcid=3c63b9996b173592b9759abcc6a3a4da&hvocijid=13585813280347005341-B001BKVZWA-&hvexpln=73&gad_source=1&th=1
Low-end:
https://www.amazon.com/Abrasive-Sanding-Assortment-Anti-Blocking-Sandpaper/dp/B0BHNLRJ9R/ref=m_crc_dp_lf_d_t1_d_sccl_4_5/145-1709821-9040453?pd_rd_w=AEuM4&content-id=amzn1.sym.a5144f00-3d78-40a4-aa84-7ff51eea31f7&pf_rd_p=a5144f00-3d78-40a4-aa84-7ff51eea31f7&pf_rd_r=ZV5BB405DAKVWCJP5WZD&pd_rd_wg=jKK5M&pd_rd_r=ec909248-4eeb-4ec6-b393-e65b9ce67cbd&pd_rd_i=B0BHNLRJ9R&th=1
– Mike at GOLDEN