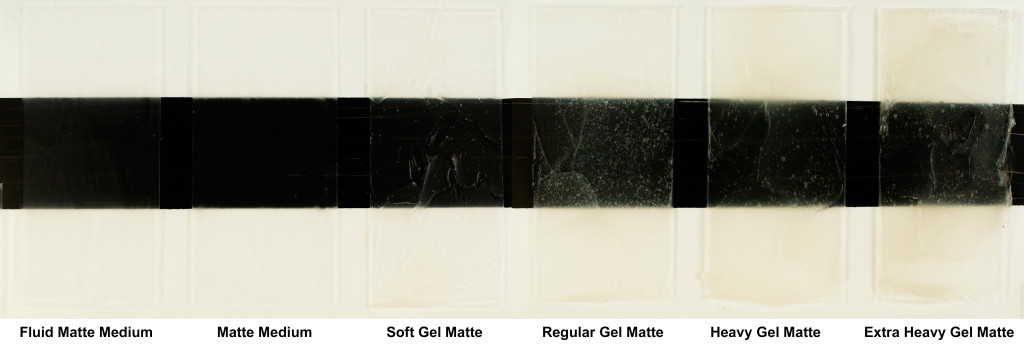
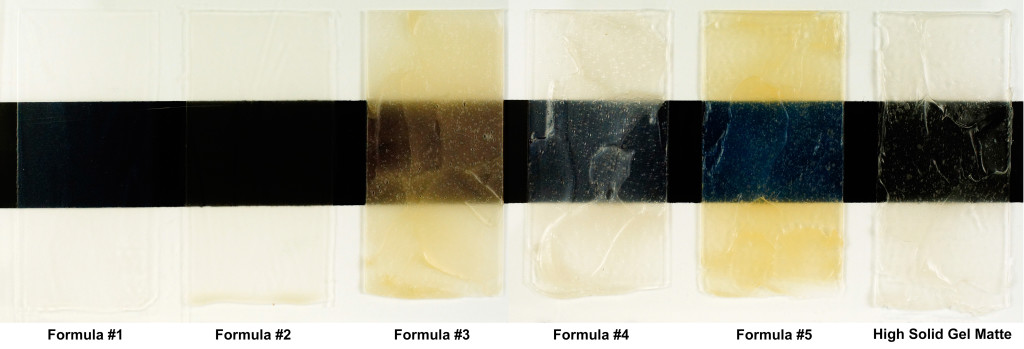
 Any Matte or Semi-Gloss medium or Gel Medium can impart a waxy look. The specific manner in which it is applied can also increase or decrease this effect. It can be helpful to test with several mediums or gels on sacrificial pieces until you get a feel for the mediums or gels and application techniques that will work best for you.
It is possible to get an “encaustic” look with the matte gels or mediums on their own, but mixing various ratios of matte gels and mediums with different amounts of paint can give a more enhanced look of actual beeswax.
This look can be achieved with a range of options from a very fluid medium like Fluid Matte Medium or Matte Medium, to a thicker consistency that can be brushed or tooled with a palette knife, such as Soft Gel (Matte or Semi-Gloss) or Regular or Heavy Gel (Matte or Semi-Gloss). If a very thick and pasty material is preferred, the Extra Heavy Gel (Matte or Semi-Gloss) or High Solid Gel (Matte) can be used.
Apply some with a palette knife or brush to a test surface and let it dry to see how it looks. Remember that when mixing with acrylic mediums, the milky, cloudy, or hazy look will change considerably when it dries, so the wet mixture color may appear as a pastel or tint, but will dry to a much darker value and higher chroma or intensity of color, along with more translucency.
To achieve a “beeswax” look, try blending in a percent or two of the Interference Gold (Fine) and Quinacridone / Nickel Azo Gold. Experiment with different ratios of these and other yellow or brown colors/pigments to get a variety of wax-like colors. Very small additions of color to a medium can be very effective and remember that the color will become darker and more saturated when the medium dries, due to the cloudy appearance of wet acrylic mediums that then become translucent or clear upon drying.
 A couple of formulas to try are:
Formula #1 (Pourable) – 8 ounces of Soft Gel (Gloss) to 2 ounces Soft Gel (Matte) and add 6 ounces of water. Then add 16 drops of Fluid Interference Blue (Fine) to 4 drops Fluid Iridescent Gold (Fine).
Formula #2 (Pourable) – 8 ounces of Fluid Matte Medium to 4 drops of Fluid Iridescent Bright Gold (Fine).
Formula #3 – 8 ounces of Soft Gel (Matte) to 2 drops Fluid Naples Yellow Hue to 1 drop Fluid Quinacridone / Nickel Azo Gold to 2 drops of Fluid Interference Red (Fine).
Formula #4 – 8 ounces Soft Gel (Semi-Gloss) to 4 drops Fluid Interference Blue (Fine) to 1 drop Fluid Iridescent Gold (Fine).
Formula #5 – 8 ounces of High Solid Gel (Matte) to 1-3 drops of Fluid Quinacridone / Nickel Azo Gold to 6 drops of Fluid Interference Blue (Fine).
Some of these recipes come from Patti Brady’s NorthLight Book, “Rethinking Acrylic: Radical Solutions for Exploiting the World’s Most Versatile Medium”.
Thank you to Scott Bennett for the contribution and information for this article.
“Encaustic Effects with GOLDEN Acrylics” video:
About Stacy Brock
View all posts by Stacy Brock -->Subscribe
Subscribe to the newsletter today!

Fantastic article, I love to do encaustic painting, but it can be costly and dangerous when working with hot wax. This is a fun and safe way to create the muted soft look of wax. I am going to give it a try. Many thanks for sharing.
Thanks for this great post! I’d like to give this a try. Is there also a formula for the last test strip? Or is that just one medium?
Thanks Nan! The last strip is not a formula. It is a gel medium called High Solid Gel Matte.
I loved working in encaustics as an art student in college. Now retired from teaching, I’d like to try again, but find it too “high maintenance.” Thank you Stacy for writing this wonderful article on “acrylic encaustics.” I definitely will give it a try. It would be nice to have an additive that would give the gel the authentic melted beeswax aroma!
can;t wait to try this out! Thanks for sharing!
It is our pleasure, Sylvia!
I love the look of encaustic but find that there are limitations with the practicality of using the medium. I’m wondering if it’s possible to apply this over an oil painting? If not, do you suggest another alternative for encaustic that would give a similar look over oil?
Hi Kristina,
Acrylics do not adhere to oils, so we would not recommend using these mediums on top of an oil painting. You may be able to get a waxy look with a cold wax medium, but please follow the guidelines on the label about maximum additions to oil paints.
It would be helpful to see example of finished pieces using this method. I am not sure I can see from the video what it might be like on a real painting. Thank you!
Marie
Hi Marie! Thank you for your question. We think this video may be more informative: https://www.goldenpaints.com/videos/achieving-an-encaustic-look-with-golden-matte-mediums
that is so cool… i find this whole business thrilling.
Hello Tracy, Thank you for your question. With acrylic paints, mediums, and gels, the next coat can usually be applied as soon as the one on the surface is dry enough not to lift and mix into the next application. Since acrylics dry through evaporation, low humidity, warm temperatures, and an air flow can all increase drying speed while cooler temperatures (not beneath 50 Fahrenheit), high humidity, and still air all slow down drying. Another important component to dry time is how thick the application is, since thin layers dry very quickly compared to thick layers. In an environment of 70ºF/21ºC and 30% relative humidity, a brushed on application similar to the thickness of Heavy Body or Regular Gel might be dry in 10 minutes. Using Retarder, Glazing Liquid, or the OPEN products will slow down drying. Our Just Paint article “Suggested Drying Times Between Acrylic Products” might be informative. We hope this is helpful. Please email [email protected] if you have more questions.
Looking at the sample photo it seems like the “encaustic” mediums are being applied as a final coating on top of the dried painting. Is this the case? Are they also being mixed with the paint as the work is being made? Its a little unclear to me. Well, nevertheless I am excited about the possibilities shared here, thank you.
Hello Lynn,
thank you for asking. the intention is indeed to apply the encaustic medium blend overtop the finished painting. We’d recommend creating a small test painting where you can try the various mixtures, before moving on to your final artwork.